文档,https://kubernetes.io/zh-cn/docs/concepts/configuration/configmap/
1. ConfigMap基本概念
ConfigMap和Secret的本质是volume的一种形式,k8s旨在把一切资源抽象化
1.1 什么是ConfigMap
ConfigMap资源主要为容器注⼊相关的程序配置信息,⽤来定制程序的运⾏⽅式,⽐如Redis监听端⼝、最⼤客户端连接数等等。
当定义好⼀个ConfigMap资源后,如果Pod需要使⽤,可以通过通过环境变量、命令行参数或存储卷形式将其挂载并加载相关的配置,降低了配置与镜像⽂件的耦合关系。
ConfigMap 对象将配置数据以键值对的形式进行存储,这些数据可以在 Pod 对象中使用或者为系统组件提供配置。
1.2 为什么需要ConfigMap
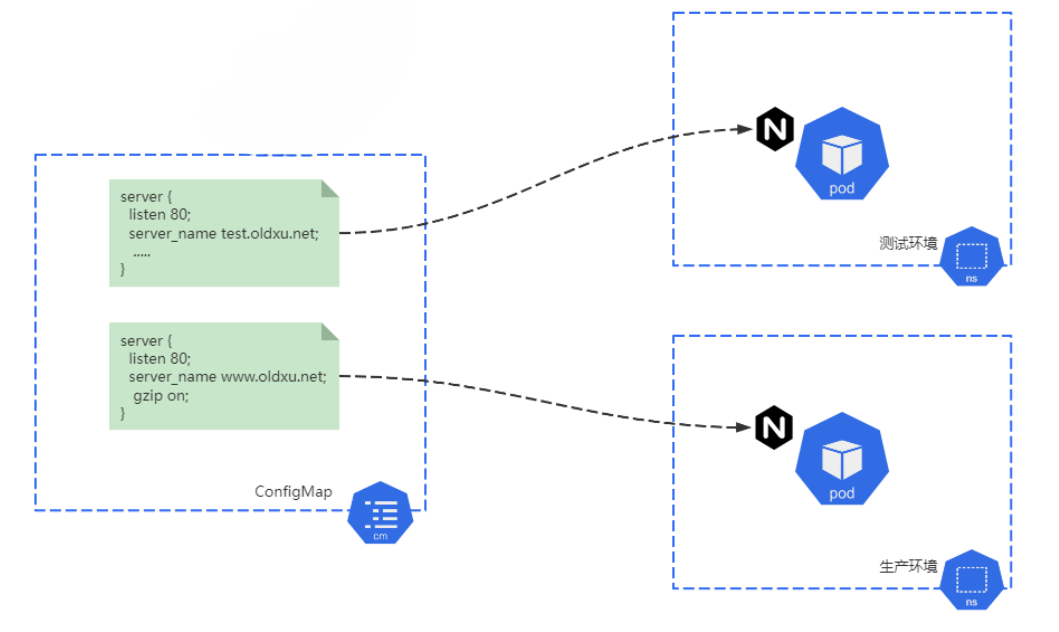
将应用配置信息与程序进行分离,这样可以使得应用程序被更好地复用,通过不同的配置能实现更灵活的功能,例如:在测试环境中Nginx提供test域名访问,且没配置压缩功能,而在生产环境中则需要提供www域名访问,且需要开启压缩功能,所以将应用容器与配置分离,根据不同的环境调用不同的ConfigMap配置,能有效的降低耦合度和复杂度。

1.3 ConfigMap作用
存储不加密数据到etcd,让Pod以变量或者Volume挂载到容器中。
2. 创建ConfigMap
官方文档,https://kubernetes.io/zh-cn/docs/tasks/configure-pod-container/configure-pod-configmap/
2.0 资源定义规范
- 创建ConfigMap后,数据实际会存储在K8s中Etcd,然后通过创建Pod时引用该数据。
- 应用场景:应用程序配置 Pod使用configmap数据有两种方式:
- 变量注入
- 数据卷挂载

#帮助文档
kubectl explain configmap

或者
kubectl create configmap --help
#帮助文档
kubectl explain configmap
或者
kubectl create configmap --help2.1 基于命令创建CM
[root@kube-master ~]# kubectl create configmap nginx-command-config --from-literal=ngx.host='0.0.0.θ' --from-literal=nginx.port='8899'
configmap/nginx-command-config created

#查看
[root@kube-master ~]# kubectl get configmaps
NAME                   DATA   AGE
nginx-command-config   2      24s

#查看内容
[root@kube-master ~]# kubectl get configmaps nginx-command-config -oyaml
apiVersion: v1
data:
  nginx.port: "8899"
  ngx.host: 0.0.0.θ
kind: ConfigMap
metadata:
  creationTimestamp: "2024-05-28T06:55:36Z"
  name: nginx-command-config
  namespace: default
  resourceVersion: "1578412"
  uid: a94ec46f-3b93-4600-80f9-fa467a5eb6cd
[root@kube-master ~]# kubectl create configmap nginx-command-config --from-literal=ngx.host='0.0.0.θ' --from-literal=nginx.port='8899'
configmap/nginx-command-config created
#查看
[root@kube-master ~]# kubectl get configmaps
NAME DATA AGE
nginx-command-config 2 24s
#查看内容
[root@kube-master ~]# kubectl get configmaps nginx-command-config -oyaml
apiVersion: v1
data:
nginx.port: "8899"
ngx.host: 0.0.0.θ
kind: ConfigMap
metadata:
creationTimestamp: "2024-05-28T06:55:36Z"
name: nginx-command-config
namespace: default
resourceVersion: "1578412"
uid: a94ec46f-3b93-4600-80f9-fa467a5eb6cd💡 说明
ConfigMap资源没有有sepc和status,而是直接使用data字段嵌套键值数据
2.2 基于文件创建(生产推荐)
为 "kubeclt create configmap" 命令使用 "--from-file" 选项即可基于文件内容来创建 ConfigMap 对象,可以重复多次使用 "--from-file" 选项以传递多个文件内容,它的命令格式如下:
Usage:
  kubectl create configmap NAME [--from-file=[key=]source] [--from-literal=key1=value1] [--dry-run=server|client|none] [options]
Usage:
kubectl create configmap NAME [--from-file=[key=]source] [--from-literal=key1=value1] [--dry-run=server|client|none] [options]#事先准备好的 Nginx 配置文件模板保存于 ConfigMap 对象 nginx-config
kubectl create configmap nginx-config \
--from-file=/data/configs/nginx/conf.d/www.aaa.com.conf \
--from-file=/data/configs/nginx/conf.d/www.bbb.com.conf#事先准备好的 Nginx 配置文件模板保存于 ConfigMap 对象 nginx-config
kubectl create configmap nginx-config \
--from-file=/data/configs/nginx/conf.d/www.aaa.com.conf \
--from-file=/data/configs/nginx/conf.d/www.bbb.com.conf如果需要自行指定键名,则可在 "--from-file" 选项中直接指定自定义的键,命令格式如下:
kubectl create configmap nginx-config \
--from-file=aaa=/data/configs/nginx/conf.d/www.aaa.com.conf \
--from-file=bbb=/data/configs/nginx/conf.d/www.bbb.com.conf
kubectl create configmap nginx-config \
--from-file=aaa=/data/configs/nginx/conf.d/www.aaa.com.conf \
--from-file=bbb=/data/configs/nginx/conf.d/www.bbb.com.conf2.3 基于目录
如果配置文件数量较多且存储于有限的目录中时,kubeclt 还提供了基于目录直接将多个文件分别纳为键值数据的 ConfigMap 资源创建方式。将 "--from-file" 选项后面所跟的路径指向一个目录路径就能将目录下的所有创建于同一 ConfigMap 资源中,命令格式如下:
Usage:
  kubectl create configmap <configmap_nam>[--from-file=<path-to-directory>]
Usage:
kubectl create configmap <configmap_nam>[--from-file=<path-to-directory>]kubect create configmap nginx-config-file --from-file=/data/confnigs/nginx/conf.d/kubect create configmap nginx-config-file --from-file=/data/confnigs/nginx/conf.d/2.4 使用资源清单创建
基于配置文件创建 ConfigMap 资源时,它所使用的字段包括通常的 apiVersion、kind 和 metadata 字段,以及用于存储数据的关键字段 "data"
[root@kube-master ~]# cat configmap.yaml
apiVersion: v1
kind: ConfigMap
metadata:
  name: demoapp-config
data:
  host: 0.0.0.0
  port: "8888"
  my-server.conf: |
    server {
      listen 80;
      server_name go.ikubernetes.net;

     location / {
      root /usr/share/nginx/html;
      index index.html;
    }
    include /etc/nginx/conf.d/*.cfg;
}[root@kube-master ~]# cat configmap.yaml
apiVersion: v1
kind: ConfigMap
metadata:
name: demoapp-config
data:
host: 0.0.0.0
port: "8888"
my-server.conf: |
server {
listen 80;
server_name go.ikubernetes.net;
location / {
root /usr/share/nginx/html;
index index.html;
}
include /etc/nginx/conf.d/*.cfg;
}2.5 更新
edit
#查看configmap
kubectl get cm

#修改
kubectl edit cm demoapp-config
#查看configmap
kubectl get cm
#修改
kubectl edit cm demoapp-configreplace
#先把yaml 文件备份出来
kubectl get cm demoapp-config -oyaml > test.yaml

#替换
[root@kube-master ~]# kubectl replace cm -f test.yaml
configmap/demoapp-config replaced
#先把yaml 文件备份出来
kubectl get cm demoapp-config -oyaml > test.yaml
#替换
[root@kube-master ~]# kubectl replace cm -f test.yaml
configmap/demoapp-config replaced3. Pod引⽤ConfigMap
环境变量通常由 name 和 value(或 valueFrom)字段构成:
name <string>: 环境变量的名称,必选字段

value <string>: 环境变量的值,通过 $(VAR_NAME)引用

valueFrom <Object>: 环境变量值的引用源。例如,当前 Pod 资源的名称、名称空间、标签等,不能与非空值的 value 字段同时使用,即环境变量的值要么源于 value 字段,要么源于 valueFrom 字段,二者不可同时提供服数据。
name <string>: 环境变量的名称,必选字段
value <string>: 环境变量的值,通过 $(VAR_NAME)引用
valueFrom <Object>: 环境变量值的引用源。例如,当前 Pod 资源的名称、名称空间、标签等,不能与非空值的 value 字段同时使用,即环境变量的值要么源于 value 字段,要么源于 valueFrom 字段,二者不可同时提供服数据。valueFrom 字段可引用的值有多种来源,包括当前 Pod 资源的属性值,容器相关的系统资源配置、ConfigMap 对象中的 Key 以及 Secret 对象中的 Key,它们应分别使用不同的嵌套字段进行定义:
configMapRef <Object>:ConfigMap 对象中的特定 Key。

secretKeyRef <Object>: Secret 对象中的特定 Key。
configMapRef <Object>:ConfigMap 对象中的特定 Key。
secretKeyRef <Object>: Secret 对象中的特定 Key。3.1 通过环境变量引⽤CM键值
env引⽤变量
pod清单中除了使⽤vaule字段直接给定变量之外,还支持vaLueFrom字段嵌套configMapKeyRef来引用ConfigMap对象的键值,具体格式如下
#查看帮助
kubectl explain pod.spec.containers.env
kubectl explain pod.spec.containers.envFrom
#查看帮助
kubectl explain pod.spec.containers.env
kubectl explain pod.spec.containers.envFromenv:
name: <string> #要赋值的环境变量名称
valueFrom: #定义变量的引|用
configMapkeyRef: # 变量来自于configmap对象
name: <string> #configmap对象的名称(因为有很多configmap,需要指定具体的名称)
key: <string> #configmap的键名称env:
name: <string> #要赋值的环境变量名称
valueFrom: #定义变量的引|用
configMapkeyRef: # 变量来自于configmap对象
name: <string> #configmap对象的名称(因为有很多configmap,需要指定具体的名称)
key: <string> #configmap的键名称💡 说明
这种⽅式赋值环境变量与直接赋值环境变量⽅式并⽆区别,它们都可以⽤于容器的启动脚本或直接传递给容器应⽤等
案例1
demoapp容器⽀持通过环境变量 HOST、PORT 为其指定监听的地址和端⼝
[root@kube-master configmaps]# cat demo.yaml
apiVersion: v1
kind: ConfigMap
metadata:
  name: busybox-httpd-config
data:
  http_port: "8080"
  verbose_level: "-vv"
---
apiVersion: v1
kind: Pod
metadata:
  name: configmap-env-demo
spec:
  containers:
  - name: demo-configmap
    image: registry.cn-zhangjiakou.aliyuncs.com/hsuing/demoapp:v1
    env:
    - name: PORT   # PORT变量名
      valueFrom:
        configMapKeyRef:
          name: busybox-httpd-config	 # 引⽤dbusybox-httpd-config资源中的http_port
key: http_port[root@kube-master configmaps]# cat demo.yaml
apiVersion: v1
kind: ConfigMap
metadata:
name: busybox-httpd-config
data:
http_port: "8080"
verbose_level: "-vv"
---
apiVersion: v1
kind: Pod
metadata:
name: configmap-env-demo
spec:
containers:
- name: demo-configmap
image: registry.cn-zhangjiakou.aliyuncs.com/hsuing/demoapp:v1
env:
- name: PORT # PORT变量名
valueFrom:
configMapKeyRef:
name: busybox-httpd-config # 引⽤dbusybox-httpd-config资源中的http_port
key: http_port❌ 注意
在 command 或 args 字段中引用环境变量要使用 "$(VAR_NAME)" 的格式
- 验证
[root@kube-master configmaps]# kubectl exec  configmap-env-demo -- netstat -lntp
Active Internet connections (only servers)
Proto Recv-Q Send-Q Local Address           Foreign Address         State       PID/Program name
tcp        0      0 0.0.0.0:8080            0.0.0.0:*               LISTEN      1/python3
[root@kube-master configmaps]# kubectl exec configmap-env-demo -- netstat -lntp
Active Internet connections (only servers)
Proto Recv-Q Send-Q Local Address Foreign Address State PID/Program name
tcp 0 0 0.0.0.0:8080 0.0.0.0:* LISTEN 1/python3❌ 注意
被引⽤的ConfigMap资源必须事先存在,否则⽆法在Pod对象中引⽤ConfigMap资源,另外ConfigMap属于名称空间级别的资源,它必须与引⽤它的Pod资源在同⼀名称空间
案例2
[root@kube-master configmaps]# cat cm-var.yaml
apiVersion: v1
kind: ConfigMap
metadata:
  name: my-configmap
data:
  special.host: 172.168.1.1
  special.type: world
---
apiVersion: v1
kind: Pod
metadata:
  name: demo-cm-pod
spec:
  containers:
  - name: buxybox
    image: busybox:latest
    command: ["sh", "-c", "echo $(SPECIAL_HOST) $(SPECIAL_TYPE)"]
    env:
      - name: SPECIAL_HOST
        valueFrom:
          configMapKeyRef:
            name: my-configmap
            key: special.host
      - name: SPECIAL_TYPE
        valueFrom:
          configMapKeyRef:
            name: my-configmap
key: special.type[root@kube-master configmaps]# cat cm-var.yaml
apiVersion: v1
kind: ConfigMap
metadata:
name: my-configmap
data:
special.host: 172.168.1.1
special.type: world
---
apiVersion: v1
kind: Pod
metadata:
name: demo-cm-pod
spec:
containers:
- name: buxybox
image: busybox:latest
command: ["sh", "-c", "echo $(SPECIAL_HOST) $(SPECIAL_TYPE)"]
env:
- name: SPECIAL_HOST
valueFrom:
configMapKeyRef:
name: my-configmap
key: special.host
- name: SPECIAL_TYPE
valueFrom:
configMapKeyRef:
name: my-configmap
key: special.type- 验证结果
[root@kube-master configmaps]# kubectl logs  demo-cm-pod
172.168.1.1 world
[root@kube-master configmaps]# kubectl logs demo-cm-pod
172.168.1.1 world3.2 通过卷挂载⽅式引⽤CM
帮助
kubectl explain pod.spec.containers.volumeMountskubectl explain pod.spec.containers.volumeMounts引⽤整个存储卷
- 创建cm
kubectl create cm nginx-conf --from-file=nginx.conf kubectl create cm nginx-conf --from-file=nginx.conf- 创建deploy
apiVersion: apps/v1
kind: Deployment
metadata:
  name: my-cm-deployment
spec:
  replicas: 1
  selector:
    matchLabels:
      app: my-cm-app
  template:
    metadata:
      labels:
        app: my-cm-app
    spec:
      volumes:
      - name: my-cm-volume  # name of the volume
        configMap:
          name: nginx-conf  # name of the ConfigMap object
      containers:
      - name: my-cm-container
        image: nginx:latest
        ports:
        - containerPort: 80
        volumeMounts:
        - name: my-cm-volume
mountPath: /usr/share/nginx/html/ #容器挂载的目录(空的),这个方式会覆盖这个目录下原有的文件apiVersion: apps/v1
kind: Deployment
metadata:
name: my-cm-deployment
spec:
replicas: 1
selector:
matchLabels:
app: my-cm-app
template:
metadata:
labels:
app: my-cm-app
spec:
volumes:
- name: my-cm-volume # name of the volume
configMap:
name: nginx-conf # name of the ConfigMap object
containers:
- name: my-cm-container
image: nginx:latest
ports:
- containerPort: 80
volumeMounts:
- name: my-cm-volume
mountPath: /usr/share/nginx/html/ #容器挂载的目录(空的),这个方式会覆盖这个目录下原有的文件- 执行
[root@kube-master volumeMounts]# kubectl apply -f demo.yaml
deployment.apps/my-cm-deployment created
[root@kube-master volumeMounts]# kubectl apply -f demo.yaml
deployment.apps/my-cm-deployment created- 验证效果
[root@kube-master volumeMounts]# kubectl exec -it my-cm-deployment-588bd59774-42wsw -- ls /usr/share/nginx/html/
nginx.conf
[root@kube-master volumeMounts]# kubectl exec -it my-cm-deployment-588bd59774-42wsw -- ls /usr/share/nginx/html/
nginx.conf引⽤存储卷部分键值(itmes)
configmap基于目录创建的时候可以使用itmes,调用部分值
apiVersion: v1
kind: Pod
metadata:
  name: configmap-volume-demo-2
  namespace: default
spec:
  volumes:
  - name: ngxconfig
    configMap:
      name: nginx-config-files
      items:
      - key: myserver.conf   # 要引⽤的键名称(必写)
        path: myserver.conf  # 挂载进 pod 后的文件名(必写)
        mode: 0644
      items:
      - key: youserver.conf
        path: youserver.conf
        mode: 0644
  containers:
  - image: nginx:alpine
    name: nginx-server
    volumeMounts:
    - name: ngxconfig
      mountPath: /etc/nginx/conf.d/
readOnly: trueapiVersion: v1
kind: Pod
metadata:
name: configmap-volume-demo-2
namespace: default
spec:
volumes:
- name: ngxconfig
configMap:
name: nginx-config-files
items:
- key: myserver.conf # 要引⽤的键名称(必写)
path: myserver.conf # 挂载进 pod 后的文件名(必写)
mode: 0644
items:
- key: youserver.conf
path: youserver.conf
mode: 0644
containers:
- image: nginx:alpine
name: nginx-server
volumeMounts:
- name: ngxconfig
mountPath: /etc/nginx/conf.d/
readOnly: true引⽤存储卷单个键值
前⾯两种⽅式中,⽆论是装在ConfigMap对象中的所有⽂件还是部分⽂件,挂载点⽬录下原有的⽂件都会被隐藏
对于期望将 ConfigMap 对象提供的配置文件补充于挂载点目录下,并且不影响原本就存在的一些文件,这种方式就可以满足需求。
使用容器的 volumeMounts 字段中使用的 subPath 字段来解决,它可以支持用户从存储卷挂载单个文件或单个目录而非整个存储卷
apiVersion: v1
kind: Pod
metadata:
  name: configmap-volume-demo-3
  namespace: default
spec:
  containers:
  - image: nginx:alpine
    name: nginx-server
    volumeMounts:
    - name: ngxconfig  #ConfigMap 的 Key 名称
      mountPath: /etc/nginx/conf.d/myserver.conf
      subPath: myserver.conf
      readOnly: true
    - name: ngxconfig   #ConfigMap 的 Key 名称
      mountPath: /etc/nginx/conf.d/yourserver.conf #挂载之后的名字
      subPath: yourserver.conf  #configmaps 中key
      readOnly: true
  volumes:
  - name: ngxconfig
    configMap:
name: nginx-config-filesapiVersion: v1
kind: Pod
metadata:
name: configmap-volume-demo-3
namespace: default
spec:
containers:
- image: nginx:alpine
name: nginx-server
volumeMounts:
- name: ngxconfig #ConfigMap 的 Key 名称
mountPath: /etc/nginx/conf.d/myserver.conf
subPath: myserver.conf
readOnly: true
- name: ngxconfig #ConfigMap 的 Key 名称
mountPath: /etc/nginx/conf.d/yourserver.conf #挂载之后的名字
subPath: yourserver.conf #configmaps 中key
readOnly: true
volumes:
- name: ngxconfig
configMap:
name: nginx-config-files4. ConfigMap实践
4.1 挂载方式
创建configmap.yaml,内容如下:
apiVersion: v1
kind: ConfigMap
metadata:
  name: configmap
  namespace: dev
data:
  info: |
    username:admin
password:123456apiVersion: v1
kind: ConfigMap
metadata:
name: configmap
namespace: dev
data:
info: |
username:admin
password:123456使用此配置文件创建configmap
# 创建configmap
[root@k8s-master01 ~]# kubectl create -f configmap.yaml
configmap/configmap created

# 查看configmap详情
[root@k8s-master01 ~]# kubectl describe cm configmap -n dev
Name:         configmap
Namespace:    dev
Labels:       <none>
Annotations:  <none>

Data
====
info:
----
username:admin
password:123456

Events:  <none>
# 创建configmap
[root@k8s-master01 ~]# kubectl create -f configmap.yaml
configmap/configmap created
# 查看configmap详情
[root@k8s-master01 ~]# kubectl describe cm configmap -n dev
Name: configmap
Namespace: dev
Labels: <none>
Annotations: <none>
Data
====
info:
----
username:admin
password:123456
Events: <none>创建一个pod-configmap.yaml,将上面创建的configmap挂载进去
apiVersion: v1
kind: Pod
metadata:
  name: pod-configmap
  namespace: dev
spec:
  containers:
  - name: nginx
    image: nginx:1.17.1
    volumeMounts: # 将configmap挂载到目录
    - name: config
      mountPath: /configmap/config
  volumes: # 引用configmap
  - name: config
    configMap:
name: configmapapiVersion: v1
kind: Pod
metadata:
name: pod-configmap
namespace: dev
spec:
containers:
- name: nginx
image: nginx:1.17.1
volumeMounts: # 将configmap挂载到目录
- name: config
mountPath: /configmap/config
volumes: # 引用configmap
- name: config
configMap:
name: configmap# 创建pod
[root@k8s-master01 ~]# kubectl create -f pod-configmap.yaml
pod/pod-configmap created
# 查看pod
[root@k8s-master01 ~]# kubectl get pod pod-configmap -n dev
NAME READY STATUS RESTARTS AGE
pod-configmap 1/1 Running 0 6s
#进入容器
[root@k8s-master01 ~]# kubectl exec -it pod-configmap -n dev /bin/sh
# cd /configmap/config/
# ls
info
# more info
username:admin
password:123456
# 可以看到映射已经成功,每个configmap都映射成了一个目录
# key--->文件 value---->文件中的内容
# 此时如果更新configmap的内容, 容器中的值也会动态更新# 创建pod
[root@k8s-master01 ~]# kubectl create -f pod-configmap.yaml
pod/pod-configmap created
# 查看pod
[root@k8s-master01 ~]# kubectl get pod pod-configmap -n dev
NAME READY STATUS RESTARTS AGE
pod-configmap 1/1 Running 0 6s
#进入容器
[root@k8s-master01 ~]# kubectl exec -it pod-configmap -n dev /bin/sh
# cd /configmap/config/
# ls
info
# more info
username:admin
password:123456
# 可以看到映射已经成功,每个configmap都映射成了一个目录
# key--->文件 value---->文件中的内容
# 此时如果更新configmap的内容, 容器中的值也会动态更新4.2 注入方式
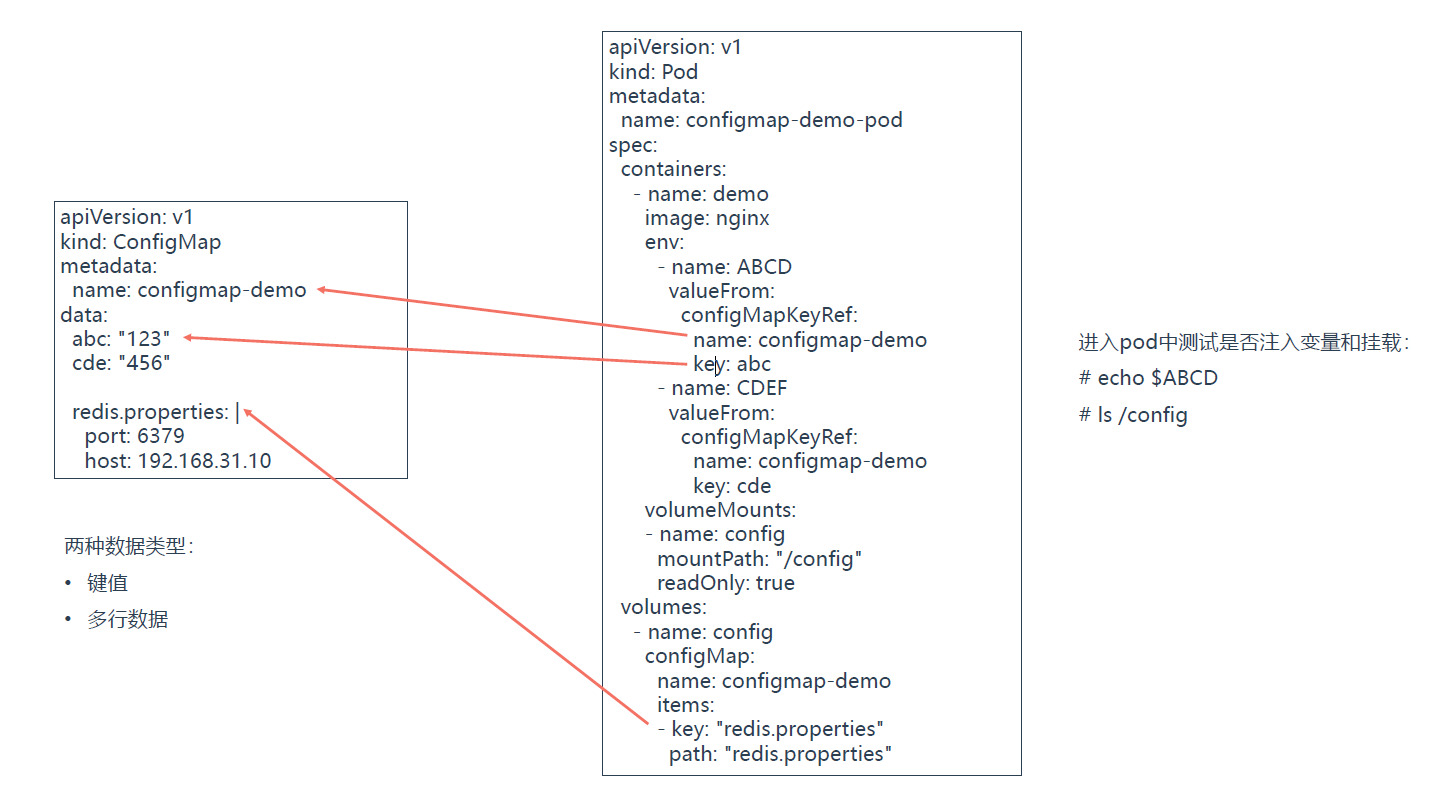
1.创建configmap
apiVersion: v1
kind: ConfigMap
metadata:
  name: configmap-demo
data:
  # 类属性键;每一个键都映射到一个简单的值
  abc: "123"
  cde: "456"

  # 类文件键
  redis.properties: |
    port: 6379
    host: 10.100.24.71
password: 123456apiVersion: v1
kind: ConfigMap
metadata:
name: configmap-demo
data:
# 类属性键;每一个键都映射到一个简单的值
abc: "123"
cde: "456"
# 类文件键
redis.properties: |
port: 6379
host: 10.100.24.71
password: 1234562.创建configmap中pod
apiVersion: v1
kind: Pod
metadata:
  name: configmap-demo-pod
spec:
  containers:
    - name: demo
      image: nginx
      env:
        # 定义环境变量
        - name: ABC_NAME # 请注意这里和 ConfigMap 中的键名是不一样的
          valueFrom:
            configMapKeyRef:
              name: configmap-demo           # 这个值来自 ConfigMap
              key: abc # 需要取值的键
        - name: CDE_NAME
          valueFrom:
            configMapKeyRef:
              name: configmap-demo
              key: cde
      volumeMounts:
      - name: config
        mountPath: "/config"
        readOnly: true
  volumes:
    # 你可以在 Pod 级别设置卷,然后将其挂载到 Pod 内的容器中
    - name: config
      configMap:
        # 提供你想要挂载的 ConfigMap 的名字
        name: configmap-demo
        # 来自 ConfigMap 的一组键,将被创建为文件
        items:
        - key: "redis.properties"
path: "redis.properties"apiVersion: v1
kind: Pod
metadata:
name: configmap-demo-pod
spec:
containers:
- name: demo
image: nginx
env:
# 定义环境变量
- name: ABC_NAME # 请注意这里和 ConfigMap 中的键名是不一样的
valueFrom:
configMapKeyRef:
name: configmap-demo # 这个值来自 ConfigMap
key: abc # 需要取值的键
- name: CDE_NAME
valueFrom:
configMapKeyRef:
name: configmap-demo
key: cde
volumeMounts:
- name: config
mountPath: "/config"
readOnly: true
volumes:
# 你可以在 Pod 级别设置卷,然后将其挂载到 Pod 内的容器中
- name: config
configMap:
# 提供你想要挂载的 ConfigMap 的名字
name: configmap-demo
# 来自 ConfigMap 的一组键,将被创建为文件
items:
- key: "redis.properties"
path: "redis.properties"4.3 from-file
--from-file 指定在目录下的所有文件都会被用在 ConfigMap 里面创建一个键值对,键的名字就是文件名,值就
是文件的内容
cat /root/yaml/configmaps/docs/ui.properties
color.good=purple
color.bad=yellow
allow.textmode=true
how.nice.to.look=fairlyNice
cat /root/yaml/configmaps/docs/ui.properties
color.good=purple
color.bad=yellow
allow.textmode=true
how.nice.to.look=fairlyNice- 创建from-file
kubectl create configmap game-config --from-file=/root/yaml/configmaps/docskubectl create configmap game-config --from-file=/root/yaml/configmaps/docs- 查看
[root@kube-master docs]# kubectl get configmaps game-config  -oyaml
apiVersion: v1
data:
  ui.properties: |
    color.good=purple
    color.bad=yellow
    allow.textmode=true
    how.nice.to.look=fairlyNice
kind: ConfigMap
metadata:
  creationTimestamp: "2024-08-09T05:57:51Z"
  name: game-config
  namespace: default
  resourceVersion: "5081904"
  uid: e0da43a5-7405-4356-9da9-23797037f4f0
[root@kube-master docs]# kubectl get configmaps game-config -oyaml
apiVersion: v1
data:
ui.properties: |
color.good=purple
color.bad=yellow
allow.textmode=true
how.nice.to.look=fairlyNice
kind: ConfigMap
metadata:
creationTimestamp: "2024-08-09T05:57:51Z"
name: game-config
namespace: default
resourceVersion: "5081904"
uid: e0da43a5-7405-4356-9da9-23797037f4f0- 引用
apiVersion: v1
kind: Pod
metadata:
  name: dapi-test-pod
spec:
  containers:
  - name: test-container
    image: wangyanglinux/myapp:v1
    command: [ "/bin/sh", "-c", "env" ]
    env:
      - name: SPECIAL_LEVEL_KEY
        valueFrom:
          configMapKeyRef:
            name: special-config # 导入special-config这个configmap
            key: special.how
      - name: SPECIAL_TYPE_KEY
        valueFrom:
          configMapKeyRef:
            name: special-config
            key: special.type
    envFrom:
      - configMapRef:
          name: env-config #导入env-config这个configmap
restartPolicy: NeverapiVersion: v1
kind: Pod
metadata:
name: dapi-test-pod
spec:
containers:
- name: test-container
image: wangyanglinux/myapp:v1
command: [ "/bin/sh", "-c", "env" ]
env:
- name: SPECIAL_LEVEL_KEY
valueFrom:
configMapKeyRef:
name: special-config # 导入special-config这个configmap
key: special.how
- name: SPECIAL_TYPE_KEY
valueFrom:
configMapKeyRef:
name: special-config
key: special.type
envFrom:
- configMapRef:
name: env-config #导入env-config这个configmap
restartPolicy: Never#设置命令行参数
[root@k8s-master01 docs]# cat pod2.yaml
apiVersion: v1
kind: Pod
metadata:
name: pod-dir
spec:
containers:
- name: test-container
image: wangyanglinux/myapp:v1
command: [ "/bin/sh", "-c", "echo $(SPECIAL_LEVEL_KEY) $(SPECIAL_TYPE_KEY)" ]
env:
- name: SPECIAL_LEVEL_KEY
valueFrom:
configMapKeyRef:
name: special-config
key: special.how
- name: SPECIAL_TYPE_KEY
valueFrom:
configMapKeyRef:
name: special-config
key: special.type
restartPolicy: Never4.3 configMap热更
等待大概 10 秒钟时间,再次查看环境变量的值
5. configmap和secret总结
configmap
主要应用一些配置文件的存储,程序的配置文件替换等
secret
主要存储一些存储镜像仓库认证信息,存储密码、密钥,TLS证书等
应用程序动态更新配置方案: 当ConfigMap发生变更时,应用程序自动感知动态加载(需要程序自身支持) 触发滚动更新,即重启服务