 SRE文档
SRE文档流程
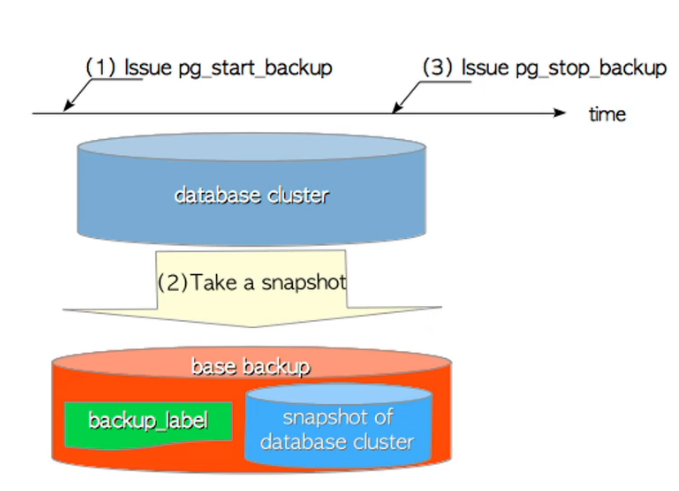
(1)执行pg_start_backup 命令
- force into the full-page wirte mode.
- witch to the current WAL segment file (version 8.4 or later).
- Do checkpoint
- Create a backup_label file-此文件创建于base目录的同一层,包含有关基本备份本身的基本信息,例如此检查点的检查点位置.
backup_label file文件包含内容
(2)使用tar/cp命令对SPGDATA目录进行备份
(3)执行pg_stop_backup 命令
1.pg_basebackup
bash
#物理备


#查看表空间目录
postgres=# \db
           List of tablespaces
  Name   | Owner  |       Location
---------------+----------+-------------------------------------
pg_default  | postgres |
pg_global   | postgres |
tbs_francs  | postgres | /database/pg93/pg_tbs/tbs_francs
tbs_source_db | postgres | /database/pg93/pg_tbs/tbs_source_db
(4 rows)
#如果有则有,如果没有则没有
#备注:先查看表空间目录和数据目录,因为这些目录需要在备库主机上手工创建

# 切换一个日志
postgres=# select pg_switch_wal();
 pg_switch_wal
---------------
 0/30000078
(1 row)

#查看时间戳
postgres=# select current_timestamp;
       current_timestamp
-------------------------------
 2020-08-03 18:20:10.155438+08
(1 row)

#创建基础备份:
#语法:
pg_basebackup -Ft -Pv -Xf -z -D <backupdir> -Z5 -h '<hostname>' -p <port> -U <username> -W

backupdir----->导出的备份文件路径。系统会自动创建目录,但是如果该目录已经存在且不为空,则会报错
-W       ----->密码


[postgres@pg01 ~]$ pg_basebackup -Ft -Pv -Xf -z -Z5 -p 5532 -D /data/pgdata/data/backup/
pg_basebackup: initiating base backup, waiting for checkpoint to complete
pg_basebackup: checkpoint completed
pg_basebackup: write-ahead log start point: 0/2B000028 on timeline 1
103245/103245 kB (100%), 1/1 tablespace
pg_basebackup: write-ahead log end point: 0/2B000100
pg_basebackup: syncing data to disk ...
pg_basebackup: base backup completed

#查看
[postgres@pg01 ~]$ ls  /data/pgdata/data/backup/
base.tar.gz
其中base是$pgdata目录的备份

2,移除故障的数据目录或者新建数据目录,在pg02
[postgres@pg02 pgdata]$ mv data data_old

3,创建新的数据库目录
[postgres@pg02 pgdata]$ mkdir data

[postgres@pg02 pgdata]$ chmod 700 data

#解压
[postgres@pg02 pgdata]$ tar zxvf base.tar.gz  -C  data/

#修改postgresql.auto.conf,默认这个文件是空
[postgres@pg02 data]$ cat postgresql.auto.conf
# Do not edit this file manually!
# It will be overwritten by the ALTER SYSTEM command.
#添加以下两行
restore_command = 'cp /data/pgdata/archive/%f %p > /data/pgdata/archive/recovery.log 2>&1'
recovery_target_time = ' 2020-08-03 17:39:38.928572+08'

#启动
[root@pg02 ~]# systemctl start postgresql
#物理备
#查看表空间目录
postgres=# \db
List of tablespaces
Name | Owner | Location
---------------+----------+-------------------------------------
pg_default | postgres |
pg_global | postgres |
tbs_francs | postgres | /database/pg93/pg_tbs/tbs_francs
tbs_source_db | postgres | /database/pg93/pg_tbs/tbs_source_db
(4 rows)
#如果有则有,如果没有则没有
#备注:先查看表空间目录和数据目录,因为这些目录需要在备库主机上手工创建
# 切换一个日志
postgres=# select pg_switch_wal();
pg_switch_wal
---------------
0/30000078
(1 row)
#查看时间戳
postgres=# select current_timestamp;
current_timestamp
-------------------------------
2020-08-03 18:20:10.155438+08
(1 row)
#创建基础备份:
#语法:
pg_basebackup -Ft -Pv -Xf -z -D <backupdir> -Z5 -h '<hostname>' -p <port> -U <username> -W
backupdir----->导出的备份文件路径。系统会自动创建目录,但是如果该目录已经存在且不为空,则会报错
-W ----->密码
[postgres@pg01 ~]$ pg_basebackup -Ft -Pv -Xf -z -Z5 -p 5532 -D /data/pgdata/data/backup/
pg_basebackup: initiating base backup, waiting for checkpoint to complete
pg_basebackup: checkpoint completed
pg_basebackup: write-ahead log start point: 0/2B000028 on timeline 1
103245/103245 kB (100%), 1/1 tablespace
pg_basebackup: write-ahead log end point: 0/2B000100
pg_basebackup: syncing data to disk ...
pg_basebackup: base backup completed
#查看
[postgres@pg01 ~]$ ls /data/pgdata/data/backup/
base.tar.gz
其中base是$pgdata目录的备份
2,移除故障的数据目录或者新建数据目录,在pg02
[postgres@pg02 pgdata]$ mv data data_old
3,创建新的数据库目录
[postgres@pg02 pgdata]$ mkdir data
[postgres@pg02 pgdata]$ chmod 700 data
#解压
[postgres@pg02 pgdata]$ tar zxvf base.tar.gz -C data/
#修改postgresql.auto.conf,默认这个文件是空
[postgres@pg02 data]$ cat postgresql.auto.conf
# Do not edit this file manually!
# It will be overwritten by the ALTER SYSTEM command.
#添加以下两行
restore_command = 'cp /data/pgdata/archive/%f %p > /data/pgdata/archive/recovery.log 2>&1'
recovery_target_time = ' 2020-08-03 17:39:38.928572+08'
#启动
[root@pg02 ~]# systemctl start postgresql--恢复到最新
recovery_target_timeline = 'latest'
--恢复到指定的时间点
recovery_target_time = ' 2020-08-03 17:39:38.928572+08'
--创建还原点
sql
postgres=# SELECT pg_create_restore_point('restore_point1');
 pg_create_restore_point
-------------------------
 0/2E000140
(1 row)postgres=# SELECT pg_create_restore_point('restore_point1');
pg_create_restore_point
-------------------------
0/2E000140
(1 row)--恢复到还原点
recovery_target_timeline = 'restore_point1'
2.热备份
pg12
1#
postgres=# select pg_start_backup('hot_back') ;
 pg_start_backup
-----------------
 0/A000028
(1 row)


2#cp
tar zcvf ${PG_HOME}/pg_hotbackup_$DATE.tar.gz $PG_DATA


3#stop
postgres=# select pg_stop_backup() ;
NOTICE:  all required WAL segments have been archived
 pg_stop_backup
----------------
 0/B000050
(1 row)


4#重新生成wal
postgres=# select pg_switch_wal() ;
 pg_switch_wal
---------------
 0/C000078
(1 row)

5#查看当前wal
postgres=# select pg_current_wal_lsn();
 pg_current_wal_lsn
--------------------
 0/D000060
(1 row)
1#
postgres=# select pg_start_backup('hot_back') ;
pg_start_backup
-----------------
0/A000028
(1 row)
2#cp
tar zcvf ${PG_HOME}/pg_hotbackup_$DATE.tar.gz $PG_DATA
3#stop
postgres=# select pg_stop_backup() ;
NOTICE: all required WAL segments have been archived
pg_stop_backup
----------------
0/B000050
(1 row)
4#重新生成wal
postgres=# select pg_switch_wal() ;
pg_switch_wal
---------------
0/C000078
(1 row)
5#查看当前wal
postgres=# select pg_current_wal_lsn();
pg_current_wal_lsn
--------------------
0/D000060
(1 row)