SRE文档
SRE文档Introduction to Windows Subsystem for Linux
Windows Subsystem for Linux is an optional feature added to Windows 10 and later versions that allows users to run a Linux instance, including most command-line tools and applications, directly on Windows without using any traditional virtual machine or dual-boot configuration.
The WSL feature was originally added to Windows 10 version 1607 (Anniversary Update) and requires an x64-bit version of Windows. On Server operating systems, it is available for installation in Server 2016 version 1803.
The initial version of WSL (now known as WSL v1 or WSL 1) does not use the real Linux kernel. Instead, a translation layer between the Linux distribution and the Windows NT kernel translates and handles all the kernel-level operations.
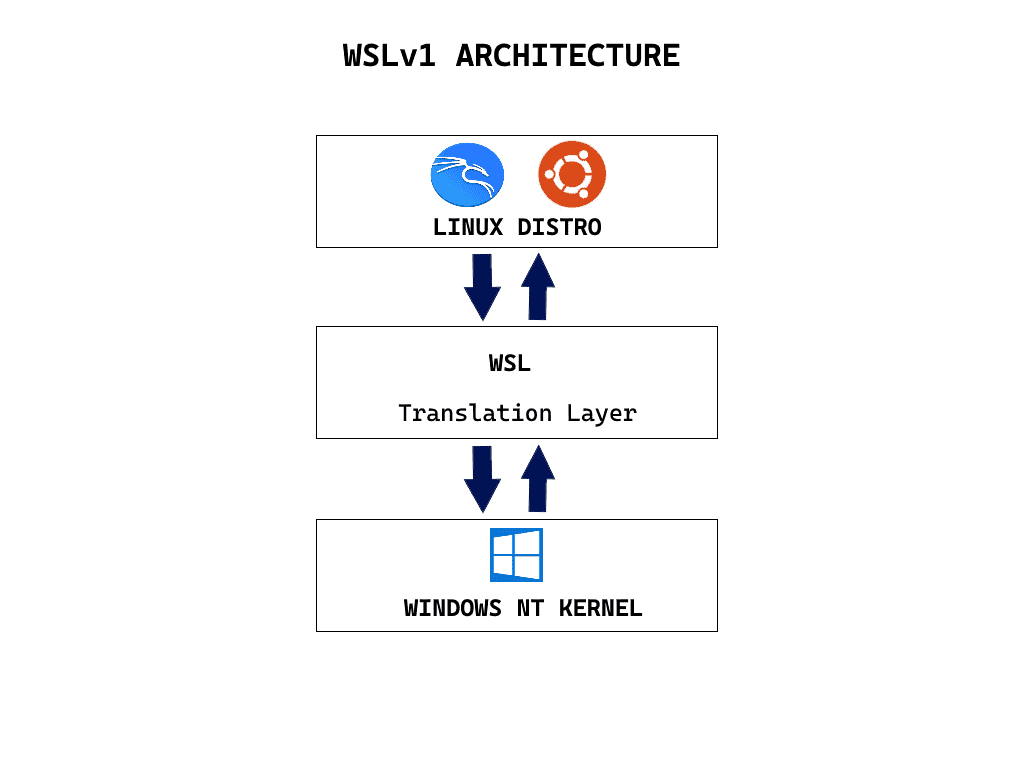 Windows Subsystem for Linux v1 architecture
A lot has changed since the initial launch of WSL. The newer version (known as WSL v2 or WSL 2) was released with Windows 10 version 1903, build 18362 (May 2019 Update); it included various architectural and performance improvements, particularly the use of the real Linux kernel. In WSL 2, in place of the translation layer, a real Linux kernel runs inside a lightweight utility virtual machine (VM), though this is not a traditional VM. This new architecture has resulted in a significant increase in file system performance and full system call compatibility.
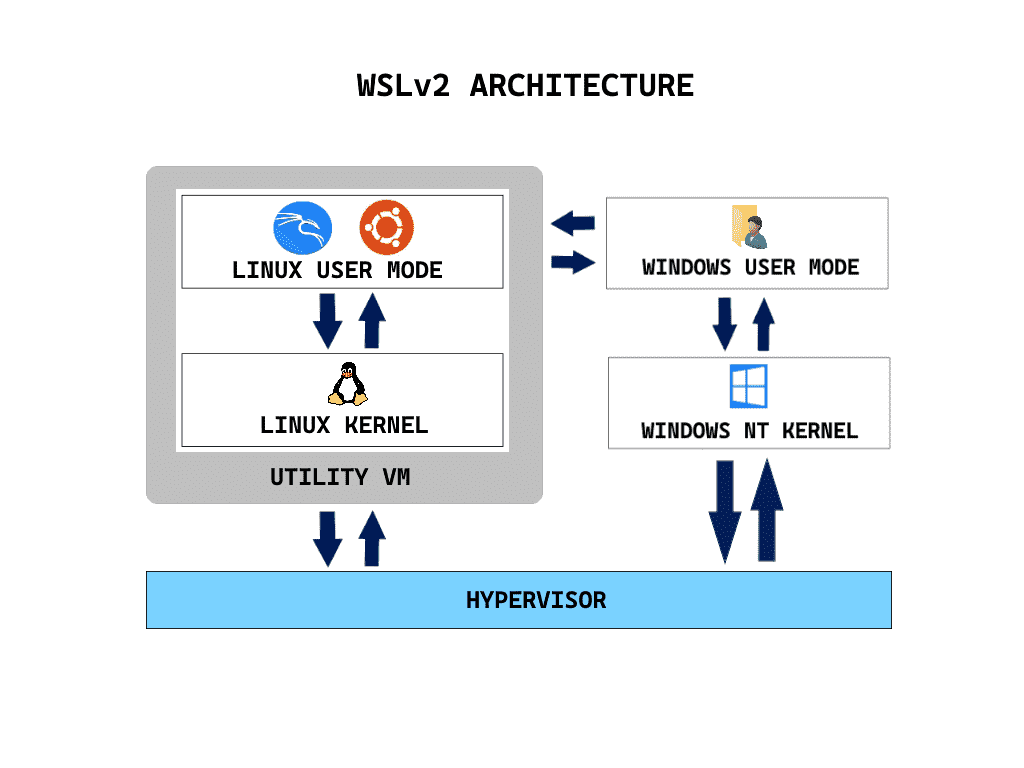
Windows Subsystem for Linux v2 architecture
Differences between WSL and traditional VM
While WSL 2 uses Microsoft's Hyper-V as a hypervisor under the hood to run the utility VM, it does not require you to enable Windows' Hyper-V role or feature; WSL works perfectly fine without it.
Please remember that WSL is not a full replacement for a traditional VM. Let me tell you why.
With the help of a hypervisor, a traditional VM creates an isolated environment in your host system that acts as a separate virtual computer with all the hardware components, such as CPU, RAM, and storage. This architecture allows a user to have a completely isolated system with a guest operating system.
However, this is not the case with WSL. While WSL 2 does run a real Linux kernel in a Hyper-V–based utility VM, it works completely behind the scenes; hence, the user does not need to install and manage the operating system or any other resources as with a traditional VM.
When to choose WSL 2
- You have a less powerful computer.
- You need a smaller memory or storage footprint.
- You need faster I/O performance.
- You don't want to waste your time installing and managing the virtual machine.
- You need to run a Linux distribution (distro) for development and testing purposes.
When to choose a traditional VM
- You have a powerful computer for which resources (such as memory, CPU, and storage) are not a concern.
- You need to run an operating system other than GNU/Linux.
- You need a completely isolated and full-fledged system environment.
- You want to manage the operating system, applications, and resources.
- You want to run production-level workloads.
- You need advanced virtualization features, such as snapshots and load balancing.
In a nutshell, both WSL and traditional VM have several pros and cons; whether you want to run a Linux distro within WSL or within a traditional virtualization platform (such as VirtualBox, Hyper-V, or VMware Workstation) depends entirely on your interest and use case. I hope the aforementioned points will help you make an informed decision.
Prerequisites for WSL
Your system must have certain prerequisites before you can run WSL.
- It must have x64-bit and ARM64 processors.
- To run WSL 1 on an x64 system, it must be running at least Windows 10 version 1607 (Anniversary Update).
- To run WSL 2 on an x64 system, it must be running at least Windows 10 version 1903, build 18362 (May 2019 Update).
- To run WSL 2 on an ARM64 system, it must be running at least Windows 10 version 2004 (build 19041 or higher).
To check the operating system version and build number, you can type the winver command in the RUN dialog and press Enter.
Install WSL in Windows 11
If your system is running Windows 10 version 2004 (build 19041 or higher) or Windows 11, Microsoft has made it incredibly easy to install WSL 2. Just launch the PowerShell console with an elevated privilege and run the following command:
wsl --installwsl --installThis command enables the optional Windows features required for WSL, downloads the latest Linux kernel, sets WSL 2 as the default, and installs the Ubuntu Linux distro for you.
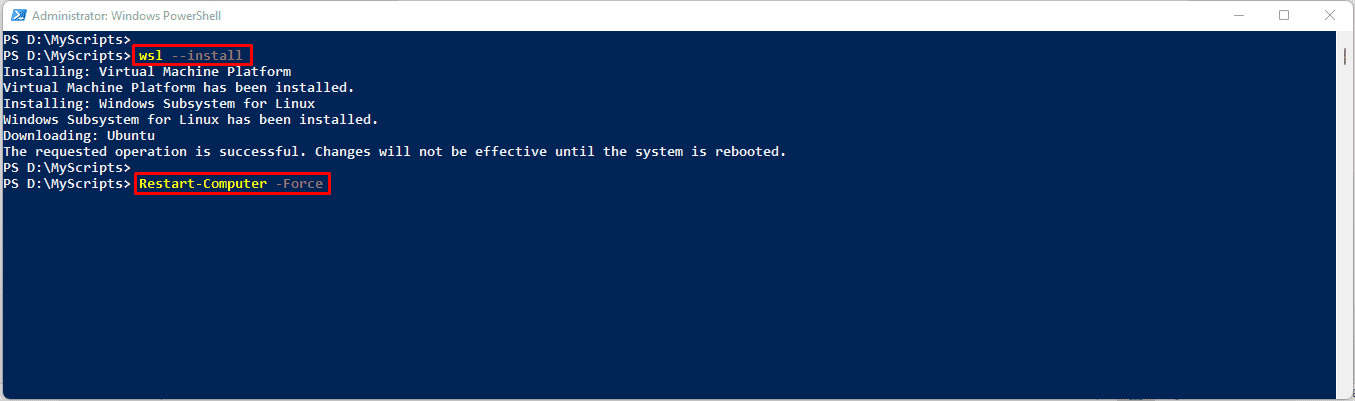
Install WSL using PowerShell The latest method
Once the command is finished, you can restart your computer using the Restart-Computer -Force command.
After the restart, the WSL installation will resume automatically, and you will see an Ubuntu Linux terminal, which will ask you to set the username and password for the Ubuntu WSL instance.
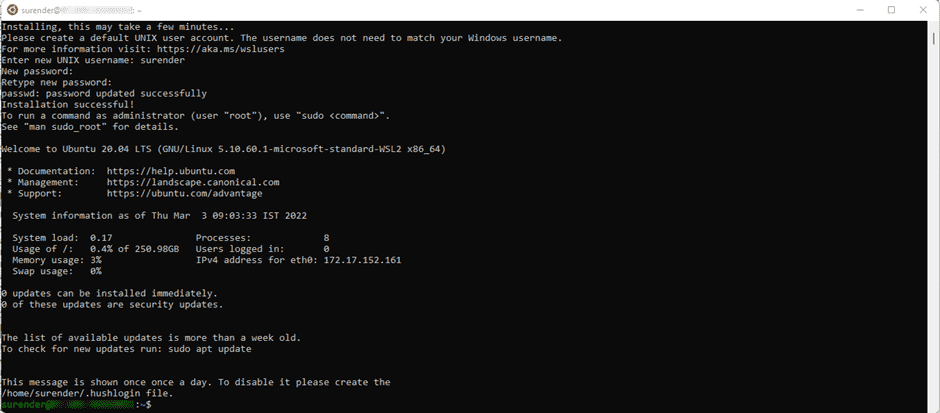
Ubuntu Linux running in the WSL instance
Manually install Windows Subsystem for Linux
If you are running an older Windows 10 build or prefer installing WSL manually, you can follow the manual installation steps laid out below.
Launch the Windows PowerShell console with an elevated privilege and run the following command:
Enable-WindowsOptionalFeature -Online -FeatureName 'Microsoft-Windows-Subsystem-Linux' -All -NoRestartEnable-WindowsOptionalFeature -Online -FeatureName 'Microsoft-Windows-Subsystem-Linux' -All -NoRestart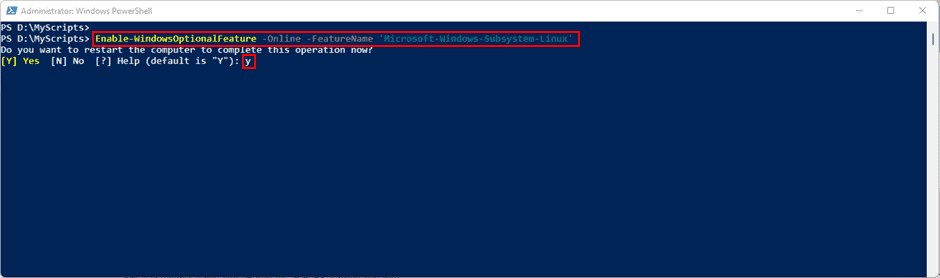
Enable the WSL feature using PowerShell The manual method
Many people still prefer using WSL 1. If you also want the same, you can restart your system at this stage and directly jump to Point 5 after rebooting. If you would rather use WSL 2, please continue to the next point. Make sure your system meets the prerequisites for running WSL 2.
The next step is to run the following command:
Enable-WindowsOptionalFeature -Online -FeatureName 'VirtualMachinePlatform' -All -NoRestartEnable-WindowsOptionalFeature -Online -FeatureName 'VirtualMachinePlatform' -All -NoRestart
Enable the Virtual Machine Platform feature using PowerShell The manual method
Now use the following command to restart your system:
Restart-Computer -Force
After the system has restarted, download the latest kernel package for your system using the following links and install the package:
Once the kernel package is installed, your system should be running WSL 1 by default. To change the default version to WSL 2, run the following command in an elevated PowerShell console:
wsl --set-default-version 2wsl --set-default-version 2Now you can install any Linux distro of your choice. We will cover that in the next section.
Install and manage Linux distros in WSL
Now that you have installed WSL in your system, you can run and manage your Linux distros using PowerShell. Launch the PowerShell console with an elevated privilege and use the commands mentioned in this section.
List the available Linux distros
To see the list of all the Linux distros available for installation with WSL in the online store, you can use the following command:
wsl --list --onlinewsl --list --online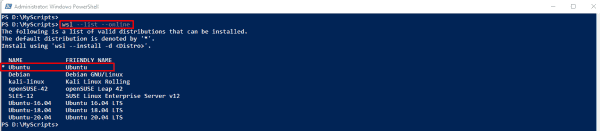
WSL list online
You can also use the short-version command wsl -l -o, which will yield a list of all the supported Linux distros available online for installation in your system.
If you're thinking that this list is quite small and that you cannot see the distro of your choice, rest assured that there is a way you can import any Linux distro in WSL. But that is a manual method involving multiple steps. Hopefully, we'll discuss that later.
Install a Linux distro
Once you have the list of available distros for your system, you can use the following command for installation:
wsl --install -d kali-linuxwsl --install -d kali-linux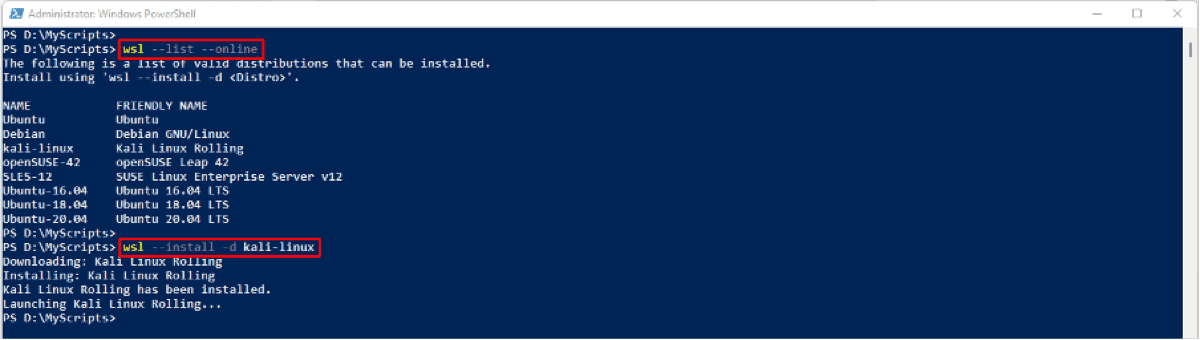
Install a Linux distro in WSL
This command installs Kali Linux in WSL. Of course, you can replace kali-linux with the name of the distro you want to install. Once installed, Kali Linux will be launched in a terminal.

Kali Linux in WSL Initial setup
List installed Linux distros
To see the list of all the Linux distros installed in your system, you can use the following command:
wsl --list --verbosewsl --list --verbose
WSL list verbose
You can also use the short-version command wsl -l -v, which will show a list of all the Linux distros installed in your system.
To list only the instances that are currently running, you can use the following command:
wsl --list --runningwsl --list --running
List of only the running instances in WSL
Change the default WSL Distro
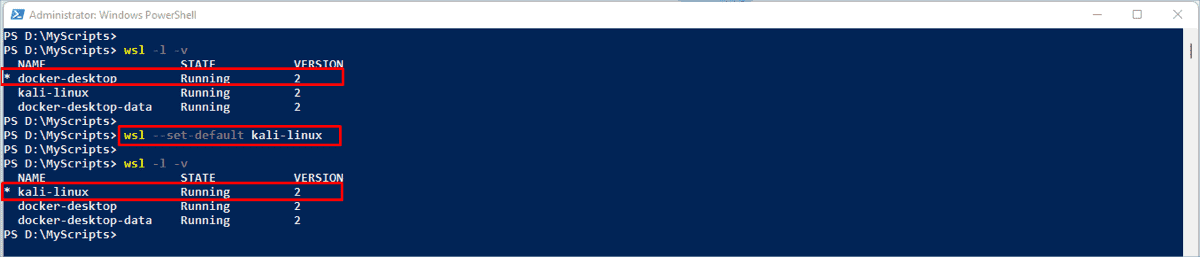
Have you noticed a small asterisk (*) right next to the distro name when you run the wsl -l -v command? This asterisk represents the default distro for WSL. The wsl --status command also shows the current default distro. The default distro is the one that runs when you run wsl in a command line without specifying the --distribution (or -d) parameter.
For example, in my system, docker-desktop is set as the default distro. Changing the default distro to kali-linux can be done with the following command:
wsl --set-default kali-linuxwsl --set-default kali-linux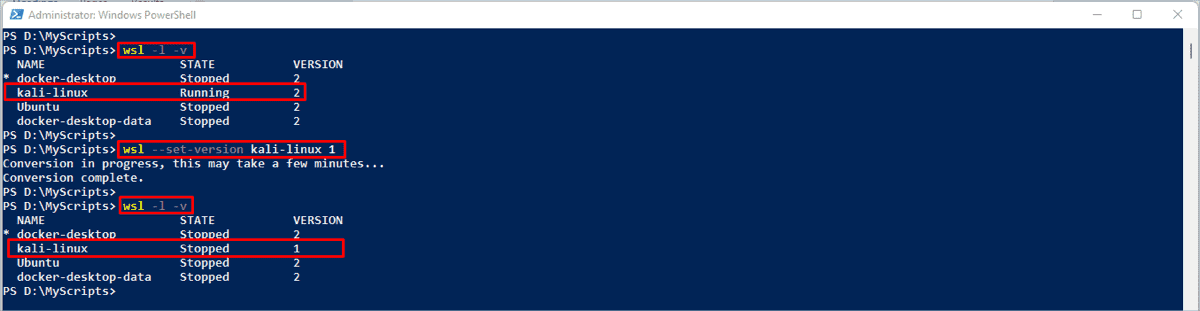
Changing the default distro in WSL
Run and terminate Linux distros
To run any distro and connect to it, you can directly use the following command in PowerShell or the command prompt:
wsl --distribution kali-linux --user surenderwsl --distribution kali-linux --user surender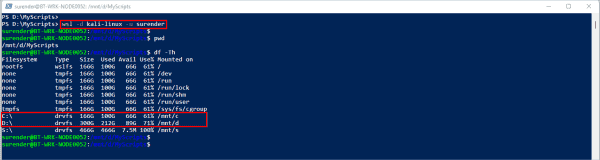
Run and connect a WSL distro with a specific user
Run and connect a WSL distro with a specific user.
After using the above command, you will be directly logged in to the Kali Linux bash shell. The good thing is that your Windows drives are automatically mounted under /mnt, so you can seamlessly transfer the files between Windows and the WSL instance.
To terminate (or stop) a WSL instance, you can use the following command:
wsl --terminate kali-linuxwsl --terminate kali-linux Terminate or stop a single WSL instance
This command stops a particular Linux distro (Kali Linux in this case). If your system has multiple Linux distros that are running, you can use the following command to stop them all at once:
wsl --shutdownwsl --shutdown[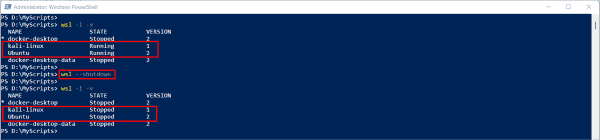
Stop all Linux instances using WSL shutdown
This command immediately stops all the running Linux distros as well as the utility VM.
Change the WSL version
As mentioned earlier, WSL 1 runs by default after installation. To change the WSL version globally, you can use the following command:
wsl --set-default-version 2wsl --set-default-version 2
Set the default WSL version
This command changes the default WSL to WSL 2. If you want to use WSL 1, you can type 1 instead of 2 in the command. Setting the default version to WSL 2 means that every Linux distro you will install in this system will be running in WSL 2.
Apart from changing the WSL version globally, which will affect all future WSL instances, you can set the WSL version specifically for the selected Linux distro. To do this, use the following command:
wsl --set-version kali-linux 1wsl --set-version kali-linux 1This command converts the Kali Linux distro to WSL 1. It could take a while for the conversion process to finish and for the change to be verified; you will see the VERSION column of the wsl -l -v command, as shown in the following image:
Change the WSL version for a particular distro
Please note that the WSL instance will be stopped during the version change process.
Remove a Linux distro
To remove or uninstall a Linux distro from WSL, you need to unregister the distro using the following command:
wsl --unregister ubuntuwsl --unregister ubuntu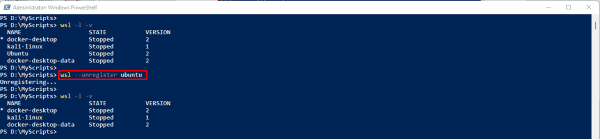
Unregister a distro from WSL
This command unregisters a Linux distro (Ubuntu in this case). Please note that this command will permanently erase all the data, settings, and applications within that distro.
Mount a disk in WSL 2
A cool feature available in WSL 2 is the ability to mount disks that are not supported by Windows. Please note that this feature is available only in WSL 2 running on Windows 11 (build 22000 or higher). Furthermore, the Linux distro in which you plan to mount the disk should be running in WSL 2.
This feature is particularly useful when you want to access the contents of a disk formatted with a Linux file system that is not supported by Windows. To do this, you can mount the disk using the wsl --mount command and then access the contents using WSL.
A quick overview—Windows can recognize FAT, NTFS, ReFS, exFAT, and a few other file systems, but the EXT3 and EXT4 file systems are not supported. exFAT is a cross-platform file system that is equally supported on Windows, Linux, and MacOS.
For demonstration purposes, I just connected a virtual disk formatted with the EXT4 file system. As this disk is formatted in EXT4, Windows won't recognize it, and nothing will show up in File Explorer.
To access its contents, we can mount this storage device and make it available for Linux distros. However, before mounting the disk, we need to get the device ID for the particular disk using the following PowerShell command:
Get-CimInstance -query 'SELECT * from Win32_DiskDrive'Get-CimInstance -query 'SELECT * from Win32_DiskDrive'
The Get CimInstance command used to obtain the device ID
Note down the device ID returned by the above command and use it to mount the disk using the following command:
wsl --mount <DeviceID>wsl --mount <DeviceID>This command mounts the specified disk and makes it available to all the Linux distros in WSL. You can use the --bare parameter to make the disk available in WSL without mounting it to all distros. The --type parameter can be used to specify the file system for the disk. If you don't know the file system, you can skip this parameter.
The image below displays the commands I used:
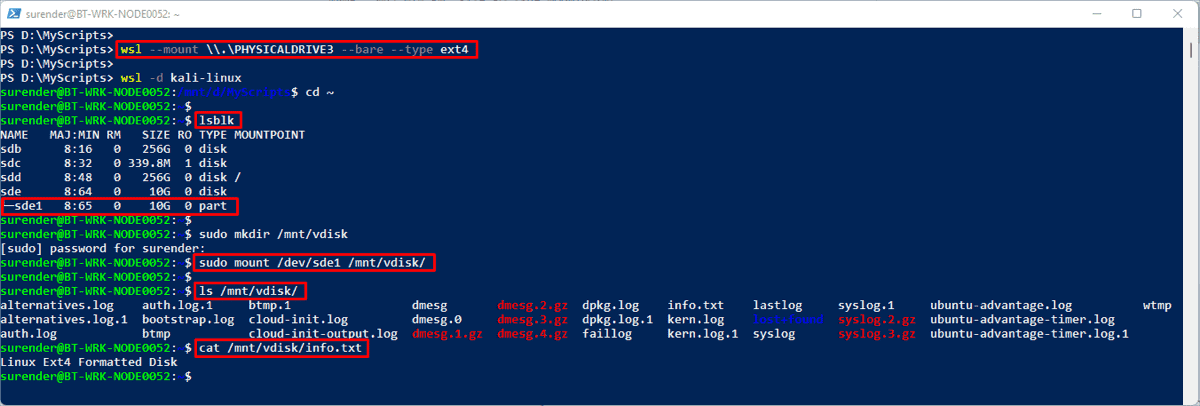
Mount and access a disk in WSL
After entering the bash terminal, I used the lsblkid command to list the partitions available on the disk. Once I obtained the partition's name, I mounted the partition inside the /mnt/vdisk/ directory using the regular mount command. Following this, I could read the contents of the disk.
Once you finish accessing the contents and want to unmount the disk, you can use the following command:
wsl --unmount <DeviceID>wsl --unmount <DeviceID>
Unmount the disk in WSL
Update the WSL Linux kernel
By default, the WSL Linux kernel will be automatically updated with Windows updates. However, to manually check and update the kernel, you can use the following commands:
wsl --statuswsl --statusThis command shows the status of WSL, including the default distro name, WSL version, and kernel version.
wsl --updatewsl --updateThis command forcefully checks and updates the kernel version if an update is available.
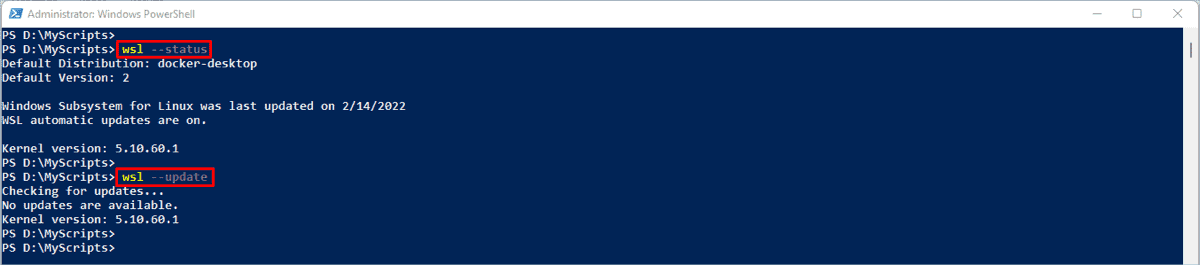
Check and update the kernel in WSL
File sharing between Windows and the WSL distro
As mentioned above, your Windows drives are automatically mounted under /mnt inside the Linux distro; hence, you can seamlessly transfer files between Windows and the WSL instance. To transfer files, you should navigate to the mounted drive and start accessing the files as you normally would in the Linux terminal.
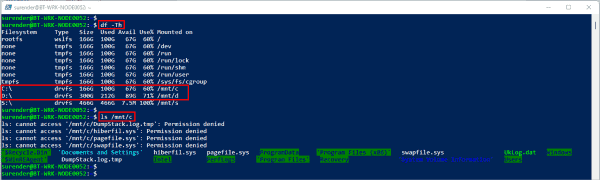 Access Windows drives in WSL
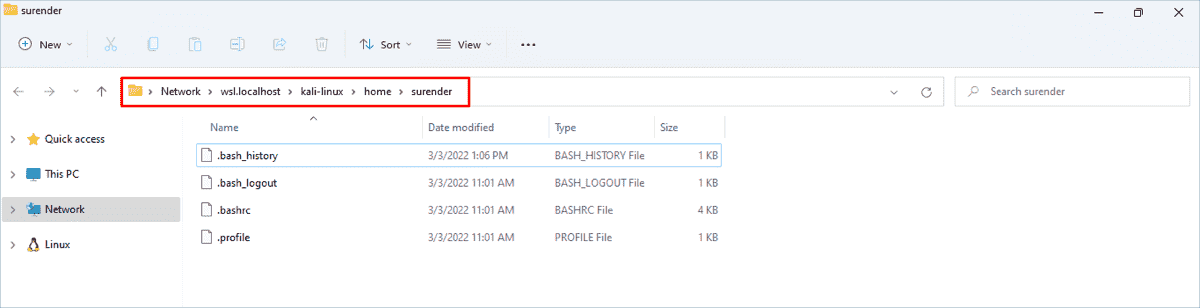
If you would like to view the Linux files directly inside Windows File Explorer, you can use the following command in the bash terminal of the Linux distro:
explorer.exe .
Please make sure you don't miss the period (.) at the end of the command.
 Launch File Explorer in WSL
This will open File Explorer in Windows directly inside your current working directory in the Linux distro.