Deploy Shadowsocks with v2ray-plugin + nginx Enabled
[TOC]
1.下载包
- mac,自带v2ray-plugin
https://github.com/ssx-ng/ShadowsocksX-NG/releases/download/v1.10.0-alpha/ShadowsocksX-NG.zip
- win
https://github.com/shadowsocks/shadowsocks-windows/releases/download/4.4.1.0/Shadowsocks-4.4.1.0.zip
- linux
- android,官方建议使用 Shadowsocks 5.04版或以上版本
- ios
小火箭,需要美版id登陆appstore下载
- 配置域名
免费域名申请:https://www.freenom.com
DNS解析服务商:https://www.cloudflare.com/
Google Cloud Platform:https://cloud.google.com/
2.nginx安装
yum install nginxyum install nginx- 配置ss代理
server {
	listen 80;
    server_name vss.freehan.ink;

include /data/apps/nginx/conf/roles/*.conf;
location / {
                rewrite ^(.*)$ https://$host$1 permanent;
            }
}

server {
    listen 443 ssl;
    server_name vss.freehan.ink;

    ssl_certificate /data/apps/nginx/ssl/9262959_vss.freehan.ink.pem;
    ssl_certificate_key /data/apps/nginx/ssl/9262959_vss.freehan.ink.key;
    ssl_session_timeout 3m;
    ssl_protocols TLSv1 TLSv1.1 TLSv1.2;
    ssl_ciphers ECDHE-RSA-AES128-GCM-SHA256:HIGH:!aNULL:!MD5:!RC4:!DHE;
    ssl_prefer_server_ciphers on;
    keepalive_timeout     70;
    add_header Strict-Transport-Security 'max-age=31536000; includeSubDomains; preload';


include /data/apps/nginx/conf/roles/*.conf;

if ($geoip2_data_country_name != China){
    return 444;
}
 if ($geoip2_data_country_code != CN) {
    return 444;
 }

location / {
            proxy_pass https://nextcloud.com; #伪装网址
            proxy_redirect off;
            proxy_ssl_server_name on;
            sub_filter_once off;
            sub_filter "nextcloud.com" $server_name;
            proxy_set_header Host "nextcloud.com";
            proxy_set_header Referer $http_referer;
            proxy_set_header X-Real-IP $remote_addr;
            proxy_set_header User-Agent $http_user_agent;
            proxy_set_header X-Forwarded-For $proxy_add_x_forwarded_for;
            proxy_set_header X-Forwarded-Proto https;
            proxy_set_header Accept-Encoding "";
            proxy_set_header Accept-Language "zh-CN";
        }
	error_page 404 500 502 503 504 /404.html;
     # 承接上面的location。
     location = /404.html {
          root html;
     }

    location /vss {
	if ($http_upgrade != "websocket") {
        	return 404;
        }
waf on;
waf_mode STD;
waf_cc_deny on rate=200r/s duration=1h size=100m;
waf_cache capacity=50;
waf_http_status general=444 cc_deny=444;
	proxy_redirect off;
        proxy_pass http://172.31.50.61:10132;
        proxy_http_version 1.1;
        proxy_set_header Upgrade $http_upgrade;
        proxy_set_header Connection "upgrade";
        proxy_set_header Host $http_host;
        proxy_set_header X-Real-IP $remote_addr;
        proxy_set_header X-Forwarded-For $proxy_add_x_forwarded_for;
    }
	deny 123.15.129.1;
	allow all;
	access_log /var/log/nginx/access.log es;
}
server {
listen 80;
server_name vss.freehan.ink;
include /data/apps/nginx/conf/roles/*.conf;
location / {
rewrite ^(.*)$ https://$host$1 permanent;
}
}
server {
listen 443 ssl;
server_name vss.freehan.ink;
ssl_certificate /data/apps/nginx/ssl/9262959_vss.freehan.ink.pem;
ssl_certificate_key /data/apps/nginx/ssl/9262959_vss.freehan.ink.key;
ssl_session_timeout 3m;
ssl_protocols TLSv1 TLSv1.1 TLSv1.2;
ssl_ciphers ECDHE-RSA-AES128-GCM-SHA256:HIGH:!aNULL:!MD5:!RC4:!DHE;
ssl_prefer_server_ciphers on;
keepalive_timeout 70;
add_header Strict-Transport-Security 'max-age=31536000; includeSubDomains; preload';
include /data/apps/nginx/conf/roles/*.conf;
if ($geoip2_data_country_name != China){
return 444;
}
if ($geoip2_data_country_code != CN) {
return 444;
}
location / {
proxy_pass https://nextcloud.com; #伪装网址
proxy_redirect off;
proxy_ssl_server_name on;
sub_filter_once off;
sub_filter "nextcloud.com" $server_name;
proxy_set_header Host "nextcloud.com";
proxy_set_header Referer $http_referer;
proxy_set_header X-Real-IP $remote_addr;
proxy_set_header User-Agent $http_user_agent;
proxy_set_header X-Forwarded-For $proxy_add_x_forwarded_for;
proxy_set_header X-Forwarded-Proto https;
proxy_set_header Accept-Encoding "";
proxy_set_header Accept-Language "zh-CN";
}
error_page 404 500 502 503 504 /404.html;
# 承接上面的location。
location = /404.html {
root html;
}
location /vss {
if ($http_upgrade != "websocket") {
return 404;
}
waf on;
waf_mode STD;
waf_cc_deny on rate=200r/s duration=1h size=100m;
waf_cache capacity=50;
waf_http_status general=444 cc_deny=444;
proxy_redirect off;
proxy_pass http://172.31.50.61:10132;
proxy_http_version 1.1;
proxy_set_header Upgrade $http_upgrade;
proxy_set_header Connection "upgrade";
proxy_set_header Host $http_host;
proxy_set_header X-Real-IP $remote_addr;
proxy_set_header X-Forwarded-For $proxy_add_x_forwarded_for;
}
deny 123.15.129.1;
allow all;
access_log /var/log/nginx/access.log es;
}3.ss安装
。。。
3.1服务端配置
[root@feiji shadowsocks-libev]# cat config.json
{
    "server":"0.0.0.0",
    "server_port":10132,
    "local_port":1080,
    "password":"qDepCjE.4",
    "timeout":300,
    "user":"nobody",
    "fast_open":false,
    "mode":"tcp_and_udp",
    "method":"aes-256-gcm",
    "plugin":"/usr/bin/v2ray-plugin",
    "plugin_opts":"server;host=127.0.0.1;path=/vss"
}
[root@feiji shadowsocks-libev]# cat config.json
{
"server":"0.0.0.0",
"server_port":10132,
"local_port":1080,
"password":"qDepCjE.4",
"timeout":300,
"user":"nobody",
"fast_open":false,
"mode":"tcp_and_udp",
"method":"aes-256-gcm",
"plugin":"/usr/bin/v2ray-plugin",
"plugin_opts":"server;host=127.0.0.1;path=/vss"
}- 解压
tar zxvf v2ray-plugin-linux-amd64-v1.3.1.tar.gz && mv v2ray-plugin_linux_amd64 /usr/bin/v2ray-plugintar zxvf v2ray-plugin-linux-amd64-v1.3.1.tar.gz && mv v2ray-plugin_linux_amd64 /usr/bin/v2ray-plugin- 启动服务
#启动,此时ss会自动启动v2ray-plugin 插件

/etc/init.d/shadowsocks start

#关闭ss,此时ss关闭,并不会关闭v2ray插件,需要手动关闭pid
/etc/init.d/shadowsocks stop
#启动,此时ss会自动启动v2ray-plugin 插件
/etc/init.d/shadowsocks start
#关闭ss,此时ss关闭,并不会关闭v2ray插件,需要手动关闭pid
/etc/init.d/shadowsocks stop3.2win client配置
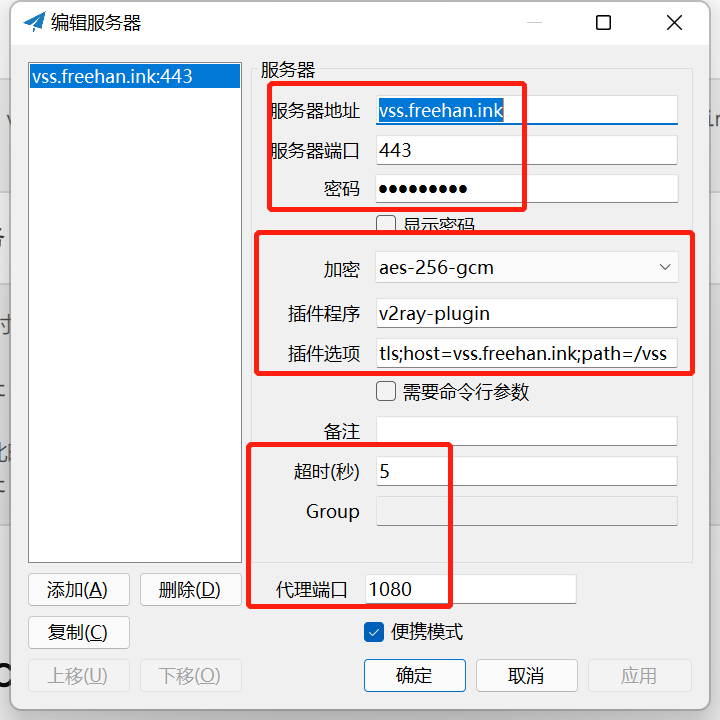
下载完成将插件v2ray-plugin.exe解压到shadowsocks的文件夹中(使其与shadowsocks.exe平级),启动按如下配置:

3.3macos
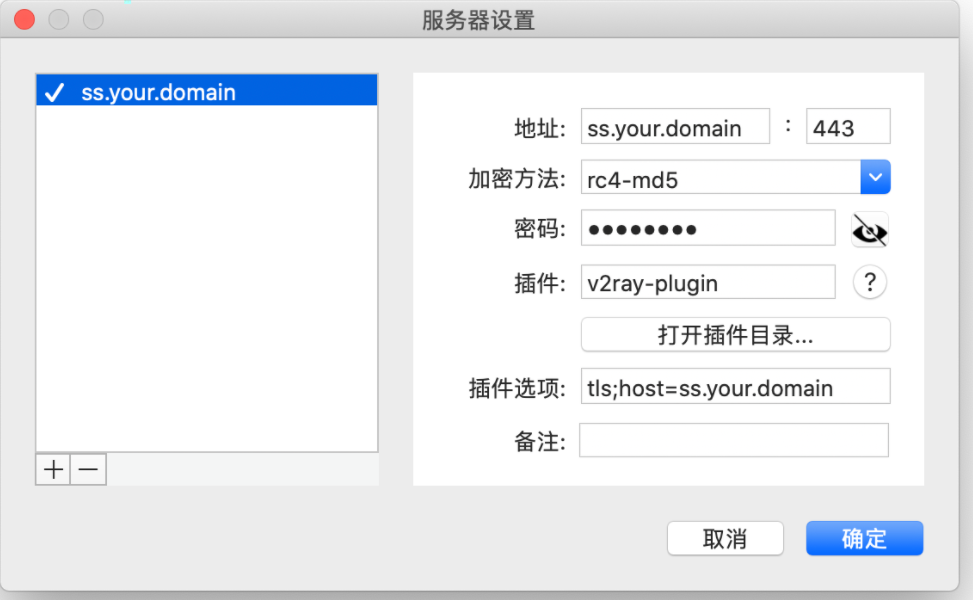
将客户端解压到应用目录(客户端会自己安装插件),启动按如下配置:

3.4Android
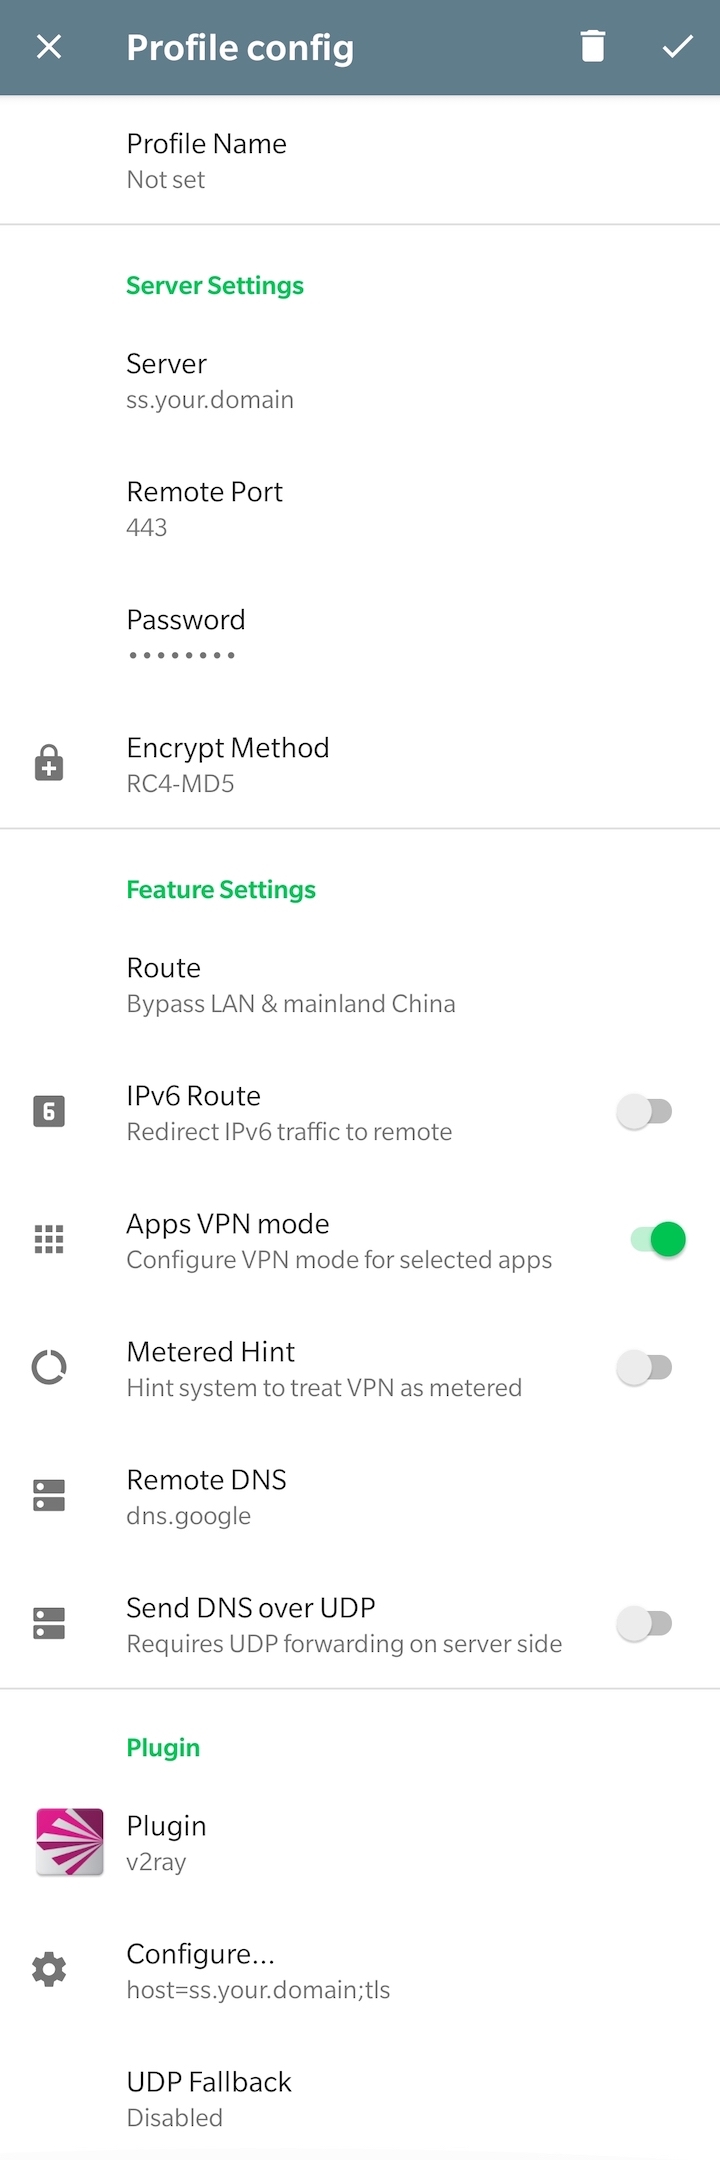
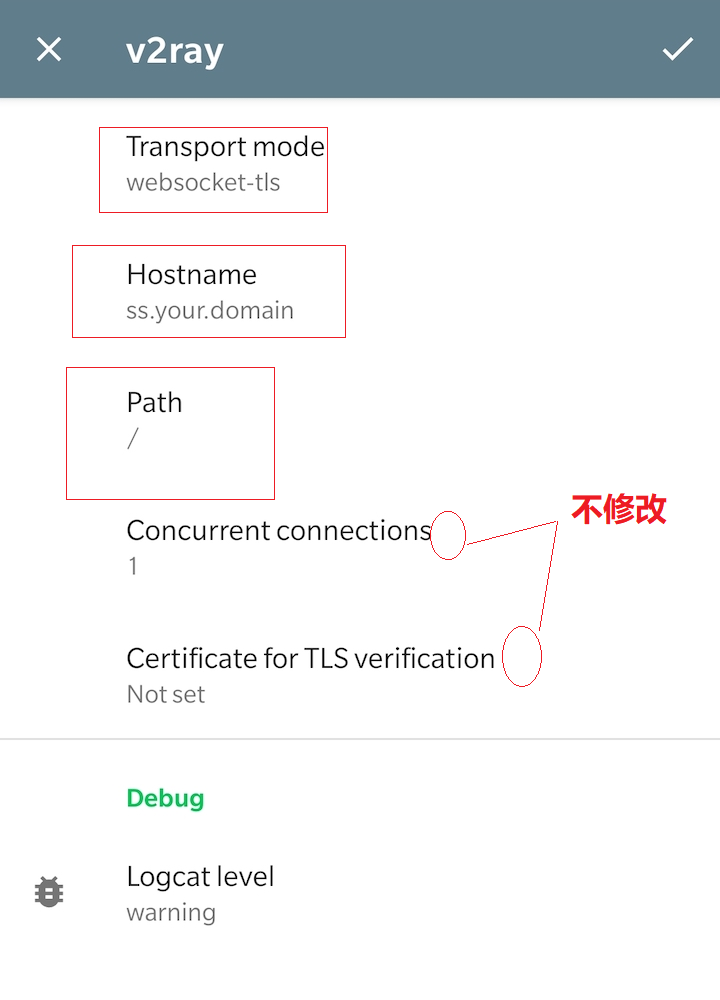
两个apk安装以后启动按如下配置:

启用插件
点击配置

点击右上角对勾,进行保存
3.5ios
小火箭2.1.5以上
地址:     xxx.com
端口:     443
密码:     xxx
加密方式:  aes-256-gcm
插件:     v2ray-plugin
插件选项 : tls;host=xxx.com;path=/vss
地址: xxx.com
端口: 443
密码: xxx
加密方式: aes-256-gcm
插件: v2ray-plugin
插件选项 : tls;host=xxx.com;path=/vss4.配置CDN
选择cloudflare(被墙之后解决方式)
5.脚本安装
Ubuntu 16.04 / Debian 9 wget -O ubuntu-ss-install.sh https://github.com/M3chD09/shadowsocks-with-v2ray-plugin-install/raw/master/ubuntu-ss-install.sh
CentOS 7系统: wget -O centos-ss-install.sh https://github.com/M3chD09/shadowsocks-with-v2ray-plugin-install/raw/master/centos-ss-install.sh
systemctl status shadowsocks              #运行状态
systemctl start shadowsocks                #启动
systemctl stop shadowsocks               #停止
systemctl status shadowsocks #运行状态
systemctl start shadowsocks #启动
systemctl stop shadowsocks #停止- rocklinux启动脚本
#!/usr/bin/env bash
# chkconfig: 2345 90 10
# description: A secure socks5 proxy, designed to protect your Internet traffic.

### BEGIN INIT INFO
# Provides:          Shadowsocks-libev
# Required-Start:    $network $syslog
# Required-Stop:     $network
# Default-Start:     2 3 4 5
# Default-Stop:      0 1 6
# Short-Description: Fast tunnel proxy that helps you bypass firewalls
# Description:       Start or stop the Shadowsocks-libev server
### END INIT INFO

# Author: Teddysun <i@teddysun.com>
if [ -f /usr/local/bin/ss-server ]; then
    DAEMON=/usr/local/bin/ss-server
elif [ -f /usr/bin/ss-server ]; then
    DAEMON=/usr/bin/ss-server
fi
NAME=Shadowsocks-libev
CONF=/etc/shadowsocks-libev/config.json
PID_DIR=/var/run
PID_FILE=$PID_DIR/shadowsocks-libev.pid
RET_VAL=0

[ -x $DAEMON ] || exit 0

if [ ! -d $PID_DIR ]; then
    mkdir -p $PID_DIR
    if [ $? -ne 0 ]; then
        echo "Creating PID directory $PID_DIR failed"
        exit 1
    fi
fi

if [ ! -f $CONF ]; then
    echo "$NAME config file $CONF not found"
     exit 1
fi

check_running() {
    if [ -r $PID_FILE ]; then
        read PID < $PID_FILE
        if [ -d "/proc/$PID" ]; then
            return 0
        else
            rm -f $PID_FILE
            return 1
        fi
    else
        return 2
    fi
}

do_status() {
    check_running
    case $? in
        0)
        echo "$NAME (pid $PID) is running..."
        ;;
        1|2)
        echo "$NAME is stopped"
        RET_VAL=1
        ;;
    esac
}

do_start() {
    if check_running; then
        echo "$NAME (pid $PID) is already running..."
        return 0
    fi
    $DAEMON -v -c $CONF -f $PID_FILE
    if check_running; then
        echo "Starting $NAME success"
    else
        echo "Starting $NAME failed"
        RET_VAL=1
    fi
}

do_stop() {
    if check_running; then
        kill -9 $PID
        rm -f $PID_FILE
        echo "Stopping $NAME success"
    else
        echo "$NAME is stopped"
        RET_VAL=1
    fi
}

do_restart() {
    do_stop
    sleep 0.5
    do_start
}

case "$1" in
    start|stop|restart|status)
    do_$1
    ;;
    *)
    echo "Usage: $0 { start | stop | restart | status }"
    RET_VAL=1
    ;;
esac

exit $RET_VAL
#!/usr/bin/env bash
# chkconfig: 2345 90 10
# description: A secure socks5 proxy, designed to protect your Internet traffic.
### BEGIN INIT INFO
# Provides: Shadowsocks-libev
# Required-Start: $network $syslog
# Required-Stop: $network
# Default-Start: 2 3 4 5
# Default-Stop: 0 1 6
# Short-Description: Fast tunnel proxy that helps you bypass firewalls
# Description: Start or stop the Shadowsocks-libev server
### END INIT INFO
# Author: Teddysun <i@teddysun.com>
if [ -f /usr/local/bin/ss-server ]; then
DAEMON=/usr/local/bin/ss-server
elif [ -f /usr/bin/ss-server ]; then
DAEMON=/usr/bin/ss-server
fi
NAME=Shadowsocks-libev
CONF=/etc/shadowsocks-libev/config.json
PID_DIR=/var/run
PID_FILE=$PID_DIR/shadowsocks-libev.pid
RET_VAL=0
[ -x $DAEMON ] || exit 0
if [ ! -d $PID_DIR ]; then
mkdir -p $PID_DIR
if [ $? -ne 0 ]; then
echo "Creating PID directory $PID_DIR failed"
exit 1
fi
fi
if [ ! -f $CONF ]; then
echo "$NAME config file $CONF not found"
exit 1
fi
check_running() {
if [ -r $PID_FILE ]; then
read PID < $PID_FILE
if [ -d "/proc/$PID" ]; then
return 0
else
rm -f $PID_FILE
return 1
fi
else
return 2
fi
}
do_status() {
check_running
case $? in
0)
echo "$NAME (pid $PID) is running..."
;;
1|2)
echo "$NAME is stopped"
RET_VAL=1
;;
esac
}
do_start() {
if check_running; then
echo "$NAME (pid $PID) is already running..."
return 0
fi
$DAEMON -v -c $CONF -f $PID_FILE
if check_running; then
echo "Starting $NAME success"
else
echo "Starting $NAME failed"
RET_VAL=1
fi
}
do_stop() {
if check_running; then
kill -9 $PID
rm -f $PID_FILE
echo "Stopping $NAME success"
else
echo "$NAME is stopped"
RET_VAL=1
fi
}
do_restart() {
do_stop
sleep 0.5
do_start
}
case "$1" in
start|stop|restart|status)
do_$1
;;
*)
echo "Usage: $0 { start | stop | restart | status }"
RET_VAL=1
;;
esac
exit $RET_VAL