 SRE文档
SRE文档1.配置openvpn使用 秘钥+用户名密码 验证登录
1.修改Server端配置文件,添加以下三行代码。
auth-user-pass-verify /etc/openvpn/checkpsw.sh via-env
username-as-common-name
script-security 3
auth-user-pass-verify /etc/openvpn/checkpsw.sh via-env
username-as-common-name
script-security 3注:
如果加上client-cert-not-required则代表只使用用户名密码方式验证登录,
如果不加,则代表需要证书和用户名密码双重验证登录!
使用用户名和密码进行客户端身份验证并非意味着完全不需要证书,CA证书和服务器证书还是需要的
2).checkpsw.sh
下载地址:http://openvpn.se/files/other/checkpsw.sh
wget http://openvpn.se/files/other/checkpsw.sh -P /etc/openvpn/
或者创建checkpsw.sh文件,直接复制粘贴以下代码也可以。
PASSFILE和LOG_FILE是密码文件和日志文件的路径,这里我们默认就好,不用修改
#!/bin/sh
###########################################################
# checkpsw.sh (C) 2004 Mathias Sundman <mathias@openvpn.se>
#
# This script will authenticate OpenVPN users against
# a plain text file. The passfile should simply contain
# one row per user with the username first followed by
# one or more space(s) or tab(s) and then the password.
PASSFILE="/etc/openvpn/psw-file"
LOG_FILE="/var/log/openvpn-password.log"
TIME_STAMP=`date "+%Y-%m-%d %T"`
###########################################################
if [ ! -r "${PASSFILE}" ]; then
  echo "${TIME_STAMP}: Could not open password file \"${PASSFILE}\" for reading." >> ${LOG_FILE}
  exit 1
fi
CORRECT_PASSWORD=`awk '!/^;/&&!/^#/&&$1=="'${username}'"{print $2;exit}' ${PASSFILE}`
if [ "${CORRECT_PASSWORD}" = "" ]; then
  echo "${TIME_STAMP}: User does not exist: username=\"${username}\", password=\"${password}\"." >> ${LOG_FILE}
  exit 1
fi
if [ "${password}" = "${CORRECT_PASSWORD}" ]; then
  echo "${TIME_STAMP}: Successful authentication: username=\"${username}\"." >> ${LOG_FILE}
  exit 0
fi
echo "${TIME_STAMP}: Incorrect password: username=\"${username}\", password=\"${password}\"." >> ${LOG_FILE}
exit 1
#!/bin/sh
###########################################################
# checkpsw.sh (C) 2004 Mathias Sundman <mathias@openvpn.se>
#
# This script will authenticate OpenVPN users against
# a plain text file. The passfile should simply contain
# one row per user with the username first followed by
# one or more space(s) or tab(s) and then the password.
PASSFILE="/etc/openvpn/psw-file"
LOG_FILE="/var/log/openvpn-password.log"
TIME_STAMP=`date "+%Y-%m-%d %T"`
###########################################################
if [ ! -r "${PASSFILE}" ]; then
echo "${TIME_STAMP}: Could not open password file \"${PASSFILE}\" for reading." >> ${LOG_FILE}
exit 1
fi
CORRECT_PASSWORD=`awk '!/^;/&&!/^#/&&$1=="'${username}'"{print $2;exit}' ${PASSFILE}`
if [ "${CORRECT_PASSWORD}" = "" ]; then
echo "${TIME_STAMP}: User does not exist: username=\"${username}\", password=\"${password}\"." >> ${LOG_FILE}
exit 1
fi
if [ "${password}" = "${CORRECT_PASSWORD}" ]; then
echo "${TIME_STAMP}: Successful authentication: username=\"${username}\"." >> ${LOG_FILE}
exit 0
fi
echo "${TIME_STAMP}: Incorrect password: username=\"${username}\", password=\"${password}\"." >> ${LOG_FILE}
exit 1添加执行权限
chmod +x /etc/openvpn/checkpsw.sh
3). 创建用户和密码认证文件
vim /etc/openvpn/psw-file
admin 123456 (前面是用户 后面是密码)
注:这里 psw-file的权限
chmod 400 /etc/openvpn/psw-file
chown nobody.nobody /etc/openvpn/psw-file
user1    pass-user1
#comment
user2   pass-user2
user1 pass-user1
#comment
user2 pass-user2- 直接往这个文件写入用户和密码即可,并不需要重启openvpn服务
4. 修改客户端配置文件:client.ovpn
再添加这一行,就会提示输入用户名和密码
auth-user-pass
5).重启OpenVPN服务,测试客户端登录
S端配置文件
port 1194
proto udp
dev tun

ca /etc/openvpn/server/ca.crt
cert /etc/openvpn/server/server.crt
key /etc/openvpn/server/server.key
dh /etc/openvpn/server/dh.pem

#VPN CIDR
server 10.8.0.0 255.255.255.0
ifconfig-pool-persist ipp.txt

#推送的S端的CIDR给C端路由
push "route 10.0.0.0 255.255.224.0"

#推送S端DNS
push "dhcp-option DNS 10.247.3.10"
push "dhcp-option DNS 114.114.114.114"

client-to-client
keepalive 20 120
cipher AES-256-CBC
persist-key
persist-tun
log         /dev/stdout
log-append  /dev/stdout

verb 3
explicit-exit-notify 1


#启用用户/密码进行登录需要添加的选项
#栗子文件里面没有这些信息
script-security 3
auth-user-pass-verify /etc/openvpn/checkpsw.sh via-env
#http://openvpn.se/files/other/checkpsw.sh
#去下载这个脚本
#client-cert-not-required
#此选项只使用用户密码,不使用证书
#注释它,使用证书和用户密码双重登录
username-as-common-name
port 1194
proto udp
dev tun
ca /etc/openvpn/server/ca.crt
cert /etc/openvpn/server/server.crt
key /etc/openvpn/server/server.key
dh /etc/openvpn/server/dh.pem
#VPN CIDR
server 10.8.0.0 255.255.255.0
ifconfig-pool-persist ipp.txt
#推送的S端的CIDR给C端路由
push "route 10.0.0.0 255.255.224.0"
#推送S端DNS
push "dhcp-option DNS 10.247.3.10"
push "dhcp-option DNS 114.114.114.114"
client-to-client
keepalive 20 120
cipher AES-256-CBC
persist-key
persist-tun
log /dev/stdout
log-append /dev/stdout
verb 3
explicit-exit-notify 1
#启用用户/密码进行登录需要添加的选项
#栗子文件里面没有这些信息
script-security 3
auth-user-pass-verify /etc/openvpn/checkpsw.sh via-env
#http://openvpn.se/files/other/checkpsw.sh
#去下载这个脚本
#client-cert-not-required
#此选项只使用用户密码,不使用证书
#注释它,使用证书和用户密码双重登录
username-as-common-nameC端配置文件
client
dev tun

proto udp
remote addr port

resolv-retry infinite

nobind

persist-key
persist-tun


#此处我将CA证书和C端证书信息写入配置文件
#当然,也可下载证书在指定,但这麻烦了
<ca>
-----BEGIN CERTIFICATE-----
xxxxxxxxxxx
-----END CERTIFICATE-----
</ca>

<cert>
-----BEGIN CERTIFICATE-----
xxxxxxxxxxxxxxxxx
-----END CERTIFICATE-----
</cert>

<key>
-----BEGIN PRIVATE KEY-----
xxxxxxxxxxxxxxxx
-----END PRIVATE KEY-----
</key>


remote-cert-tls server
cipher AES-256-CBC
verb 3

#用户认证
script-security 3
auth-user-pass
#可将用户信息写入文件,用户密码各一行
client
dev tun
proto udp
remote addr port
resolv-retry infinite
nobind
persist-key
persist-tun
#此处我将CA证书和C端证书信息写入配置文件
#当然,也可下载证书在指定,但这麻烦了
<ca>
-----BEGIN CERTIFICATE-----
xxxxxxxxxxx
-----END CERTIFICATE-----
</ca>
<cert>
-----BEGIN CERTIFICATE-----
xxxxxxxxxxxxxxxxx
-----END CERTIFICATE-----
</cert>
<key>
-----BEGIN PRIVATE KEY-----
xxxxxxxxxxxxxxxx
-----END PRIVATE KEY-----
</key>
remote-cert-tls server
cipher AES-256-CBC
verb 3
#用户认证
script-security 3
auth-user-pass
#可将用户信息写入文件,用户密码各一行2,案例
2.1 via-env
- 目录结构
[root@hkfengkongnginx openvpn]# tree -L 2
.
├── ccd
│   └── han
├── checkpsw.sh
├── client
├── openvpn-auth.sh
├── psw-file
├── server
│   ├── ca.crt
│   ├── ca.key
│   ├── client-common.txt
│   ├── crl.pem
│   ├── dh.pem
│   ├── easy-rsa
│   ├── ipp.txt
│   ├── openvpn.log
│   ├── openvpn-status.log
│   ├── server.conf
│   ├── server.crt
│   ├── server.key
│   └── ta.key
├── via-file
└── viafile.sh

[root@hkfengkongnginx /etc/openvpn]#mkdir ccd;chow -R root.openvpn ccd
[root@hkfengkongnginx /etc/openvpn]#cd ccd;touch han(根据用户创建)
[root@hkfengkongnginx /etc/openvpn/ccd]#cat han
ifconfig-push 10.8.0.3 255.255.255.0
push "redirect-gateway def1 bypass-dhcp"

[root@hkfengkongnginx openvpn]# cat psw-file
han 123456
[root@hkfengkongnginx openvpn]# tree -L 2
.
├── ccd
│ └── han
├── checkpsw.sh
├── client
├── openvpn-auth.sh
├── psw-file
├── server
│ ├── ca.crt
│ ├── ca.key
│ ├── client-common.txt
│ ├── crl.pem
│ ├── dh.pem
│ ├── easy-rsa
│ ├── ipp.txt
│ ├── openvpn.log
│ ├── openvpn-status.log
│ ├── server.conf
│ ├── server.crt
│ ├── server.key
│ └── ta.key
├── via-file
└── viafile.sh
[root@hkfengkongnginx /etc/openvpn]#mkdir ccd;chow -R root.openvpn ccd
[root@hkfengkongnginx /etc/openvpn]#cd ccd;touch han(根据用户创建)
[root@hkfengkongnginx /etc/openvpn/ccd]#cat han
ifconfig-push 10.8.0.3 255.255.255.0
push "redirect-gateway def1 bypass-dhcp"
[root@hkfengkongnginx openvpn]# cat psw-file
han 123456- server端配置文件
port 61379
proto tcp
dev tun
sndbuf 0
rcvbuf 0
ca ca.crt
cert server.crt
key server.key
dh dh.pem
auth SHA512
tls-auth ta.key 0
topology subnet
server 10.8.0.0 255.255.255.0
ifconfig-pool-persist ipp.txt
push "redirect-gateway def1 bypass-dhcp"
push "dhcp-option DNS 114.114.114.114"
push "dhcp-option DNS 1.1.1.1"

client-config-dir /etc/openvpn/ccd
#route 10.8.0.0 255.255.255.0

push "route 172.31.65.0 255.255.255.0"
keepalive 10 120
cipher AES-256-CBC
user nobody
group nobody
persist-key
persist-tun
status openvpn-status.log
log-append openvpn.log
verb 3
comp-lzo
max-clients 100
mute 20
crl-verify crl.pem

username-as-common-name
script-security 3
auth-user-pass-verify /etc/openvpn/checkpsw.sh via-env
#auth-user-pass-verify /etc/openvpn/openvpn-auth.sh via-file
port 61379
proto tcp
dev tun
sndbuf 0
rcvbuf 0
ca ca.crt
cert server.crt
key server.key
dh dh.pem
auth SHA512
tls-auth ta.key 0
topology subnet
server 10.8.0.0 255.255.255.0
ifconfig-pool-persist ipp.txt
push "redirect-gateway def1 bypass-dhcp"
push "dhcp-option DNS 114.114.114.114"
push "dhcp-option DNS 1.1.1.1"
client-config-dir /etc/openvpn/ccd
#route 10.8.0.0 255.255.255.0
push "route 172.31.65.0 255.255.255.0"
keepalive 10 120
cipher AES-256-CBC
user nobody
group nobody
persist-key
persist-tun
status openvpn-status.log
log-append openvpn.log
verb 3
comp-lzo
max-clients 100
mute 20
crl-verify crl.pem
username-as-common-name
script-security 3
auth-user-pass-verify /etc/openvpn/checkpsw.sh via-env
#auth-user-pass-verify /etc/openvpn/openvpn-auth.sh via-file[!NOTE] /etc/openvpn/server/ccd 使用其他路径,否则客户端会出现权限拒绝
默认的/etc/openvpn/server/ccd路径,但它导致以下错误
Could not access file 'ccd/koromicha': Permission denied (errno=13)
Could not access file 'ccd/DEFAULT': Permission denied (errno=13)
Could not access file 'ccd/koromicha': Permission denied (errno=13) Could not access file 'ccd/DEFAULT': Permission denied (errno=13)
- client端配置
client
dev tun
proto tcp
sndbuf 0
rcvbuf 0
remote 127.0.0.1 1194
route 10.8.0.3 255.255.255.0
resolv-retry infinite
nobind
persist-key
persist-tun
remote-cert-tls server
auth SHA512
cipher AES-256-CBC
setenv opt block-outside-dns
key-direction 1
redirect-gateway def1
#route-nopull
route-method exe
route-delay 2


comp-lzo
verb 3
script-security 3
auth-user-pass
client
dev tun
proto tcp
sndbuf 0
rcvbuf 0
remote 127.0.0.1 1194
route 10.8.0.3 255.255.255.0
resolv-retry infinite
nobind
persist-key
persist-tun
remote-cert-tls server
auth SHA512
cipher AES-256-CBC
setenv opt block-outside-dns
key-direction 1
redirect-gateway def1
#route-nopull
route-method exe
route-delay 2
comp-lzo
verb 3
script-security 3
auth-user-pass[!NOTE] client 端配置是全局走openvpn流量
- 登陆效果
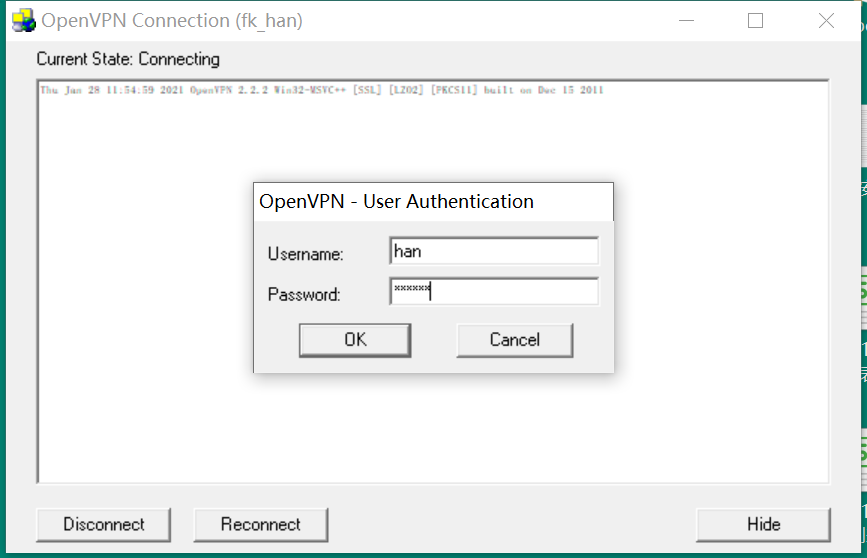
[root@hkfengkongnginx openvpn]# tail /var/log/openvpn-password.log
2021-01-28 10:53:53: Successful authentication: username="han".
[root@hkfengkongnginx openvpn]# tail /var/log/openvpn-password.log
2021-01-28 10:53:53: Successful authentication: username="han".2.2 via-file
[root@hkfengkongnginx openvpn]# cat openvpn-auth.sh
read -p "Login:" Login;read -p "Password:" Password;[ -n "$Login" ] && [ -n "$Password" ] && echo -e "$Login\t$(echo $Password|md5sum|cut -f 1 -d ' ')">>/etc/openvpn/via-file

[root@hkfengkongnginx openvpn]# cat via-file
han	f447b20a7fcbf53a5d5be013ea0b15af
li	5ce4e85ef0aa7345d829abec08780219
[root@hkfengkongnginx openvpn]# cat openvpn-auth.sh
read -p "Login:" Login;read -p "Password:" Password;[ -n "$Login" ] && [ -n "$Password" ] && echo -e "$Login\t$(echo $Password|md5sum|cut -f 1 -d ' ')">>/etc/openvpn/via-file
[root@hkfengkongnginx openvpn]# cat via-file
han f447b20a7fcbf53a5d5be013ea0b15af
li 5ce4e85ef0aa7345d829abec087802192.3 不让全部流量走VPN通道
- 修改前
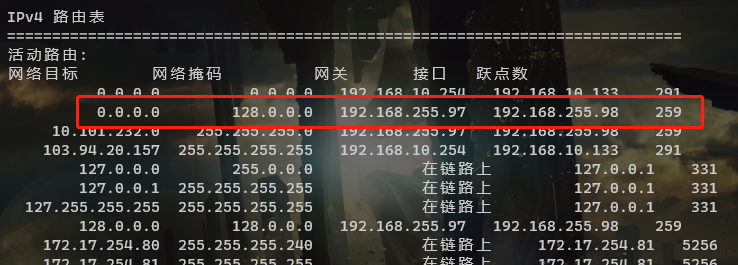
在百度中查看ip,发现也确实是该VPN所在的ip

仅仅需要10.8.0.x这些走VPN
在client端配置
# 在remote ip port 这行后面加入
route 10.101.232.0 255.255.255.0

# 文件末尾注释掉,防止所有网络都走VPN服务器, 如果想全部流量通过VPN则添加这一行。
# redirect-gateway def1
# 添加下面一行,不从服务器拉取路由表
route-nopull
# 在remote ip port 这行后面加入
route 10.101.232.0 255.255.255.0
# 文件末尾注释掉,防止所有网络都走VPN服务器, 如果想全部流量通过VPN则添加这一行。
# redirect-gateway def1
# 添加下面一行,不从服务器拉取路由表
route-nopull- 完整配置
client
dev tun
proto tcp
sndbuf 0
rcvbuf 0
remote 127.0.0.1 1194
route 10.8.0.3 255.255.255.0
resolv-retry infinite
nobind
persist-key
persist-tun
remote-cert-tls server
auth SHA512
cipher AES-256-CBC
setenv opt block-outside-dns
key-direction 1
route-nopull
route-method exe
route-delay 2


comp-lzo
verb 3
script-security 3
auth-user-pass
client
dev tun
proto tcp
sndbuf 0
rcvbuf 0
remote 127.0.0.1 1194
route 10.8.0.3 255.255.255.0
resolv-retry infinite
nobind
persist-key
persist-tun
remote-cert-tls server
auth SHA512
cipher AES-256-CBC
setenv opt block-outside-dns
key-direction 1
route-nopull
route-method exe
route-delay 2
comp-lzo
verb 3
script-security 3
auth-user-pass