 SRE文档
SRE文档1. 隐藏版本信息
修改Nginx源码文件,此配置文件需要在nginx.conf的http中添加server_tokens off;开启nginx版本隐藏才能实现预期效果
[root@CentOS7 nginx-1.14.2]#vim src/http/ngx_http_header_filter_module.c
 49 static u_char ngx_http_server_string[] = "Server: Darius/10.0" CRLF;


 # 修改src/core/nginx.h文件无需开启隐藏功能,起到修改版本信息的效果
[root@CentOS7 nginx-1.14.2]# vim src/core/nginx.h
#define NGINX_VERSION      "10.0"
 #define NGINX_VER          "Darius/" NGINX_VERSION

sed -i -e 's/1.12.2//g' -e 's/nginx\//JSP/g' -e 's/"NGINX"/"JSP"/g' src/core/nginx.h


vi +48 src/http/ngx_http_header_filter_module.c
static char ngx_http_server_string[] = "Server: nginx" CRLF;
static char ngx_http_server_full_string[] = "Server: " NGINX_VER CRLF;

修改
static char ngx_http_server_string[] = "Server: Ninja Web Server" CRLF;
static char ngx_http_server_full_string[] = "Server: Ninja Web Server" CRLF;
[root@CentOS7 nginx-1.14.2]#vim src/http/ngx_http_header_filter_module.c
49 static u_char ngx_http_server_string[] = "Server: Darius/10.0" CRLF;
# 修改src/core/nginx.h文件无需开启隐藏功能,起到修改版本信息的效果
[root@CentOS7 nginx-1.14.2]# vim src/core/nginx.h
#define NGINX_VERSION "10.0"
#define NGINX_VER "Darius/" NGINX_VERSION
sed -i -e 's/1.12.2//g' -e 's/nginx\//JSP/g' -e 's/"NGINX"/"JSP"/g' src/core/nginx.h
vi +48 src/http/ngx_http_header_filter_module.c
static char ngx_http_server_string[] = "Server: nginx" CRLF;
static char ngx_http_server_full_string[] = "Server: " NGINX_VER CRLF;
修改
static char ngx_http_server_string[] = "Server: Ninja Web Server" CRLF;
static char ngx_http_server_full_string[] = "Server: Ninja Web Server" CRLF;只允许我们的域名的访问
 if ($host !~ ^(nixcraft.in|www.nixcraft.in|images.nixcraft.in)$ ) {
         return 444;
      }
if ($host !~ ^(nixcraft.in|www.nixcraft.in|images.nixcraft.in)$ ) {
return 444;
}vim /usr/local/nginx/conf/nginx.conf
http{
server_tokens off;
# tricks
server_tokens off;
#Server头伪装
server_tag 'Apache';
server_info off;
proxy_hide_header "X-Powered-By";
proxy_hide_header "Server";
}vim /usr/local/nginx/conf/nginx.conf
http{
server_tokens off;
# tricks
server_tokens off;
#Server头伪装
server_tag 'Apache';
server_info off;
proxy_hide_header "X-Powered-By";
proxy_hide_header "Server";
}2. 更改Nginx默认用户
root@Debian:~# useradd nginx -s /sbin/nologin -M
root@Debian:~# grep "user" /usr/local/nginx/conf/nginx.conf
user nginx nginx;
定义user和工作group 进程使用的凭证。如果group省略,user则使用名称等于的组
root@Debian:~# useradd nginx -s /sbin/nologin -M
root@Debian:~# grep "user" /usr/local/nginx/conf/nginx.conf
user nginx nginx;
定义user和工作group 进程使用的凭证。如果group省略,user则使用名称等于的组3. 优化worker进程个数
worker_processes 4 一般为CPU核数 或 CPU核数*2
lscpu
root@Debian:~# grep 'physical id' /proc/cpuinfo|sort -nr|uniq -c|wc -l #查看物理CPU颗数
1
root@Debian:~# grep 'core id' /proc/cpuinfo | sort -u | wc -l #查看单核心数量
4
root@Debian:~# grep "processor" /etc/cpuinfo|sort -nr|uniq -c|wc -l #逻辑核心数
4
worker_processes 4 一般为CPU核数 或 CPU核数*2
lscpu
root@Debian:~# grep 'physical id' /proc/cpuinfo|sort -nr|uniq -c|wc -l #查看物理CPU颗数
1
root@Debian:~# grep 'core id' /proc/cpuinfo | sort -u | wc -l #查看单核心数量
4
root@Debian:~# grep "processor" /etc/cpuinfo|sort -nr|uniq -c|wc -l #逻辑核心数
44. CPU核数绑定
5. Nginx事件处理模型优化
6. 调整进程最大连接数
并发=worker_process * worker_connections
7. worker进程最大打开文件数
worker_rlimit_nofile 65535; 设置为ulimit -HSn结果
8. 开启高效文件传输模式
sendfile参数用于开启文件的高效传输模式,同时将tcp_nopush和tcp_nodelay两个指定设为on,可防止网络及磁盘I/O阻塞,提升Nginx工作效 率。3个参数配合使用
http {
sendfile on;
tcp_nopush on;
tcp_nodelay on;
}
http {
sendfile on;
tcp_nopush on;
tcp_nodelay on;
}9. 设置连接超时
http {
keepalive_timeout 60; #设置客户端连接保持会话的超时时间
client_header_timeout 15; #读取客户端请求头数据超时时间,超时则返回“Request time out(408)”
clietn_body_timeout 15; #读取客户端请求主体超时时间
send_timeout 15; #指定客户端响应时间
}
#将无用的连接尽快设置为超时,可以保护服务器的系统资源(CPU、内存、磁盘)

控制缓冲区溢出攻击
## Start: Size Limits & Buffer Overflows ##
  client_body_buffer_size  1K;
  client_header_buffer_size 1k;
  client_max_body_size 1k;
  large_client_header_buffers 2 1k;
 ## END: Size Limits & Buffer Overflows ##

 1、client_body_buffer_size 1k-(默认8k或16k)这个指令可以指定连接请求实体的缓冲区大小。如果连接请求超过缓存区指定的值,那么这些请求实体的整体或部分将尝试写入一个临时文件。

2、client_header_buffer_size 1k-指令指定客户端请求头部的缓冲区大小。绝大多数情况下一个请求头不会大于1k,不过如果有来自于wap客户端的较大的cookie它可能会大于1k,Nginx将分配给它一个更大的缓冲区,这个值可以在large_client_header_buffers里面设置。

3、client_max_body_size 1k-指令指定允许客户端连接的最大请求实体大小,它出现在请求头部的Content-Length字段。

如果请求大于指定的值,客户端将收到一个”Request Entity Too Large” (413)错误。记住,浏览器并不知道怎样显示这个错误。

4、large_client_header_buffers-指定客户端一些比较大的请求头使用的缓冲区数量和大小。请求字段不能大于一个缓冲区大小,如果客户端发送一个比较大的头,nginx将返回”Request URI too large” (414)

同样,请求的头部最长字段不能大于一个缓冲区,否则服务器将返回”Bad request” (400)。缓冲区只在需求时分开。默认一个缓冲区大小为操作系统中分页文件大小,通常是4k或8k,如果一个连接请求最终将状态转换为keep-alive,它所占用的缓冲区将被释放
http {
keepalive_timeout 60; #设置客户端连接保持会话的超时时间
client_header_timeout 15; #读取客户端请求头数据超时时间,超时则返回“Request time out(408)”
clietn_body_timeout 15; #读取客户端请求主体超时时间
send_timeout 15; #指定客户端响应时间
}
#将无用的连接尽快设置为超时,可以保护服务器的系统资源(CPU、内存、磁盘)
控制缓冲区溢出攻击
## Start: Size Limits & Buffer Overflows ##
client_body_buffer_size 1K;
client_header_buffer_size 1k;
client_max_body_size 1k;
large_client_header_buffers 2 1k;
## END: Size Limits & Buffer Overflows ##
1、client_body_buffer_size 1k-(默认8k或16k)这个指令可以指定连接请求实体的缓冲区大小。如果连接请求超过缓存区指定的值,那么这些请求实体的整体或部分将尝试写入一个临时文件。
2、client_header_buffer_size 1k-指令指定客户端请求头部的缓冲区大小。绝大多数情况下一个请求头不会大于1k,不过如果有来自于wap客户端的较大的cookie它可能会大于1k,Nginx将分配给它一个更大的缓冲区,这个值可以在large_client_header_buffers里面设置。
3、client_max_body_size 1k-指令指定允许客户端连接的最大请求实体大小,它出现在请求头部的Content-Length字段。
如果请求大于指定的值,客户端将收到一个”Request Entity Too Large” (413)错误。记住,浏览器并不知道怎样显示这个错误。
4、large_client_header_buffers-指定客户端一些比较大的请求头使用的缓冲区数量和大小。请求字段不能大于一个缓冲区大小,如果客户端发送一个比较大的头,nginx将返回”Request URI too large” (414)
同样,请求的头部最长字段不能大于一个缓冲区,否则服务器将返回”Bad request” (400)。缓冲区只在需求时分开。默认一个缓冲区大小为操作系统中分页文件大小,通常是4k或8k,如果一个连接请求最终将状态转换为keep-alive,它所占用的缓冲区将被释放10.优化服务器域名的bash表大小
设置存放域名(server names)的最大哈希表大小
server_names_hash_bucket_size size 512;
#默认是512KB 一般要看系统给出确切的值。这里一般是cpu L1的4-5倍
设置存放域名(server names)的最大哈希表大小
server_names_hash_bucket_size size 512;
#默认是512KB 一般要看系统给出确切的值。这里一般是cpu L1的4-5倍11. 设置请求 上传大小
client_header_buffer_size 32k; #设置读取客户端请求标头的缓冲区大小
large_client_header_buffers 4 32k; #设置读取客户端请求标头的最大值number和size缓冲区
client_max_body_size 300m; #设置上传大小(根据业务调整)
client_header_buffer_size 32k; #设置读取客户端请求标头的缓冲区大小
large_client_header_buffers 4 32k; #设置读取客户端请求标头的最大值number和size缓冲区
client_max_body_size 300m; #设置上传大小(根据业务调整)12. 开启gzip压缩
以下字段的写入配置段可以为:http server location
gzip            on;
gzip_vary       on;
gzip_min_length 1000;
gzip_buffers    16 10k;
gzip_comp_level 3;
gzip_proxied    any;
gzip_types      text/html;
gzip_http_version 1.0;
gzip_disable    "msie6";
gzip on;
gzip_vary on;
gzip_min_length 1000;
gzip_buffers 16 10k;
gzip_comp_level 3;
gzip_proxied any;
gzip_types text/html;
gzip_http_version 1.0;
gzip_disable "msie6";12.1 GZip 压缩的增强插件
- http_gzip_static_module
- http_gunzip_module
# 配置段: http, server, location
# 值: on, off, always
gzip_static  ${value};

# 配置段: http, server, location
# 值: on, off
gunzip  ${value};

http_gzip_static_module 发送一个已经压缩好的文件,而 http_gunzip_module 可以解压文件以让 Nginx 发送给不支持压缩的客户端
# 配置段: http, server, location
# 值: on, off, always
gzip_static ${value};
# 配置段: http, server, location
# 值: on, off
gunzip ${value};
http_gzip_static_module 发送一个已经压缩好的文件,而 http_gunzip_module 可以解压文件以让 Nginx 发送给不支持压缩的客户端- 完整配置
gzip on;
    gzip_vary on;
    gzip_proxied any;
    gzip_disable "msie6";
    gzip_min_length  1100;
    gzip_buffers     4 32k;
    gzip_http_version 1.1;
    gzip_comp_level 6;
    gzip_types text/plain text/css text/xml text/javascript application/json application/javascript application/x-javascript application/xml application/xml+rss image/jpeg image/png font/ttf font/otf image/svg+xml;
    gzip_static                 always;
    gunzip                      on;
gzip on;
gzip_vary on;
gzip_proxied any;
gzip_disable "msie6";
gzip_min_length 1100;
gzip_buffers 4 32k;
gzip_http_version 1.1;
gzip_comp_level 6;
gzip_types text/plain text/css text/xml text/javascript application/json application/javascript application/x-javascript application/xml application/xml+rss image/jpeg image/png font/ttf font/otf image/svg+xml;
gzip_static always;
gunzip on;13. Nginx Fastcgi相关参数
http {
fastcgi_connect_timeout 300; #连接到后端fastcgi的超时时间
fastcgi_send_timeout 300; #已经和fastcgi建立连接后多久不传送数据,就会被断开
fastcgi_read_timeout 300; #接收fastcgi应答的超时时间
fastcgi_buffer_size 64k; 指定读取FastCGI服务端收到的第一部分响应信息的缓冲区大小
fastcgi_buffers 4 64k; 指定读取从FastCGI服务端收到的响应信息的缓冲区大小以及缓冲区数量
fastcgi_busy_buffers_size 128k #繁忙时的buffer,可以是fastcgi_buffer的两倍;
fastcgi_temp_file_write_size 128k; #fastcgi临时文件的大小,可设置128-256k
fastcgi_temp_path /data/ngx_fcgi_tmp; #fastcgi临时文件目录
fastcgi_cache_path /data/ngx_fcgi_cache levels=2:2 keys_zone=ngx_fcgi_cache:512m inactive=1d max_s
ize=40g; #缓存目录,可以设置目录哈希层级。比如2:2会生成256*256个子目录,keys_zene是这个缓存空间的名字,
cache是用多少内存(这样热门的内容nginx直接放入内存,提高访问速度),inactive表示默认失效时间,max_size表示
最多用多少硬盘空间,需要注意的是fastcgi_cache缓存是先卸载fastcgi_temp_path再移到fastcgi_cache_path。
所以这两个目录最好在同一个分区
}

server {
location ~ .*\.(php|php5)?$ {
root html/www;
fastcgi_pass 127.0.0.1:9000;
fastcgi_index index.php;
include fastcgi.conf;
fastcgi_cache ngx_fcgi_cache;#表示开启缓存并为其指定一个名称,可以有效降低cpu的负载,并且防止502的发生,但是也可能会带来其他问题
fastcgi_cache_valid 200 302 1h; #将对应的应答码缓存时间
fastcgi_cache_valid 301 1d; #将301缓存1天
fastcgi_cache_valid any 1m; #将其他应答缓存1分钟
fastcgi_cache_min_uses 1; #请求数量
fastcgi_cache_use_stale error timeout invalid_header http_500; #错误判断
fastcgi_cache_key http://$host$request_uri;
}
}
http {
fastcgi_connect_timeout 300; #连接到后端fastcgi的超时时间
fastcgi_send_timeout 300; #已经和fastcgi建立连接后多久不传送数据,就会被断开
fastcgi_read_timeout 300; #接收fastcgi应答的超时时间
fastcgi_buffer_size 64k; 指定读取FastCGI服务端收到的第一部分响应信息的缓冲区大小
fastcgi_buffers 4 64k; 指定读取从FastCGI服务端收到的响应信息的缓冲区大小以及缓冲区数量
fastcgi_busy_buffers_size 128k #繁忙时的buffer,可以是fastcgi_buffer的两倍;
fastcgi_temp_file_write_size 128k; #fastcgi临时文件的大小,可设置128-256k
fastcgi_temp_path /data/ngx_fcgi_tmp; #fastcgi临时文件目录
fastcgi_cache_path /data/ngx_fcgi_cache levels=2:2 keys_zone=ngx_fcgi_cache:512m inactive=1d max_s
ize=40g; #缓存目录,可以设置目录哈希层级。比如2:2会生成256*256个子目录,keys_zene是这个缓存空间的名字,
cache是用多少内存(这样热门的内容nginx直接放入内存,提高访问速度),inactive表示默认失效时间,max_size表示
最多用多少硬盘空间,需要注意的是fastcgi_cache缓存是先卸载fastcgi_temp_path再移到fastcgi_cache_path。
所以这两个目录最好在同一个分区
}
server {
location ~ .*\.(php|php5)?$ {
root html/www;
fastcgi_pass 127.0.0.1:9000;
fastcgi_index index.php;
include fastcgi.conf;
fastcgi_cache ngx_fcgi_cache;#表示开启缓存并为其指定一个名称,可以有效降低cpu的负载,并且防止502的发生,但是也可能会带来其他问题
fastcgi_cache_valid 200 302 1h; #将对应的应答码缓存时间
fastcgi_cache_valid 301 1d; #将301缓存1天
fastcgi_cache_valid any 1m; #将其他应答缓存1分钟
fastcgi_cache_min_uses 1; #请求数量
fastcgi_cache_use_stale error timeout invalid_header http_500; #错误判断
fastcgi_cache_key http://$host$request_uri;
}
}14. 配置Nginx expires缓存功能
server {
location ~ .*\.(gif|jpg|jpeg|png|bmp|swf)$ { #指定缓存文件的类型
expires 365d; #指定缓存时间
}
location ~ .*\.(js|css)?$ {
expires 3d;
}
}
server {
location ~ .*\.(gif|jpg|jpeg|png|bmp|swf)$ { #指定缓存文件的类型
expires 365d; #指定缓存时间
}
location ~ .*\.(js|css)?$ {
expires 3d;
}
}15.Nginx日志相关优化与安全
不记录不需要的访问日志
对于健康检查或者某些图片、JS、CSS日志,一般不需要记录日志,因为在统计PV时是按照页面计算的,而且写入频繁会消耗IO,降低服务器性能
location ~ .*\.(js|jpg|JPG|jpeg|JPEG|css|bmp|gif|GIF)$ {
access_log off;
}
不记录不需要的访问日志
对于健康检查或者某些图片、JS、CSS日志,一般不需要记录日志,因为在统计PV时是按照页面计算的,而且写入频繁会消耗IO,降低服务器性能
location ~ .*\.(js|jpg|JPG|jpeg|JPEG|css|bmp|gif|GIF)$ {
access_log off;
}16.Nginx站点目录及文件URL访问控制
1)根据扩展名限制程序或者文件被访问
资源文件夹如用户上传的头像,防止恶意上传脚本病毒文件被解析执行
server {
location ~ ^/images/.*\.(php|php5|sh|pl|py)$ { #指定目录限制访问
deny all;
}
location ~ ^/static/.*\.(php|php5|sh|pl|py)$ {
deny all;
}
location ~ ^/data/.*\.(php|php5|sh|pl|py)$ {
deny all;
}
location ~ .*\.(php|php5)?$ { #必须配置在解析之前
root html/www;
fastcgi_pass 127.0.0.1:9000;
fastcgi_index index.php;
include fastcgi.conf;
}
}

2)禁止访问目录并返回指定HTTP代码

server {
location /admin/ { return 404; }
}
3)限制网站来源IP

server {
location ~ ^/admin/ {
allow 202.111.12.211;
#allow 192.168.1.0/24; #也可以限制IP段
deny all;
}
}
企业问题案列:Nginx做方向代理的时候可以限制客户端IP吗?
方法一:用if来控制
if ( $remotea_addr = 10.0.0.110 ) {
return 403;
}
if ( $remotea_addr = 10.0.0.111 ) {
set $allow_access_root 'true';
}

方法二:利用deny和allow
location / {
root html/blog;
index index.php index.html index.html;
deny 10.0.0.7;
allow all;
}
1)根据扩展名限制程序或者文件被访问
资源文件夹如用户上传的头像,防止恶意上传脚本病毒文件被解析执行
server {
location ~ ^/images/.*\.(php|php5|sh|pl|py)$ { #指定目录限制访问
deny all;
}
location ~ ^/static/.*\.(php|php5|sh|pl|py)$ {
deny all;
}
location ~ ^/data/.*\.(php|php5|sh|pl|py)$ {
deny all;
}
location ~ .*\.(php|php5)?$ { #必须配置在解析之前
root html/www;
fastcgi_pass 127.0.0.1:9000;
fastcgi_index index.php;
include fastcgi.conf;
}
}
2)禁止访问目录并返回指定HTTP代码
server {
location /admin/ { return 404; }
}
3)限制网站来源IP
server {
location ~ ^/admin/ {
allow 202.111.12.211;
#allow 192.168.1.0/24; #也可以限制IP段
deny all;
}
}
企业问题案列:Nginx做方向代理的时候可以限制客户端IP吗?
方法一:用if来控制
if ( $remotea_addr = 10.0.0.110 ) {
return 403;
}
if ( $remotea_addr = 10.0.0.111 ) {
set $allow_access_root 'true';
}
方法二:利用deny和allow
location / {
root html/blog;
index index.php index.html index.html;
deny 10.0.0.7;
allow all;
}17.防止恶意解析访问企业网站(针对80,443)
方法一
server {
listen 80 default_server;
server_name _;
return 501;
}

方法二
server {
listen 80 default_server;
server_name _;
rewrite ^(.*) http://www.sundayle.com$1 permanent;
}

方法三
server {
if ($host !~ ^www/.sundayle/.com$) {
rewrite ^(.*) http://www.sundayle.com$1 permanent;
}

https 443 端口 Nginx 配置如下
# 注意:ssl_certificate ssl_certificate_key 这两行配置必须要有,否则 Nginx 会拒绝所有443的连接
server {
    listen 443 ssl default_server;
    server_name _;
    ssl_certificate   cert/2546685_www.678fly.cn.pem;
    ssl_certificate_key  cert/2546685_www.678fly.cn.key;
    return 403;
    #rewrite ^(.*) https://www.678fly.cn;
}
方法一
server {
listen 80 default_server;
server_name _;
return 501;
}
方法二
server {
listen 80 default_server;
server_name _;
rewrite ^(.*) http://www.sundayle.com$1 permanent;
}
方法三
server {
if ($host !~ ^www/.sundayle/.com$) {
rewrite ^(.*) http://www.sundayle.com$1 permanent;
}
https 443 端口 Nginx 配置如下
# 注意:ssl_certificate ssl_certificate_key 这两行配置必须要有,否则 Nginx 会拒绝所有443的连接
server {
listen 443 ssl default_server;
server_name _;
ssl_certificate cert/2546685_www.678fly.cn.pem;
ssl_certificate_key cert/2546685_www.678fly.cn.key;
return 403;
#rewrite ^(.*) https://www.678fly.cn;
}18.Nginx图片及目录防盗链
网站图片被盗链最直接的影响就是网络带宽占用加大了,宽带费用变高了,网络流量忽高忽低
利用referer防盗链

location ~.* \.(jpg|gif|png|swf|flv|wma|wmv|asf|mp3|mmf|zip|rar)$ {
valid_referers none blocked *.xxx.cn xxx.cn;
if ($invalid_referer) {s
rewrite ^/ http://www.xxx.cn/img/nolink.jpg
}
}
网站图片被盗链最直接的影响就是网络带宽占用加大了,宽带费用变高了,网络流量忽高忽低
利用referer防盗链
location ~.* \.(jpg|gif|png|swf|flv|wma|wmv|asf|mp3|mmf|zip|rar)$ {
valid_referers none blocked *.xxx.cn xxx.cn;
if ($invalid_referer) {s
rewrite ^/ http://www.xxx.cn/img/nolink.jpg
}
}19. Nginx错误页面的优雅显示
server {
error_page 403 /403.html; #当出现403错误时,会跳转到403.html页面
}
server {
error_page 403 /403.html; #当出现403错误时,会跳转到403.html页面
}20. Nginx防爬虫优化
robots.txt机器人协议
网络爬虫排除标准,告诉搜索引擎哪些目录可以抓取,哪些禁止抓取
禁止下载协议代理

if ($http_user_agent ~* LWP::Simple|BBBike|wget) {
return 403;
}
防止N多爬虫代理访问网站
if ($http_user_agent ~*
“qihoobot|Baiduspider|Googlebot|Googlebot-Mobile|Googlebot-Image|Mediapartners-Google|Adsbot-Google|Yahoo! Slurp China|YoudaoBot|Sosospider|Sogou spider|Sogou web spider|MSNBot”) {
return 403;
}
禁止不同浏览器访问
if ($http_user_agent ~* “Firefox|MSIE”)
{
rewrite ^(.*) http://blog.etiantian.org/$1 permanent
}
robots.txt机器人协议
网络爬虫排除标准,告诉搜索引擎哪些目录可以抓取,哪些禁止抓取
禁止下载协议代理
if ($http_user_agent ~* LWP::Simple|BBBike|wget) {
return 403;
}
防止N多爬虫代理访问网站
if ($http_user_agent ~*
“qihoobot|Baiduspider|Googlebot|Googlebot-Mobile|Googlebot-Image|Mediapartners-Google|Adsbot-Google|Yahoo! Slurp China|YoudaoBot|Sosospider|Sogou spider|Sogou web spider|MSNBot”) {
return 403;
}
禁止不同浏览器访问
if ($http_user_agent ~* “Firefox|MSIE”)
{
rewrite ^(.*) http://blog.etiantian.org/$1 permanent
}21. 限制HTTP请求方法
if ($request_method !~ ^(GET|HEAD|POST)$ ) {
return 501;
}
只允许GET等,允许DELETE、SEARCH等
为防止黑客通过上传服务器执行木马,也可以在上传服务器上做限制HTTP的GET
if ($request_method ~* ^(GET)$ ) {
return 501;
}
if ($request_method !~ ^(GET|HEAD|POST)$ ) {
return 501;
}
只允许GET等,允许DELETE、SEARCH等
为防止黑客通过上传服务器执行木马,也可以在上传服务器上做限制HTTP的GET
if ($request_method ~* ^(GET)$ ) {
return 501;
}22. 防DOS攻击
使用limit_conn_zone进行控制,控制单个IP或域名的访问次数,限制连续访问

limit_conn_zone $binary_remote_addr zone=perip:10m;
limit_conn_zone $server_remote_addr zone=perserver:10m;
server {
limit_conn perip 10; 允许每一个IP地址最多同时打开有10个连接。
limit_conn perserver 100;
}
#还可以使用limit_req_zone进行控制,控制单个IP的访问速
使用limit_conn_zone进行控制,控制单个IP或域名的访问次数,限制连续访问
limit_conn_zone $binary_remote_addr zone=perip:10m;
limit_conn_zone $server_remote_addr zone=perserver:10m;
server {
limit_conn perip 10; 允许每一个IP地址最多同时打开有10个连接。
limit_conn perserver 100;
}
#还可以使用limit_req_zone进行控制,控制单个IP的访问速24. Nginx程序架构优化
解耦,一堆程序代码按照业务用途分开,然后提供服务,例如:注册登录、上传、下载、浏览列表、商品内容、订单支付等都应该是独立的程序服务, 只不过在客户端看来是一个整体而已,小公司最起码要做到的解耦是 01.网页页面服务 02.图片附件及下载服务 03.上传图片服务
25. fastcgi 调优
fastcgi_connect_timeout 600;
fastcgi_send_timeout 600;
fastcgi_read_timeout 600;
fastcgi_buffer_size 64k;
fastcgi_buffers 4 64k;
fastcgi_busy_buffers_size 128k;
fastcgi_temp_file_write_size 128k;
fastcgi_temp_path /usr/local/nginx1.10/nginx_tmp;
fastcgi_intercept_errors on;
fastcgi_cache_path /usr/local/nginx1.10/fastcgi_cache levels=1:2 keys_zone=cache_fastcgi:128minactive=1d max_size=10g;
fastcgi_connect_timeout 600;
fastcgi_send_timeout 600;
fastcgi_read_timeout 600;
fastcgi_buffer_size 64k;
fastcgi_buffers 4 64k;
fastcgi_busy_buffers_size 128k;
fastcgi_temp_file_write_size 128k;
fastcgi_temp_path /usr/local/nginx1.10/nginx_tmp;
fastcgi_intercept_errors on;
fastcgi_cache_path /usr/local/nginx1.10/fastcgi_cache levels=1:2 keys_zone=cache_fastcgi:128minactive=1d max_size=10g;fastcgi_connect_time 600:指定连接到后端FastCGI的超时时间
fastcgi_send_timeout 600:向fastcgi传送请求的超时时间;
fastcgi_read_timeout 600:指定接收FastCGI应答的超时时间。
fastcgi_buffer_size 64k :指定读取fastcgi应答第一部分需要用多大的缓冲区,默认的缓冲区大小为fastcgi_buffers指令中的每块大小,可以将这个值设置更小。
fastcgi_buffers 4 64K :指定本地需要用多少和多大的缓冲区来缓冲fastcgi的应答请求,如果一个php脚本所产生的页面大小为256KB,那么会分配4个64KB的缓冲区来缓存,如果页面大小大于256KB,那么大于256KB的部分会缓存到fastcgi_temp_path指定的路径中,但是这并不是好方法,因为内存中的数据处理速度要快于磁盘。一般这个值应该为站点中php脚本所产生的页面大小的中间值,如果站点大部分脚本所产生的页面大小为256KB,那么可以把这个值设置为“8 32K”、“4 64k”等。(要根据实际中php页面大小来调整)
fastcgi_busy_buffers_size 128K : 建议设置为fastcgi_buffers的两倍,繁忙时候的buffer。
fastcgi_temp_path:缓存临时目录
fastcgi_intercept_errors on:这个指定指定是否传递4XX和5XX错误信息到客户端,或者允许nginx使用error_page处理错误信息。注意:静态文件不存在会返回404页面,但是php页面则返回空白页!
fastcgi_cache_path /usr/local/nginx1.10/fastcgi_cachelevels=1:2 keys_zone=cache_fastcgi:128minactive=1d max_size=10g :fastcgi_cache缓存目录,可以设置目录层级,比如1:2会生成16*256个子目录,cache_fastcgi是这个缓存空间的名字,cache是用多少内存(这样热门的内容nginx直接放内存,提高访问速度),inactive表示默认失效时间,如果缓存数据在失效时间内没有被访问,将被删除,max_size表示最多用多少硬盘空间。
fastcgi_cache cache_fastcgi:表示开启fastcgi缓存并为其指定一个名称。开启缓存非常有用,可以有效降低cpu的负载,并且防止502的错误发生。cache_fastcgi为proxy_cache_path指令创建缓存区名称。
fastcgi_cache_valid 200 302 1h:用来指定应答代码的缓存时间,实际中的值将表示200和302应答缓存一小时,要和fastcgi_cache配合使用。
fastcgi_cache_valid 301 1d:将301应答缓存1天。
fastcgi_cache_vaild any 1m :其他应答缓存为1分钟
fastcgi——cache_min_uses 1:该指令用于设置经过多少次请求的相同的URL将被缓存。
fastcgi_cache_key http://$host$request_uri:该指令用来设置web缓存的key值,nginx根据key值md5哈希存储,一般根据$host $request_uri 等变量组合成proxy_cache_key。
fastcgi_pass:指定fastcgi服务器监听的地址与端口,可以是本机或者是其他
26. TCP 优化
http {
    sendfile    on;
    tcp_nopush  on;
    tcp_nodelay on;
    keepalive_timeout 60;
}

server {
    listen 443 fastopen=3 reuseport;
}
http {
sendfile on;
tcp_nopush on;
tcp_nodelay on;
keepalive_timeout 60;
}
server {
listen 443 fastopen=3 reuseport;
}sendfile 可以提高 Nginx 静态资源管理效率,它是一个系统调用,直接在内核空间完成文件发送,不需要先 read 再 write,没有上下文切换开销。
tcp_nopush 是 FreeBSD 的一个 socket 选项,对应于 Linux 的 tcp_cork,Nginx 中统一用 tcp_nopush 控制,且只有在启用了 sendfile 后才会生效。启用它后,数据包会累计到一定大小后才会发送,减小额外开销,提高网络效率。
tcp_nodelay 也是一个 socket 选项,启用后会禁用 Nagle 算法,尽快发送数据。Nginx 只会针对处于 keep-alive 状态的 TCP 连接启用 tcp_nodelay。
然后你会发现,一个要等数据包累积到一定大小才发送,另一个要尽快发送,这不是矛盾的吗?事实是,这俩是可以叠加的,最终结果是:先填满包,然后尽快发送。
keepalive_timeout 用于指定服务端每个 TCP 连接的最大保持连接时间。Nginx 默认是 75 秒,而有的浏览器最多只保持 60 秒,所以我设置为 60。
fastopen=3 用于指定开启 Tcp Fast Open。设置这项的值为 3,表示只允许 3 个未经三次握手的 TCP 连接进行排队。超过这个限制,服务端会退化到采用普通的 TCP 握手流程。这是为了减少资源耗尽攻击:Tcp Fast Open 可以在第一次 SYN 的时候发送 HTTP 请求,而服务端会校验 Fast Open Cookie(FOC),如果通过就开始处理请求。如果不加限制,恶意客户端可以利用合法的 FOC 发送大量请求耗光服务端资源。关于 Tcp Fast Open 的更多信息,可以参看 RFC7413。
reuseport Nginx 在 1.9.1 版本中加入了 reuseport 功能,表示 Nginx 开始支持 TCP 的 so_reuseport 选项
27. 内核参数优化
fs.file-max = 999999:这个参数表示进程(比如一个worker进程)可以同时打开的最大句柄数,这个参数直线限制最大并发连接数,需根据实际情况配置。
net.ipv4.tcp_max_tw_buckets = 6000 :这个参数表示操作系统允许TIME_WAIT套接字数量的最大值,如果超过这个数字,TIME_WAIT套接字将立刻被清除并打印警告信息。该参数默认为180000,过多的TIME_WAIT套接字会使Web服务器变慢。注:主动关闭连接的服务端会产生TIME_WAIT状态的连接
net.ipv4.ip_local_port_range = 1024 65000 :允许系统打开的端口范围。
net.ipv4.tcp_tw_recycle = 1 :启用timewait快速回收。
net.ipv4.tcp_tw_reuse = 1 :开启重用。允许将TIME-WAIT sockets重新用于新的TCP连接。这对于服务器来说很有意义,因为服务器上总会有大量TIME-WAIT状态的连接。
net.ipv4.tcp_keepalive_time = 30:这个参数表示当keepalive启用时,TCP发送keepalive消息的频度。默认是2小时,若将其设置的小一些,可以更快地清理无效的连接。
net.ipv4.tcp_syncookies = 1 :开启SYN Cookies,当出现SYN等待队列溢出时,启用cookies来处理。
net.core.somaxconn = 40960 :web 应用中 listen 函数的 backlog 默认会给我们内核参数的。
net.core.somaxconn :限制到128,而nginx定义的NGX_LISTEN_BACKLOG 默认为511,所以有必要调整这个值。注:对于一个TCP连接,Server与Client需要通过三次握手来建立网络连接.当三次握手成功后,我们可以看到端口的状态由LISTEN转变为ESTABLISHED,接着这条链路上就可以开始传送数据了.每一个处于监听(Listen)状态的端口,都有自己的监听队列.监听队列的长度与如somaxconn参数和使用该端口的程序中listen()函数有关。somaxconn定义了系统中每一个端口最大的监听队列的长度,这是个全局的参数,默认值为128,对于一个经常处理新连接的高负载 web服务环境来说,默认的 128 太小了。大多数环境这个值建议增加到 1024 或者更多。大的侦听队列对防止拒绝服务 DoS ***也会有所帮助。
net.core.netdev_max_backlog = 262144 :每个网络接口接收数据包的速率比内核处理这些包的速率快时,允许送到队列的数据包的最大数目。
net.ipv4.tcp_max_syn_backlog = 262144 :这个参数标示TCP三次握手建立阶段接受SYN请求队列的最大长度,默认为1024,将其设置得大一些可以使出现Nginx繁忙来不及accept新连接的情况时,Linux不至于丢失客户端发起的连接请求。
net.ipv4.tcp_rmem = 10240 87380 12582912 :这个参数定义了TCP接受缓存(用于TCP接受滑动窗口)的最小值、默认值、最大值
net.ipv4.tcp_wmem = 10240 87380 12582912:这个参数定义了TCP发送缓存(用于TCP发送滑动窗口)的最小值、默认值、最大值。
net.core.rmem_default = 6291456:这个参数表示内核套接字接受缓存区默认的大小。
net.core.wmem_default = 6291456:这个参数表示内核套接字发送缓存区默认的大小。
net.core.rmem_max = 12582912:这个参数表示内核套接字接受缓存区的最大大小。
net.core.wmem_max = 12582912:这个参数表示内核套接字发送缓存区的最大大小。
net.ipv4.tcp_syncookies = 1:该参数与性能无关,用于解决TCP的SYN
fs.file-max = 999999:这个参数表示进程(比如一个worker进程)可以同时打开的最大句柄数,这个参数直线限制最大并发连接数,需根据实际情况配置。
net.ipv4.tcp_max_tw_buckets = 6000 :这个参数表示操作系统允许TIME_WAIT套接字数量的最大值,如果超过这个数字,TIME_WAIT套接字将立刻被清除并打印警告信息。该参数默认为180000,过多的TIME_WAIT套接字会使Web服务器变慢。注:主动关闭连接的服务端会产生TIME_WAIT状态的连接
net.ipv4.ip_local_port_range = 1024 65000 :允许系统打开的端口范围。
net.ipv4.tcp_tw_recycle = 1 :启用timewait快速回收。
net.ipv4.tcp_tw_reuse = 1 :开启重用。允许将TIME-WAIT sockets重新用于新的TCP连接。这对于服务器来说很有意义,因为服务器上总会有大量TIME-WAIT状态的连接。
net.ipv4.tcp_keepalive_time = 30:这个参数表示当keepalive启用时,TCP发送keepalive消息的频度。默认是2小时,若将其设置的小一些,可以更快地清理无效的连接。
net.ipv4.tcp_syncookies = 1 :开启SYN Cookies,当出现SYN等待队列溢出时,启用cookies来处理。
net.core.somaxconn = 40960 :web 应用中 listen 函数的 backlog 默认会给我们内核参数的。
net.core.somaxconn :限制到128,而nginx定义的NGX_LISTEN_BACKLOG 默认为511,所以有必要调整这个值。注:对于一个TCP连接,Server与Client需要通过三次握手来建立网络连接.当三次握手成功后,我们可以看到端口的状态由LISTEN转变为ESTABLISHED,接着这条链路上就可以开始传送数据了.每一个处于监听(Listen)状态的端口,都有自己的监听队列.监听队列的长度与如somaxconn参数和使用该端口的程序中listen()函数有关。somaxconn定义了系统中每一个端口最大的监听队列的长度,这是个全局的参数,默认值为128,对于一个经常处理新连接的高负载 web服务环境来说,默认的 128 太小了。大多数环境这个值建议增加到 1024 或者更多。大的侦听队列对防止拒绝服务 DoS ***也会有所帮助。
net.core.netdev_max_backlog = 262144 :每个网络接口接收数据包的速率比内核处理这些包的速率快时,允许送到队列的数据包的最大数目。
net.ipv4.tcp_max_syn_backlog = 262144 :这个参数标示TCP三次握手建立阶段接受SYN请求队列的最大长度,默认为1024,将其设置得大一些可以使出现Nginx繁忙来不及accept新连接的情况时,Linux不至于丢失客户端发起的连接请求。
net.ipv4.tcp_rmem = 10240 87380 12582912 :这个参数定义了TCP接受缓存(用于TCP接受滑动窗口)的最小值、默认值、最大值
net.ipv4.tcp_wmem = 10240 87380 12582912:这个参数定义了TCP发送缓存(用于TCP发送滑动窗口)的最小值、默认值、最大值。
net.core.rmem_default = 6291456:这个参数表示内核套接字接受缓存区默认的大小。
net.core.wmem_default = 6291456:这个参数表示内核套接字发送缓存区默认的大小。
net.core.rmem_max = 12582912:这个参数表示内核套接字接受缓存区的最大大小。
net.core.wmem_max = 12582912:这个参数表示内核套接字发送缓存区的最大大小。
net.ipv4.tcp_syncookies = 1:该参数与性能无关,用于解决TCP的SYN#vim /etc/systcl.conf
fs.file-max = 999999
net.ipv4.ip_forward = 0
net.ipv4.conf.default.rp_filter = 1
net.ipv4.conf.default.accept_source_route = 0
kernel.sysrq = 0
kernel.core_uses_pid = 1
net.ipv4.tcp_syncookies = 1
kernel.msgmnb = 65536
kernel.msgmax = 65536
kernel.shmmax = 68719476736
kernel.shmall = 4294967296
net.ipv4.tcp_max_tw_buckets = 6000
net.ipv4.tcp_sack = 1
net.ipv4.tcp_window_scaling = 1
net.ipv4.tcp_rmem = 10240 87380 12582912
net.ipv4.tcp_wmem = 10240 87380 12582912
net.core.wmem_default = 8388608
net.core.rmem_default = 8388608
net.core.rmem_max = 16777216
net.core.wmem_max = 16777216
net.core.netdev_max_backlog = 262144
net.core.somaxconn = 40960
net.ipv4.tcp_max_orphans = 3276800
net.ipv4.tcp_max_syn_backlog = 262144
net.ipv4.tcp_timestamps = 0
net.ipv4.tcp_synack_retries = 1
net.ipv4.tcp_syn_retries = 1
net.ipv4.tcp_tw_recycle = 1
net.ipv4.tcp_tw_reuse = 1
net.ipv4.tcp_mem = 94500000 915000000 927000000
net.ipv4.tcp_fin_timeout = 1
net.ipv4.tcp_keepalive_time = 30
net.ipv4.ip_local_port_range = 1024 65000#vim /etc/systcl.conf
fs.file-max = 999999
net.ipv4.ip_forward = 0
net.ipv4.conf.default.rp_filter = 1
net.ipv4.conf.default.accept_source_route = 0
kernel.sysrq = 0
kernel.core_uses_pid = 1
net.ipv4.tcp_syncookies = 1
kernel.msgmnb = 65536
kernel.msgmax = 65536
kernel.shmmax = 68719476736
kernel.shmall = 4294967296
net.ipv4.tcp_max_tw_buckets = 6000
net.ipv4.tcp_sack = 1
net.ipv4.tcp_window_scaling = 1
net.ipv4.tcp_rmem = 10240 87380 12582912
net.ipv4.tcp_wmem = 10240 87380 12582912
net.core.wmem_default = 8388608
net.core.rmem_default = 8388608
net.core.rmem_max = 16777216
net.core.wmem_max = 16777216
net.core.netdev_max_backlog = 262144
net.core.somaxconn = 40960
net.ipv4.tcp_max_orphans = 3276800
net.ipv4.tcp_max_syn_backlog = 262144
net.ipv4.tcp_timestamps = 0
net.ipv4.tcp_synack_retries = 1
net.ipv4.tcp_syn_retries = 1
net.ipv4.tcp_tw_recycle = 1
net.ipv4.tcp_tw_reuse = 1
net.ipv4.tcp_mem = 94500000 915000000 927000000
net.ipv4.tcp_fin_timeout = 1
net.ipv4.tcp_keepalive_time = 30
net.ipv4.ip_local_port_range = 1024 6500028.ssl优化
- 在server中加入
    listen 443 ssl http2 fastopen=3 reuseport;
    server_name xxx.com;

	# Enable SSL cache to speed up for return visitors
        ssl_session_cache   shared:SSL:20m; # speed up first time. 1m ~= 4000 connections
        ssl_session_timeout 4h;
        ssl_protocols TLSv1.2 TLSv1.3;

        # Specify cipher
        ssl_prefer_server_ciphers on;  # prefer a list of ciphers to prevent old and slow ciphers
        ssl_ciphers 'EECDH+AESGCM:EDH+AESGCM:AES256+EECDH:AES256+EDH';


        # Enable TLS
        charset utf-8;
 		ssl_certificate /usr/local/openresty/ssl/new.crt;
		ssl_certificate_key /usr/local/openresty/ssl/new.key;

	# OCSP
        ssl_stapling on;
        ssl_stapling_verify on;
		ssl_stapling_file /usr/local/openresty/ssl/stapling_ocsp;
        ssl_trusted_certificate  /usr/local/openresty/ssl/new.crt;

		resolver 114.114.114.114 valid=300s;
		#resolver 8.8.8.8 valid=300s;
		resolver_timeout 2s;

        ssl_buffer_size 4k;
        add_header Strict-Transport-Security "max-age=31536000";
listen 443 ssl http2 fastopen=3 reuseport;
server_name xxx.com;
# Enable SSL cache to speed up for return visitors
ssl_session_cache shared:SSL:20m; # speed up first time. 1m ~= 4000 connections
ssl_session_timeout 4h;
ssl_protocols TLSv1.2 TLSv1.3;
# Specify cipher
ssl_prefer_server_ciphers on; # prefer a list of ciphers to prevent old and slow ciphers
ssl_ciphers 'EECDH+AESGCM:EDH+AESGCM:AES256+EECDH:AES256+EDH';
# Enable TLS
charset utf-8;
ssl_certificate /usr/local/openresty/ssl/new.crt;
ssl_certificate_key /usr/local/openresty/ssl/new.key;
# OCSP
ssl_stapling on;
ssl_stapling_verify on;
ssl_stapling_file /usr/local/openresty/ssl/stapling_ocsp;
ssl_trusted_certificate /usr/local/openresty/ssl/new.crt;
resolver 114.114.114.114 valid=300s;
#resolver 8.8.8.8 valid=300s;
resolver_timeout 2s;
ssl_buffer_size 4k;
add_header Strict-Transport-Security "max-age=31536000";- 查看ocsp地址
openssl x509 -in new.crt -noout -ocsp_uriopenssl x509 -in new.crt -noout -ocsp_uri
- stapling_ocsp生成(godday)
openssl ocsp -issuer gd_bundle-g2-g1.crt -cert new.crt -no_nonce -text -url http://ocsp.godaddy.com -text -respout stapling_ocspopenssl ocsp -issuer gd_bundle-g2-g1.crt -cert new.crt -no_nonce -text -url http://ocsp.godaddy.com -text -respout stapling_ocsp- 验证
echo QUIT | openssl s_client -connect han.xxx.io:443 -status 2> /dev/null | grep -A 17 'OCSP response:' | grep -B 17 'Next Update'

#或者
https://myssl.com/

https://www.ssllabs.com/ssltest/index.html
echo QUIT | openssl s_client -connect han.xxx.io:443 -status 2> /dev/null | grep -A 17 'OCSP response:' | grep -B 17 'Next Update'
#或者
https://myssl.com/
https://www.ssllabs.com/ssltest/index.html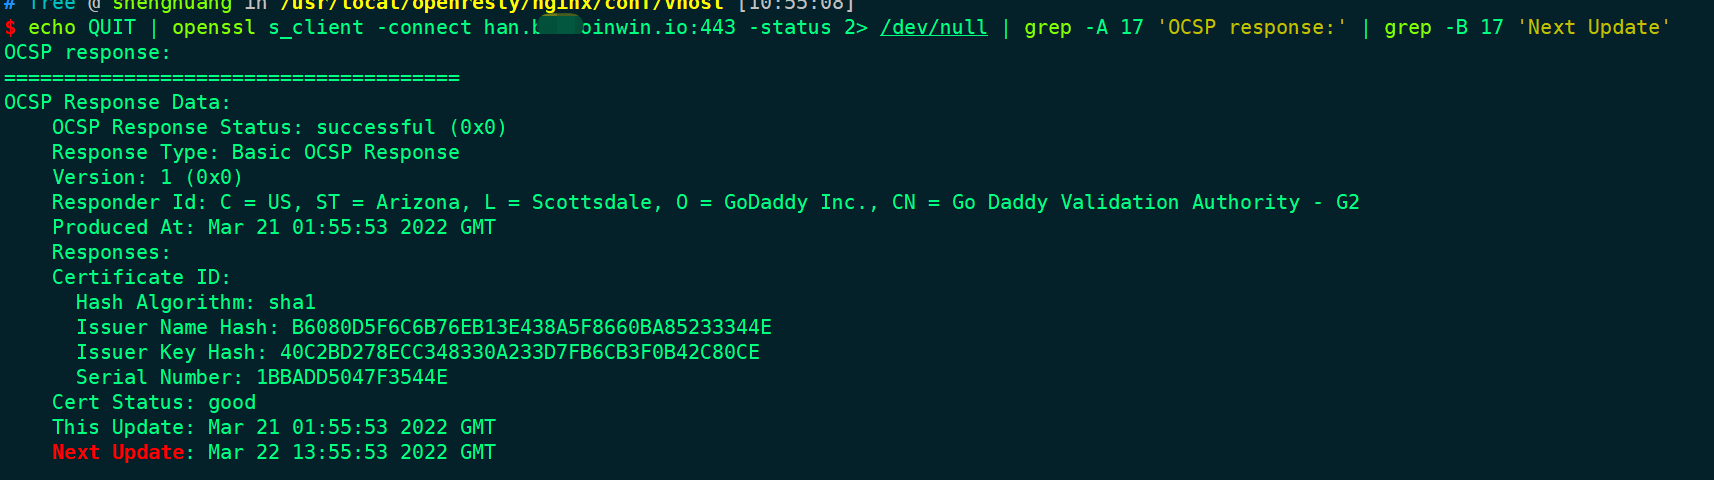
29.header
- https://developer.mozilla.org/zh-CN/docs/Web/HTTP/CSP
- https://www.owasp.org/index.php/OWASP_Secure_Headers_Project#csp
Content-Security-Policy
是一种HTTP内容安全策略响应头,允许网站管理员控制页面加载的资源,有助于防止跨站脚本攻击(Cross-site scripting 通常也称作 XSS)。XSS 是一种网站应用程序的安全漏洞攻击,是代码注入的一种。配置 Content-Security-Policy 可有助于防止 XSS ,虽然它无法替代WAF,但是它加固了网站前端安全的第一道防线
| Directive | Description |
|---|---|
| base-uri | Define the base uri for relative uri. |
| default-src | Define loading policy for all resources type in case of a resource type dedicated directive is not defined (fallback). |
| script-src | Define which scripts the protected resource can execute. |
| object-src | Define from where the protected resource can load plugins. |
| style-src | Define which styles (CSS) the user applies to the protected resource. |
| img-src | Define from where the protected resource can load images. |
| media-src | Define from where the protected resource can load video and audio. |
| frame-src | Deprecated and replaced by child-src. Define from where the protected resource can embed frames. |
| child-src | Define from where the protected resource can embed frames. |
| frame-ancestors | Define from where the protected resource can be embedded in frames. |
| font-src | Define from where the protected resource can load fonts. |
| connect-src | Define which URIs the protected resource can load using script interfaces. |
| manifest-src | Define from where the protected resource can load manifest. |
| form-action | Define which URIs can be used as the action of HTML form elements. |
| sandbox | Specifies an HTML sandbox policy that the user agent applies to the protected resource. |
| script-nonce | Define script execution by requiring the presence of the specified nonce on script elements. |
| plugin-types | Define the set of plugins that can be invoked by the protected resource by limiting the types of resources that can be embedded. |
| reflected-xss | Instructs a user agent to activate or deactivate any heuristics used to filter or block reflected cross-site scripting attacks, equivalent to the effects of the non-standard X-XSS-Protection header. |
| block-all-mixed-content | Prevent user agent from loading mixed content. |
| upgrade-insecure-requests | Instructs user agent to download insecure resources using HTTPS. |
| referrer | Define information user agent must send in Referer header. |
| report-uri | Specifies a URI to which the user agent sends reports about policy violation. |
| report-to | Specifies a group (defined in Report-To header) to which the user agent sends reports about policy violation. |
add_header Content-Security-Policy "upgrade-insecure-requests;connect-src *";add_header Content-Security-Policy "upgrade-insecure-requests;connect-src *";即消除全部警告,同时兼容了各种协议资源
基础配置
server {
	#只允许通过 https 加载资源(图片、字体、JavaScript等)
	add_header Content-Security-Policy: default-src https:;

}
server {
#只允许通过 https 加载资源(图片、字体、JavaScript等)
add_header Content-Security-Policy: default-src https:;
}高级配置
server {

add_header Content-Security-Policy "connect-src 'self' https://pagead2.googlesyndication.com; default-src 'self'; script-src 'self' 'unsafe-inline' 'unsafe-eval' https://cdn.jsdelivr.net https://hm.baidu.com https://pagead2.googlesyndication.com https://partner.googleadservices.com https://adservice.google.com https://www.googletagservices.com https://tpc.googlesyndication.com https://cpwebassets.codepen.io; img-src 'self' data: https://hm.baidu.com https://pagead2.googlesyndication.com; style-src 'self' 'unsafe-inline' https://cdn.jsdelivr.net https://hm.baidu.com https://pagead2.googlesyndication.com; font-src 'self' https://cdn.jsdelivr.net https://fonts.gstatic.com; frame-src https://codepen.io https://pagead2.googlesyndication.com https://googleads.g.doubleclick.net https://tpc.googlesyndication.com https://www.google.com; object-src 'none'";

}


add_header  Content-Security-Policy  "default-src 'self'; script-src 'self' 'unsafe-inline' 'unsafe-eval' https://a.disquscdn.com; img-src 'self' data: https://www.google-analytics.com; style-src 'self' 'unsafe-inline'; frame-src https://disqus.com";
server {
add_header Content-Security-Policy "connect-src 'self' https://pagead2.googlesyndication.com; default-src 'self'; script-src 'self' 'unsafe-inline' 'unsafe-eval' https://cdn.jsdelivr.net https://hm.baidu.com https://pagead2.googlesyndication.com https://partner.googleadservices.com https://adservice.google.com https://www.googletagservices.com https://tpc.googlesyndication.com https://cpwebassets.codepen.io; img-src 'self' data: https://hm.baidu.com https://pagead2.googlesyndication.com; style-src 'self' 'unsafe-inline' https://cdn.jsdelivr.net https://hm.baidu.com https://pagead2.googlesyndication.com; font-src 'self' https://cdn.jsdelivr.net https://fonts.gstatic.com; frame-src https://codepen.io https://pagead2.googlesyndication.com https://googleads.g.doubleclick.net https://tpc.googlesyndication.com https://www.google.com; object-src 'none'";
}
add_header Content-Security-Policy "default-src 'self'; script-src 'self' 'unsafe-inline' 'unsafe-eval' https://a.disquscdn.com; img-src 'self' data: https://www.google-analytics.com; style-src 'self' 'unsafe-inline'; frame-src https://disqus.com";add_header Content-Security-Policy "default-src 'self' xxx.xxx.com(允许的地址)
add_header X-Content-Type-Options "nosniff";
add_header X-XSS-Protection "1; mode=block";
add_header X-Frame-Options SAMEORIGIN;
add_header Strict-Transport-Security "max-age=63072000; includeSubdomains; preload";
add_header 'Referrer-Policy' 'origin';
add_header X-Download-Options noopen;
add_header X-Permitted-Cross-Domain-Policies none;add_header Content-Security-Policy "default-src 'self' xxx.xxx.com(允许的地址)
add_header X-Content-Type-Options "nosniff";
add_header X-XSS-Protection "1; mode=block";
add_header X-Frame-Options SAMEORIGIN;
add_header Strict-Transport-Security "max-age=63072000; includeSubdomains; preload";
add_header 'Referrer-Policy' 'origin';
add_header X-Download-Options noopen;
add_header X-Permitted-Cross-Domain-Policies none;script-src:外部脚本 定义针对 JavaScript 的加载策略
style-src:样式表 定义针对样式的加载策略
img-src:图像 定义针对图片的加载策略
media-src:媒体文件(音频和视频) 定义针对多媒体的加载策略
font-src:字体文件 定义针对字体的加载策略。
object-src:插件(比如 Flash) 定义针对插件的加载策略
child-src:框架 定义针对框架的加载策略
frame-ancestors:嵌入的外部资源(比如<frame>、<iframe>、<embed>和<applet>)
connect-src:HTTP 连接(通过 XHR、WebSockets、EventSource等)定义针对 Ajax/WebSocket 等请求的加载策略。不允许的情况下,浏览器会模拟一个状态为400的响应
worker-src:worker脚本
manifest-src:manifest 文件
##################################################
sandbox : 定义针对 sandbox 的限制
report-uri : 告诉浏览器如果请求的资源不被策略允许时,往哪个地址提交日志信息
form-action : 定义针对提交的 form 到特定来源的加载策略。
referrer : 定义针对 referrer 的加载策略
reflected-xss : 定义针对 XSS 过滤器使用策略。
add_header "Content-Security-Policy" "default-src 'self' *.zhixueyun.com 'unsafe-inline' 'unsafe-eval'; script-src 'self' *.zhixueyun.com; frame-ancestors 'self' *.zhixueyun.com; object-src 'none' *.zhixueyun.com";
add_header "Content-Security-Policy" "default-src 'self' ehr.abc *.abchina.com 'unsafe-inline' 'unsafe-eval' blob: data: ;"
add_header "Content-Security-Policy" "default-src 'self' *.zhixueyun.com 'unsafe-inline' 'unsafe-eval'; script-src 'self' *.zhixueyun.com; frame-ancestors 'self' *.zhixueyun.com; object-src 'none' *.zhixueyun.com";script-src:外部脚本 定义针对 JavaScript 的加载策略
style-src:样式表 定义针对样式的加载策略
img-src:图像 定义针对图片的加载策略
media-src:媒体文件(音频和视频) 定义针对多媒体的加载策略
font-src:字体文件 定义针对字体的加载策略。
object-src:插件(比如 Flash) 定义针对插件的加载策略
child-src:框架 定义针对框架的加载策略
frame-ancestors:嵌入的外部资源(比如<frame>、<iframe>、<embed>和<applet>)
connect-src:HTTP 连接(通过 XHR、WebSockets、EventSource等)定义针对 Ajax/WebSocket 等请求的加载策略。不允许的情况下,浏览器会模拟一个状态为400的响应
worker-src:worker脚本
manifest-src:manifest 文件
##################################################
sandbox : 定义针对 sandbox 的限制
report-uri : 告诉浏览器如果请求的资源不被策略允许时,往哪个地址提交日志信息
form-action : 定义针对提交的 form 到特定来源的加载策略。
referrer : 定义针对 referrer 的加载策略
reflected-xss : 定义针对 XSS 过滤器使用策略。
add_header "Content-Security-Policy" "default-src 'self' *.zhixueyun.com 'unsafe-inline' 'unsafe-eval'; script-src 'self' *.zhixueyun.com; frame-ancestors 'self' *.zhixueyun.com; object-src 'none' *.zhixueyun.com";
add_header "Content-Security-Policy" "default-src 'self' ehr.abc *.abchina.com 'unsafe-inline' 'unsafe-eval' blob: data: ;"
add_header "Content-Security-Policy" "default-src 'self' *.zhixueyun.com 'unsafe-inline' 'unsafe-eval'; script-src 'self' *.zhixueyun.com; frame-ancestors 'self' *.zhixueyun.com; object-src 'none' *.zhixueyun.com";主机名:example.org,https://example.com:443
路径名:example.org/resources/js/
通配符:*.example.org,*://*.example.com:*(表示任意协议、任意子域名、任意端口)
协议名:https:、data:
关键字'self':当前域名,需要加引号
关键字'none':禁止加载任何外部资源,需要加引号
#指令值 说明
* 允许加载任何内容
‘none‘ 允许加载任何内容
‘self‘ 允许加载相同源的内容
www.a.com 允许加载指定域名的资源
*.a.com 允许加载 a.com 任何子域名的资源
https://a.com 允许加载 a.com 的 https 资源
https: 允许加载 https 资源
data: 允许加载 data: 协议,例如:base64编码的图片
‘unsafe-inline‘ 允许加载 inline 资源,例如style属性、onclick、inline js、inline css等
‘unsafe-eval‘ 允许加载动态 js 代码,例如 eval()主机名:example.org,https://example.com:443
路径名:example.org/resources/js/
通配符:*.example.org,*://*.example.com:*(表示任意协议、任意子域名、任意端口)
协议名:https:、data:
关键字'self':当前域名,需要加引号
关键字'none':禁止加载任何外部资源,需要加引号
#指令值 说明
* 允许加载任何内容
‘none‘ 允许加载任何内容
‘self‘ 允许加载相同源的内容
www.a.com 允许加载指定域名的资源
*.a.com 允许加载 a.com 任何子域名的资源
https://a.com 允许加载 a.com 的 https 资源
https: 允许加载 https 资源
data: 允许加载 data: 协议,例如:base64编码的图片
‘unsafe-inline‘ 允许加载 inline 资源,例如style属性、onclick、inline js、inline css等
‘unsafe-eval‘ 允许加载动态 js 代码,例如 eval()Referrer-Policy
配置参数:no-referrer-when-downgrade:在同等安全等级下(例如https页面请求https地址),发送referer,但当请求方低于发送方(例如https页面请求http地址),不发送refererorigin:仅仅发送origin,即protocal+hostorigin-when-cross-origin:跨域时发送originsame-origin:当双方origin相同时发送strict-origin:当双方origin相同且安全等级相同时发送unfafe-url:任何情况下都显示完整的referernginx配置:add_header 'Referrer-Policy' 'origin';配置参数:no-referrer-when-downgrade:在同等安全等级下(例如https页面请求https地址),发送referer,但当请求方低于发送方(例如https页面请求http地址),不发送refererorigin:仅仅发送origin,即protocal+hostorigin-when-cross-origin:跨域时发送originsame-origin:当双方origin相同时发送strict-origin:当双方origin相同且安全等级相同时发送unfafe-url:任何情况下都显示完整的referernginx配置:add_header 'Referrer-Policy' 'origin';X-Permitted-Cross-Domain-Policies
一个针对flash的安全策略,用于指定当不能将"crossdomain.xml"文件(当需要从别的域名中的某个文件中读取 Flash 内容时用于进行必要设置的策略文件)放置在网站根目录等场合时采取的替代策略。配置参数:X-Permitted-Cross-Domain-Policies: master-onlymaster-only 只允许使用主策略文件(/crossdomain.xml)add_header X-Permitted-Cross-Domain-Policies none;一个针对flash的安全策略,用于指定当不能将"crossdomain.xml"文件(当需要从别的域名中的某个文件中读取 Flash 内容时用于进行必要设置的策略文件)放置在网站根目录等场合时采取的替代策略。配置参数:X-Permitted-Cross-Domain-Policies: master-onlymaster-only 只允许使用主策略文件(/crossdomain.xml)add_header X-Permitted-Cross-Domain-Policies none;X-Download-Options
用于控制浏览器下载文件是否支持直接打开,如果支持直接打开,可能会有安全隐患。配置信息:X-Download-Options: noopennoopen 用于指定IE 8以上版本的用户不打开文件而直接保存文件。在下载对话框中不显示“打开”选项。nginx配置:add_header X-Download-Options noopen;用于控制浏览器下载文件是否支持直接打开,如果支持直接打开,可能会有安全隐患。配置信息:X-Download-Options: noopennoopen 用于指定IE 8以上版本的用户不打开文件而直接保存文件。在下载对话框中不显示“打开”选项。nginx配置:add_header X-Download-Options noopen;30.time
复用tcp连接的优点:
1.减少握手次数
2.减少并发连接数,减少了服务器资源的消耗
3.降低TCP拥塞控制的影响

分两步使用keepalive:1.对客户端使用 keepalive,2.对上游服务使用 keepalive

upstream uuUP {
#对上游服务使用keepalive,并缓存32个连接
    keepalive 32;

#在一个tcp连接上,最多执行多少个http请求,默认值100
    keepalive_requests 100;

#一个http请求完成后,最多经过timeout时间,如果还没有新的请求就关闭连接,默认值60s
    keepalive_timeout 45 50;
}

#对客户端keepalive-tcp探活,30分钟后无数据会发送探活包,时间间隔使用系统默认的,发送10次探活包
    listen 80 so_keepalive=30m::10;
复用tcp连接的优点:
1.减少握手次数
2.减少并发连接数,减少了服务器资源的消耗
3.降低TCP拥塞控制的影响
分两步使用keepalive:1.对客户端使用 keepalive,2.对上游服务使用 keepalive
upstream uuUP {
#对上游服务使用keepalive,并缓存32个连接
keepalive 32;
#在一个tcp连接上,最多执行多少个http请求,默认值100
keepalive_requests 100;
#一个http请求完成后,最多经过timeout时间,如果还没有新的请求就关闭连接,默认值60s
keepalive_timeout 45 50;
}
#对客户端keepalive-tcp探活,30分钟后无数据会发送探活包,时间间隔使用系统默认的,发送10次探活包
listen 80 so_keepalive=30m::10;另一个维度来总结
一、安全方面
- 1.1. 根据实际情况,隐藏 nginx header 版本号
- 1.2. 根据实际情况,更改源码,隐藏 nginx 软件名称
- 1.3. 更改 nginx 默认用户及用户组
- 1.4. nginx 站点目录及文件 URL 访问控制(防止恶意解析)
- 1.5. 防止恶意解析访问企业网站
- 1.6. 配置 nginx 图片及目录防盗链
- 1.7. 配置 nginx 防爬虫
- 1.8. 限制 HTTP 请求方法
- 1.9. 防 DOS 攻击
二、性能方面
- 2.1. 根据 CPU 逻辑核心数,配置 nginx worker 进程个数
- 2.2. 配置 nginx worker 进程的 CPU 亲和力参数
- 2.3. 配置 ngixn worker 单个进程允许的客户端最大连接数
- 2.4. 配置 nginx worker 进程的最大打开文件数
- 2.5. 配置 nginx 事件处理模型为 epoll
三、HTTP 协议方面
- 3.1. 开启高效的文件传输模式(sendfile/tcp_nopush/tcp_nodelay)
- 3.2. 设置连接超时时间
- 3.3. 设置客户端上传文件大小
- 3.4. fastcgi 调优
四、功能方面
- 4.1. 配置 nginx gzip 压缩功能
- 4.2. 配置 nginx expires 缓存功能
- 4.3. 配置 nginx 错误页面的优雅显示
五、日志方面
5.1. 每天进行日志切割、备份/不记录不需要的访问日志/访问日志的权限设置
六、架构方面
- 6.1. nginx 程序架构优化(服务解耦)
- 6.2. 使用 CDN 为网站内容加速