 SRE文档
SRE文档![]()
- 场景
openvpn使用场景
a) 企业员工远程办公,通过远程VPN连接到公司的服务器,访问公司ERP、OA等系统。IT技术人员通过VPN远程连接到机房进行系统维护。
b) 总部与分支机构之间联通,打通分支与总部的连接
c) 多IDC机房之间的互联,实现多机房之间的互联互通,数据共享,文件传送
注意:OpenVPN适用于功能性实现,对于大流量大带宽应用,建议使用点对点专线实现互联
#一、安装
WARNING
For warning
由于不同环境及软件版本命令使用略有差异,特别是 easy-rsa 的使用在 2.0 和 3.0 的差别有点大
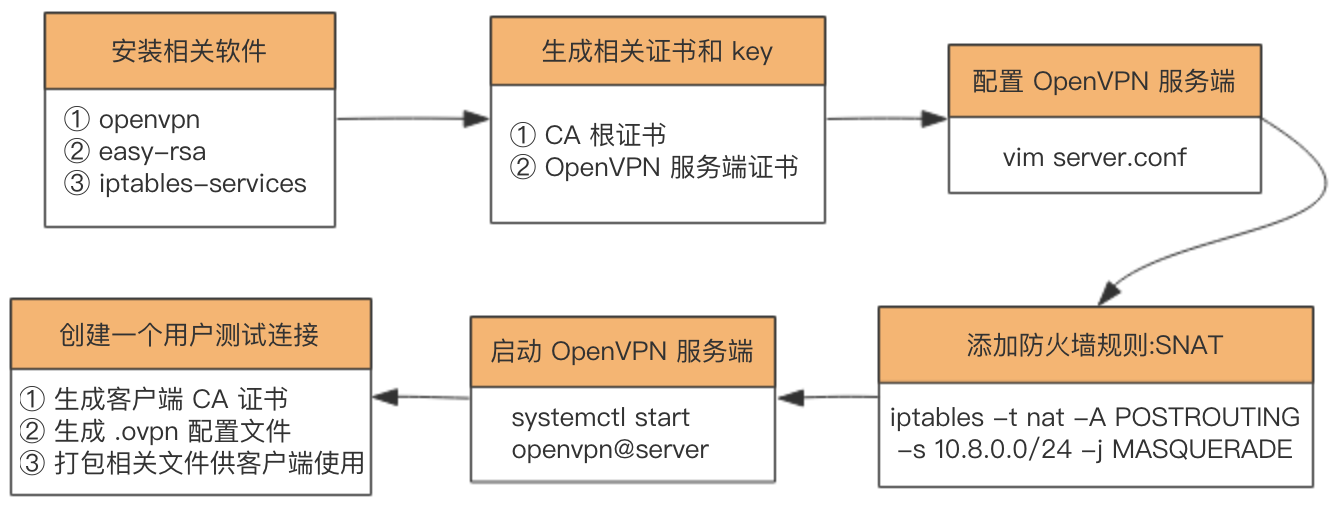
尽管不同环境及软件版本命令使用略有所差异,但是整个搭建过程都是一致的:
安装相关软件—>生成相关证书:CA 根证书、服务器证书—>配置 open VPN 服务端—>添加防火墙规则:snat—>启动 open VPN 服务端—>创建一个用户测试连接:创建客户端 CA 证书、生成 .ovpn 配置文件、打包相关文件供客户端使用
环境配置:
centos7
easy-rsa - 3.0.5
OpenVPN - 2.4.7
时间服务器一定要同步
环境配置:
centos7
easy-rsa - 3.0.5
OpenVPN - 2.4.7
时间服务器一定要同步#更换阿里源
curl -o /etc/yum.repos.d/epel.repo http://mirrors.aliyun.com/repo/epel-7.repo
yum clean all && yum makecache
[root@beta ~]# yum install -y epel-release
[root@beta ~]# yum install -y openssl lzo pam openssl-devel lzo-devel pam-devel
[root@beta ~]#yum -y install epel-release
[root@beta ~]#yum -y install openvpn easy-rsa iptables-services
#或者脚本安装
[root@beta ~]# sh openvpn-install.sh
Welcome to this OpenVPN "road warrior" installer!
I need to ask you a few questions before starting the setup.
You can leave the default options and just press enter if you are ok with them.
First, provide the IPv4 address of the network interface you want OpenVPN
listening to.
IP address:
Which protocol do you want for OpenVPN connections?
1) UDP (recommended)
2) TCP
Protocol [1-2]: 2
What port do you want OpenVPN listening to?
Port: 330
Which DNS do you want to use with the VPN?
1) Current system resolvers
2) 1.1.1.1
3) Google
4) OpenDNS
5) Verisign
DNS [1-5]: 1#更换阿里源
curl -o /etc/yum.repos.d/epel.repo http://mirrors.aliyun.com/repo/epel-7.repo
yum clean all && yum makecache
[root@beta ~]# yum install -y epel-release
[root@beta ~]# yum install -y openssl lzo pam openssl-devel lzo-devel pam-devel
[root@beta ~]#yum -y install epel-release
[root@beta ~]#yum -y install openvpn easy-rsa iptables-services
#或者脚本安装
[root@beta ~]# sh openvpn-install.sh
Welcome to this OpenVPN "road warrior" installer!
I need to ask you a few questions before starting the setup.
You can leave the default options and just press enter if you are ok with them.
First, provide the IPv4 address of the network interface you want OpenVPN
listening to.
IP address:
Which protocol do you want for OpenVPN connections?
1) UDP (recommended)
2) TCP
Protocol [1-2]: 2
What port do you want OpenVPN listening to?
Port: 330
Which DNS do you want to use with the VPN?
1) Current system resolvers
2) 1.1.1.1
3) Google
4) OpenDNS
5) Verisign
DNS [1-5]: 1输入用户名
Finally, tell me your name for the client certificate.
Please, use one word only, no special characters.
Client name: client1
Finally, tell me your name for the client certificate.
Please, use one word only, no special characters.
Client name: client1Okay, that was all I needed. We are ready to set up your OpenVPN server now.
Press any key to continue...
Loaded plugins: fastestmirror
Loading mirror speeds from cached hostfile
Package epel-release-7-11.noarch already installed and latest version
Nothing to do
Loaded plugins: fastestmirror
Loading mirror speeds from cached hostfile
Package iptables-1.4.21-28.el7.x86_64 already installed and latest version
Package 1:openssl-1.0.2k-16.el7_6.1.x86_64 already installed and latest version
Package ca-certificates-2018.2.22-70.0.el7_5.noarch already installed and latest version
Resolving Dependencies
--> Running transaction check
---> Package openvpn.x86_64 0:2.4.7-1.el7 will be installed
--> Finished Dependency Resolution
。。。。
Installed:
openvpn.x86_64 0:2.4.7-1.el7
Complete!
Using SSL: openssl OpenSSL 1.0.2k-fips 26 Jan 2017
init-pki complete; you may now create a CA or requests.
Your newly created PKI dir is: /etc/openvpn/server/easy-rsa/pki
Generating RSA private key, 2048 bit long modulus
.............................+++
................................+++
e is 65537 (0x10001)
Using SSL: openssl OpenSSL 1.0.2k-fips 26 Jan 2017
Generating a 2048 bit RSA private key
..+++
.............................................+++
writing new private key to '/etc/openvpn/server/easy-rsa/pki/private/server.key.IseSDZ9N9j'
-----
Using configuration from ./safessl-easyrsa.cnf
Check that the request matches the signature
Signature ok
The Subject's Distinguished Name is as follows
commonName :ASN.1 12:'server'
Certificate is to be certified until Sep 3 03:03:59 2029 GMT (3650 days)
Write out database with 1 new entries
Data Base Updated
Using SSL: openssl OpenSSL 1.0.2k-fips 26 Jan 2017
Generating a 2048 bit RSA private key
...............+++
....+++
writing new private key to '/etc/openvpn/server/easy-rsa/pki/private/client1.key.EdLb68mAda'
-----
Using configuration from ./safessl-easyrsa.cnf
Check that the request matches the signature
Signature ok
The Subject's Distinguished Name is as follows
commonName :ASN.1 12:'client1'
Certificate is to be certified until Sep 3 03:04:00 2029 GMT (3650 days)
Write out database with 1 new entries
Data Base Updated
Using SSL: openssl OpenSSL 1.0.2k-fips 26 Jan 2017
Using configuration from ./safessl-easyrsa.cnf
An updated CRL has been created.
CRL file: /etc/openvpn/server/easy-rsa/pki/crl.pem
Created symlink from /etc/systemd/system/multi-user.target.wants/openvpn-iptables.service to /etc/systemd/system/openvpn-iptables.service.
Job for openvpn-iptables.service failed because the control process exited with error code. See "systemctl status openvpn-iptables.service" and "journalctl -xe" for details.
Created symlink from /etc/systemd/system/multi-user.target.wants/openvpn-server@server.service to /usr/lib/systemd/system/openvpn-server@.service.
Finished!
Your client configuration is available at: /root/client1.ovpn
If you want to add more clients, you simply need to run this script again!Okay, that was all I needed. We are ready to set up your OpenVPN server now.
Press any key to continue...
Loaded plugins: fastestmirror
Loading mirror speeds from cached hostfile
Package epel-release-7-11.noarch already installed and latest version
Nothing to do
Loaded plugins: fastestmirror
Loading mirror speeds from cached hostfile
Package iptables-1.4.21-28.el7.x86_64 already installed and latest version
Package 1:openssl-1.0.2k-16.el7_6.1.x86_64 already installed and latest version
Package ca-certificates-2018.2.22-70.0.el7_5.noarch already installed and latest version
Resolving Dependencies
--> Running transaction check
---> Package openvpn.x86_64 0:2.4.7-1.el7 will be installed
--> Finished Dependency Resolution
。。。。
Installed:
openvpn.x86_64 0:2.4.7-1.el7
Complete!
Using SSL: openssl OpenSSL 1.0.2k-fips 26 Jan 2017
init-pki complete; you may now create a CA or requests.
Your newly created PKI dir is: /etc/openvpn/server/easy-rsa/pki
Generating RSA private key, 2048 bit long modulus
.............................+++
................................+++
e is 65537 (0x10001)
Using SSL: openssl OpenSSL 1.0.2k-fips 26 Jan 2017
Generating a 2048 bit RSA private key
..+++
.............................................+++
writing new private key to '/etc/openvpn/server/easy-rsa/pki/private/server.key.IseSDZ9N9j'
-----
Using configuration from ./safessl-easyrsa.cnf
Check that the request matches the signature
Signature ok
The Subject's Distinguished Name is as follows
commonName :ASN.1 12:'server'
Certificate is to be certified until Sep 3 03:03:59 2029 GMT (3650 days)
Write out database with 1 new entries
Data Base Updated
Using SSL: openssl OpenSSL 1.0.2k-fips 26 Jan 2017
Generating a 2048 bit RSA private key
...............+++
....+++
writing new private key to '/etc/openvpn/server/easy-rsa/pki/private/client1.key.EdLb68mAda'
-----
Using configuration from ./safessl-easyrsa.cnf
Check that the request matches the signature
Signature ok
The Subject's Distinguished Name is as follows
commonName :ASN.1 12:'client1'
Certificate is to be certified until Sep 3 03:04:00 2029 GMT (3650 days)
Write out database with 1 new entries
Data Base Updated
Using SSL: openssl OpenSSL 1.0.2k-fips 26 Jan 2017
Using configuration from ./safessl-easyrsa.cnf
An updated CRL has been created.
CRL file: /etc/openvpn/server/easy-rsa/pki/crl.pem
Created symlink from /etc/systemd/system/multi-user.target.wants/openvpn-iptables.service to /etc/systemd/system/openvpn-iptables.service.
Job for openvpn-iptables.service failed because the control process exited with error code. See "systemctl status openvpn-iptables.service" and "journalctl -xe" for details.
Created symlink from /etc/systemd/system/multi-user.target.wants/openvpn-server@server.service to /usr/lib/systemd/system/openvpn-server@.service.
Finished!
Your client configuration is available at: /root/client1.ovpn
If you want to add more clients, you simply need to run this script again!#二、步骤
监听地址设置为空 IP address
Protocol:[2]TCP
Port:1194
不选DNS
client name: client_k2
External IP : 公网ip地址
监听地址设置为空 IP address
Protocol:[2]TCP
Port:1194
不选DNS
client name: client_k2
External IP : 公网ip地址#三、添加用户
Select an option[1-4]:1 (add a new user)
client name: client_name
Select an option[1-4]:1 (add a new user)
client name: client_name#三、删除用户
[root@beta ~]# sh openvpn-install.sh
Looks like OpenVPN is already installed.

What do you want to do?
   1) Add a new user
   2) Revoke an existing user
   3) Remove OpenVPN
   4) Exit
Select an option [1-4]:
[root@beta ~]# sh openvpn-install.sh
Looks like OpenVPN is already installed.
What do you want to do?
1) Add a new user
2) Revoke an existing user
3) Remove OpenVPN
4) Exit
Select an option [1-4]:#四、启动服务
#重启生效
[root@beta server]#systemctl restart openvpn-server@server.service

#随系统启动服务
[root@beta server]#systemctl enable openvpn-server@server.service
#重启生效
[root@beta server]#systemctl restart openvpn-server@server.service
#随系统启动服务
[root@beta server]#systemctl enable openvpn-server@server.service#五、配置 iptables 及转发
#关闭 firewalld 防火墙
[root@beta ~]# systemctl stop firewalld.service    //停止服务
[root@beta ~]# systemctl disable firewalld.service //禁止开启动
[root@beta ~]# firewall-cmd --state                //查看状态

删除FORWARD 规则:
iptables -nL FORWARD --line-number
iptables -D FORWARD 1

#查看nat
[root@beta ~]#iptables -L -n -t nat --line-number

删除一条nat 规则  删除SNAT规则
iptables -t nat  -D POSTROUTING  1
iptables -t nat -D POSTROUTING 7

让openstack 虚拟机上网的规则
iptables -t nat -A POSTROUTING -s 172.28.101.111/255.255.255.0 -o ens33 -j MASQUERADE


##如果是 iptables
[root@beta ~]# yum -y install iptables iptables-services
[root@beta ~]# iptables -t nat -A POSTROUTING -s 17.166.221.0/24 -o ens192 -j MASQUERADE   #NAT

[root@beta ~]# systemctl enable iptables.service
Created symlink from /etc/systemd/system/basic.target.wants/iptables.service to /usr/lib/systemd/system/iptables.service.

#保存
[root@beta ~]# service iptables save
[root@beta ~]# systemctl start iptables.service

#查看
[root@beta ~]# iptables -L -n
[root@beta ~]# iptables -t nat -L -n


#如果是 firewall-cmd
[root@beta ~]#firewall-cmd --permanent --add-masquerade
[root@beta ~]#firewall-cmd --permanent --add-service=openvpn

# 或者添加自定义端口
# firewall-cmd --permanent  --add-port=1194/tcp
[root@beta ~]# firewall-cmd --permanent --direct --passthrough ipv4 -t nat -A POSTROUTING -s 10.8.0.0/24 -o eth0 -j MASQUERADE

[root@beta ~]#firewall-cmd --reload

#开启转发
[root@beta ~]# vim /etc/sysctl.conf
net.ipv4.ip_forward = 1
或者
echo "1" > /proc/sys/net/ipv4/ip_forward  #这个是临时
[root@beta ~]# sysctl -p

:::warning
到这里为止,openvpn搭建结束,不过这个时候链接vpn之后,本地网络是不能上网的
17.166.221.0/24 这个地址vpn server配置文件中定义
:::
[C:\~]$ ping www.baidu.com

正在 Ping www.a.shifen.com [220.181.38.150] 具有 32 字节的数据:
请求超时。

220.181.38.150 的 Ping 统计信息:
    数据包: 已发送 = 1,已接收 = 0,丢失 = 1 (100% 丢失),
#关闭 firewalld 防火墙
[root@beta ~]# systemctl stop firewalld.service //停止服务
[root@beta ~]# systemctl disable firewalld.service //禁止开启动
[root@beta ~]# firewall-cmd --state //查看状态
删除FORWARD 规则:
iptables -nL FORWARD --line-number
iptables -D FORWARD 1
#查看nat
[root@beta ~]#iptables -L -n -t nat --line-number
删除一条nat 规则 删除SNAT规则
iptables -t nat -D POSTROUTING 1
iptables -t nat -D POSTROUTING 7
让openstack 虚拟机上网的规则
iptables -t nat -A POSTROUTING -s 172.28.101.111/255.255.255.0 -o ens33 -j MASQUERADE
##如果是 iptables
[root@beta ~]# yum -y install iptables iptables-services
[root@beta ~]# iptables -t nat -A POSTROUTING -s 17.166.221.0/24 -o ens192 -j MASQUERADE #NAT
[root@beta ~]# systemctl enable iptables.service
Created symlink from /etc/systemd/system/basic.target.wants/iptables.service to /usr/lib/systemd/system/iptables.service.
#保存
[root@beta ~]# service iptables save
[root@beta ~]# systemctl start iptables.service
#查看
[root@beta ~]# iptables -L -n
[root@beta ~]# iptables -t nat -L -n
#如果是 firewall-cmd
[root@beta ~]#firewall-cmd --permanent --add-masquerade
[root@beta ~]#firewall-cmd --permanent --add-service=openvpn
# 或者添加自定义端口
# firewall-cmd --permanent --add-port=1194/tcp
[root@beta ~]# firewall-cmd --permanent --direct --passthrough ipv4 -t nat -A POSTROUTING -s 10.8.0.0/24 -o eth0 -j MASQUERADE
[root@beta ~]#firewall-cmd --reload
#开启转发
[root@beta ~]# vim /etc/sysctl.conf
net.ipv4.ip_forward = 1
或者
echo "1" > /proc/sys/net/ipv4/ip_forward #这个是临时
[root@beta ~]# sysctl -p
:::warning
到这里为止,openvpn搭建结束,不过这个时候链接vpn之后,本地网络是不能上网的
17.166.221.0/24 这个地址vpn server配置文件中定义
:::
[C:\~]$ ping www.baidu.com
正在 Ping www.a.shifen.com [220.181.38.150] 具有 32 字节的数据:
请求超时。
220.181.38.150 的 Ping 统计信息:
数据包: 已发送 = 1,已接收 = 0,丢失 = 1 (100% 丢失),WARNING
允许 tun0 网卡进行 FORWARD
OpenVPN nat配置笔录

#192.168.10.0 为虚拟网卡地址
iptables -t nat -A POSTROUTING -s 172.31.33.214/20 -j MASQUERADE
iptables -A INPUT -i tun0 -j ACCEPT
iptables -A FORWARD -i tun0 -j ACCEPT
iptables -A FORWARD -o tun0 -j ACCEPT
############################################

[root@beta ~]# iptables -I FORWARD -i tun0 -j ACCEPT
[root@beta ~]# iptables -I FORWARD -m state --state ESTABLISHED,RELATED -j ACCEPT
[root@beta ~]# iptables -L -n
Chain FORWARD (policy ACCEPT)
target     prot opt source               destination
ACCEPT     all  --  0.0.0.0/0            0.0.0.0/0            state RELATED,ESTABLISHED
ACCEPT     all  --  0.0.0.0/0            0.0.0.0/0
OpenVPN nat配置笔录
#192.168.10.0 为虚拟网卡地址
iptables -t nat -A POSTROUTING -s 172.31.33.214/20 -j MASQUERADE
iptables -A INPUT -i tun0 -j ACCEPT
iptables -A FORWARD -i tun0 -j ACCEPT
iptables -A FORWARD -o tun0 -j ACCEPT
############################################
[root@beta ~]# iptables -I FORWARD -i tun0 -j ACCEPT
[root@beta ~]# iptables -I FORWARD -m state --state ESTABLISHED,RELATED -j ACCEPT
[root@beta ~]# iptables -L -n
Chain FORWARD (policy ACCEPT)
target prot opt source destination
ACCEPT all -- 0.0.0.0/0 0.0.0.0/0 state RELATED,ESTABLISHED
ACCEPT all -- 0.0.0.0/0 0.0.0.0/0WARNING
到这里为止,openvpn搭建结束,不过这个时候链接vpn之后,本地网络是不能上网的 17.166.221.0/24 这个地址vpn server配置文件中定义
[C:\~]$ ping www.baidu.com

正在 Ping www.wshifen.com [103.235.46.39] 具有 32 字节的数据:
来自 103.235.46.39 的回复: 字节=32 时间=55ms TTL=56
来自 103.235.46.39 的回复: 字节=32 时间=134ms TTL=56

103.235.46.39 的 Ping 统计信息:
    数据包: 已发送 = 2,已接收 = 2,丢失 = 0 (0% 丢失),
往返行程的估计时间(以毫秒为单位):
    最短 = 55ms,最长 = 134ms,平均 = 94ms


 #如果还是不行,查看
 cat /etc/iptables/add-openvpn-rules.sh
iptables -t nat -A POSTROUTING -s 10.8.8.0/24 -o eth0 -j MASQUERADE
iptables -A INPUT -i tun0 -j ACCEPT
iptables -A FORWARD -i eth0 -o tun0 -j ACCEPT
iptables -A FORWARD -i tun0 -o eth0 -j ACCEPT
iptables -A INPUT -i eth0 -p udp --dport 56619 -j ACCEPT

iptables -t nat -L -n -v
net.ipv4.ip_forward
netstat -tulpn | grep :1194
ps aux | grep openvpn
[C:\~]$ ping www.baidu.com

正在 Ping www.wshifen.com [103.235.46.39] 具有 32 字节的数据:
来自 103.235.46.39 的回复: 字节=32 时间=55ms TTL=56
来自 103.235.46.39 的回复: 字节=32 时间=134ms TTL=56

103.235.46.39 的 Ping 统计信息:
    数据包: 已发送 = 2,已接收 = 2,丢失 = 0 (0% 丢失),
往返行程的估计时间(以毫秒为单位):
    最短 = 55ms,最长 = 134ms,平均 = 94ms


 #如果还是不行,查看
 cat /etc/iptables/add-openvpn-rules.sh
iptables -t nat -A POSTROUTING -s 10.8.8.0/24 -o eth0 -j MASQUERADE
iptables -A INPUT -i tun0 -j ACCEPT
iptables -A FORWARD -i eth0 -o tun0 -j ACCEPT
iptables -A FORWARD -i tun0 -o eth0 -j ACCEPT
iptables -A INPUT -i eth0 -p udp --dport 56619 -j ACCEPT

iptables -t nat -L -n -v
net.ipv4.ip_forward
netstat -tulpn | grep :1194
ps aux | grep openvpn- iptables
[root@hkfengkongnginx ~]# iptables -L -n
Chain INPUT (policy ACCEPT)
target     prot opt source               destination
ACCEPT     tcp  --  0.0.0.0/0            0.0.0.0/0            tcp dpt:61379

Chain FORWARD (policy ACCEPT)
target     prot opt source               destination
ACCEPT     all  --  0.0.0.0/0            0.0.0.0/0            state RELATED,ESTABLISHED
ACCEPT     all  --  0.0.0.0/0            0.0.0.0/0
ACCEPT     all  --  0.0.0.0/0            0.0.0.0/0
ACCEPT     all  --  10.8.0.0/24          0.0.0.0/0
ACCEPT     all  --  0.0.0.0/0            0.0.0.0/0

Chain OUTPUT (policy ACCEPT)
target     prot opt source               destination
ACCEPT     all  --  0.0.0.0/0            0.0.0.0/0

[root@hkfengkongnginx ~]# iptables -L -n -t nat
Chain PREROUTING (policy ACCEPT)
target     prot opt source               destination

Chain INPUT (policy ACCEPT)
target     prot opt source               destination

Chain OUTPUT (policy ACCEPT)
target     prot opt source               destination

Chain POSTROUTING (policy ACCEPT)
target     prot opt source               destination
MASQUERADE  all  --  10.8.0.0/24          0.0.0.0/0
[root@hkfengkongnginx ~]# iptables -L -n
Chain INPUT (policy ACCEPT)
target prot opt source destination
ACCEPT tcp -- 0.0.0.0/0 0.0.0.0/0 tcp dpt:61379
Chain FORWARD (policy ACCEPT)
target prot opt source destination
ACCEPT all -- 0.0.0.0/0 0.0.0.0/0 state RELATED,ESTABLISHED
ACCEPT all -- 0.0.0.0/0 0.0.0.0/0
ACCEPT all -- 0.0.0.0/0 0.0.0.0/0
ACCEPT all -- 10.8.0.0/24 0.0.0.0/0
ACCEPT all -- 0.0.0.0/0 0.0.0.0/0
Chain OUTPUT (policy ACCEPT)
target prot opt source destination
ACCEPT all -- 0.0.0.0/0 0.0.0.0/0
[root@hkfengkongnginx ~]# iptables -L -n -t nat
Chain PREROUTING (policy ACCEPT)
target prot opt source destination
Chain INPUT (policy ACCEPT)
target prot opt source destination
Chain OUTPUT (policy ACCEPT)
target prot opt source destination
Chain POSTROUTING (policy ACCEPT)
target prot opt source destination
MASQUERADE all -- 10.8.0.0/24 0.0.0.0/0添加路由规则方式访问内部网络
在内网主机web01上添加一条路由规则,让web01有回到OpenVPN客户端的路由。如果不添加,那web01只能接受到来自客户端的包,但是没法把响应的包传回去。
[root@web01 ~]# route add -net 10.8.0.0/24 gw 172.16.1.61
添加防火墙方式访问内部网络
在服务端开启防火墙,放行openvpn服务,并且开启masquerade。
优点:只需在OpenVPN服务端配置防火墙规则,内部网络主机无需配置
systemctl start firewalld
firewall-cmd --add-masquerade --permanent
firewall-cmd --add-service=openvpn --permanent
firewall-cmd --reload
systemctl start firewalld
firewall-cmd --add-masquerade --permanent
firewall-cmd --add-service=openvpn --permanent
firewall-cmd --reload1.添加记录日志
增加记录用户登录log的脚本
cat connect.sh
#!/bin/bash
Time=`date +%F`
if [ -f /etc/openvpn/log/openvpn_$Time.log ];then
  touch /etc/openvpn/log/openvpn_$Time.log
  echo "`date '+%F %H:%M:%S'` User $common_name trust_ip $trusted_ip is login,Remote_ip is $ifconfig_pool_remote_ip, Mask is $route_netmask_1" >> /etc/openvpn/log/openvpn_$Time.log
else
  touch /etc/openvpn/log/openvpn_$Time.log
  echo "`date '+%F %H:%M:%S'` User $common_name trust_ip $trusted_ip is login,Remote_ip is $ifconfig_pool_remote_ip, Mask is $route_netmask_1" >> /etc/openvpn/log/openvpn_$Time.log
fi
cat connect.sh
#!/bin/bash
Time=`date +%F`
if [ -f /etc/openvpn/log/openvpn_$Time.log ];then
touch /etc/openvpn/log/openvpn_$Time.log
echo "`date '+%F %H:%M:%S'` User $common_name trust_ip $trusted_ip is login,Remote_ip is $ifconfig_pool_remote_ip, Mask is $route_netmask_1" >> /etc/openvpn/log/openvpn_$Time.log
else
touch /etc/openvpn/log/openvpn_$Time.log
echo "`date '+%F %H:%M:%S'` User $common_name trust_ip $trusted_ip is login,Remote_ip is $ifconfig_pool_remote_ip, Mask is $route_netmask_1" >> /etc/openvpn/log/openvpn_$Time.log
fi增加记录用户退出登录log的脚本
cat disconnect.sh
#!/bin/bash
Time=`date +%F`
if [ -f /etc/openvpn/log/openvpn_$Time.log ];then
  touch /etc/openvpn/log/openvpn_$Time.log
  echo "`date '+%F %H:%M:%S'` User $common_name trust_ip $trusted_ip is logout,Remote_ip is $ifconfig_pool_remote_ip, Mask is $route_netmask_1" >> /etc/openvpn/log/openvpn_$Time.log
  else
  touch /etc/openvpn/log/openvpn_$Time.log
  echo "`date '+%F %H:%M:%S'` User $common_name trust_ip $trusted_ip is logout,Remote_ip is $ifconfig_pool_remote_ip, Mask is $route_netmask_1" >> /etc/openvpn/log/openvpn_$Time.log
fi
cat disconnect.sh
#!/bin/bash
Time=`date +%F`
if [ -f /etc/openvpn/log/openvpn_$Time.log ];then
touch /etc/openvpn/log/openvpn_$Time.log
echo "`date '+%F %H:%M:%S'` User $common_name trust_ip $trusted_ip is logout,Remote_ip is $ifconfig_pool_remote_ip, Mask is $route_netmask_1" >> /etc/openvpn/log/openvpn_$Time.log
else
touch /etc/openvpn/log/openvpn_$Time.log
echo "`date '+%F %H:%M:%S'` User $common_name trust_ip $trusted_ip is logout,Remote_ip is $ifconfig_pool_remote_ip, Mask is $route_netmask_1" >> /etc/openvpn/log/openvpn_$Time.log
fi修改openvpn配置
vim server.conf
client-connect /etc/openvpn/connect.sh
client-disconnect /etc/openvpn/disconnect.sh
vim server.conf
client-connect /etc/openvpn/connect.sh
client-disconnect /etc/openvpn/disconnect.shchmod 755 /etc/openvpn/connect.sh
chmod 755 /etc/openvpn/disconnect.shchmod 755 /etc/openvpn/connect.sh
chmod 755 /etc/openvpn/disconnect.sh重启openvpn服务
2.警告信息解决
2.1 警告1:
WARNING: --ns-cert-type is DEPRECATED. Use --remote-cert-tls instead. 或者 No sever certificate verficaton method has been enabled.
# 解决,win客户端修改配置文件注释一个和添加一个(如果没有ns-cert-type server这个参数,那只用添加remote-cert-tls server这个参数)
;ns-cert-type server
remote-cert-tls server
# 解决,win客户端修改配置文件注释一个和添加一个(如果没有ns-cert-type server这个参数,那只用添加remote-cert-tls server这个参数)
;ns-cert-type server
remote-cert-tls server2.2 警告2:
WARNING: this configuration may cache passwords in memory -- use the auth-nocache option to prevent this
# 解决,在客户端配置文件添加参数
auth-nocache
# 解决,在客户端配置文件添加参数
auth-nocache警告3:
WARNING: 'link-mtu' is used inconsistently, local='link-mtu 1602', remote='link-mtu 1570' WARNING: 'tun-mtu' is used inconsistently, local='tun-mtu 1532', remote='tun-mtu 1500'
# 解决
去掉配置文件tun-mtu相关的参数
# 解决
去掉配置文件tun-mtu相关的参数警告4:
(此错误会导致连上vpn无法上网): us=967576 WARNING: 'comp-lzo' is present in remote config but missing in local config, remote='comp-lzo' 或 write to TUN/TAP : Unknown error (code=122)
# 解决,在客户端配置文件添加参数
comp-lzo
# 解决,在客户端配置文件添加参数
comp-lzo警告5:
ROUTE: route addition failed using CreateIpForwardEntry: ÖÁÉÙÓÐһ¸ֲÎÊ�Õýȷc [status=160 if_index=19]
# 解决,在客户端配置文件添加参数
route-method exe
route-delay 2
# 解决,在客户端配置文件添加参数
route-method exe
route-delay 2警告6:
AEAD Decrypt error: bad packet ID (may be a replay): [ #141 ] -- see the man page entry for --no-replay and --replay-window for more info or silence this warning with --mute-replay-warnings
# 解决,在客户端配置文件添加参数
mute-replay-warnings
# 解决,在客户端配置文件添加参数
mute-replay-warnings警告7:
WARNING: --ping should normally be used with --ping-restart or --ping-exit
# 解决,配置文件中参数修改为下面的
# ping 表示每隔多少秒就ping对端一次
# ping-restart/ping-exit 表示在多少秒后没有收到对端的包就重启或者退出
ping 15
ping-restart 15
或者
ping-exit 15
# 解决,配置文件中参数修改为下面的
# ping 表示每隔多少秒就ping对端一次
# ping-restart/ping-exit 表示在多少秒后没有收到对端的包就重启或者退出
ping 15
ping-restart 15
或者
ping-exit 15警告8(和客户端版本有关系):
DEPRECATED OPTION: --cipher set to 'AES-256-CBC' but missing in --data-ciphers (AES-256-GCM:AES-128-GCM). OpenVPN ignores --cipher for cipher negotiations.
	# 解决,配置文件中参数修改为下面的
data-ciphers AES-256-CBC
data-ciphers-fallback AES-256-CBC
# 解决,配置文件中参数修改为下面的
data-ciphers AES-256-CBC
data-ciphers-fallback AES-256-CBC警告9(和客户端版本有关系):
WARNING: Compression for receiving enabled. Compression has been used in the past to break encryption. Sent packets are not compressed unless "allow-compression yes" is also set.
# 解决,不启用压缩,配置文件中参数修改为下面的
comp-lzo no
allow-compression no
# 解决,不启用压缩,配置文件中参数修改为下面的
comp-lzo no
allow-compression no